Introduction:
A regular problem raised by users of this website is the all too common occurrence of jammed recess tray covers . In fact, it's such a problem, that a FAQ was prepared some years ago.
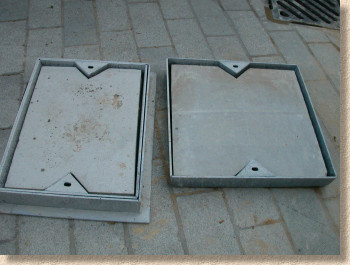
Recess tray covers are typically used in decorative pavements as a more aesthetically pleasing "lid" over a chamber which provides access to drains or other sub-surface utilities ('phone/broadband cables, lighting and power supply, etc.) The whole point of these chambers is to provide access for maintenance, inspection or repair. If it's proving well-nigh impossible to get the cover off, this sort-of defeats the whole point of having an access cover.
A brief history of recess tray covers:
In the 1980s and '90s, most recess trays were fabricated from steel. The best quality used stainless steel, while more commonly, a galvanised steel was used for 'everyday' covers, combining performance with economy. When a cheaper, lower quality frame-and-tray had been used, poor galvanising sometimes allowed the steel to rust, to swell and to coalesce into a tray-jamming mass, with the rust bridging the gap between tray and frame, almost welding the two components together.
This can still be a problem with the covers used nowadays on commercial projects, particularly when there has been inadequate quality control or sloppy specification which has allowed cheaper, shoddily galvanised covers to be used, either as a cost-saving exercise by the specifier, or as a way of increasing the profit margin for unscrupulous contractors.
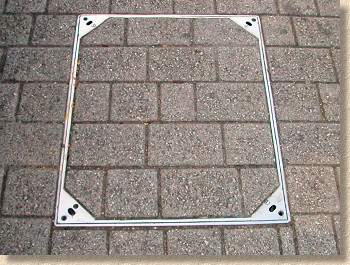
More recently, on most residential projects, the covers have been either all plastic (a polyurthane blend, usually) or a mix of plastic with galvanised steel and this has largely (but not completely) eliminated the problem of rust-jamming. Instead, most jammed covers were found to be stuck because of an accumulation of dust and detritus between frame and tray.
Luckily, if a detritus-jammed tray is discovered soon enough, ie, before the frame-tray gap becomes completely filled with detritus, the tray could usually be jiggled free, or, in extreme cases, hydraulically "persuaded" out from the frame - see the aforementioned FAQ.
How trays become jammed:
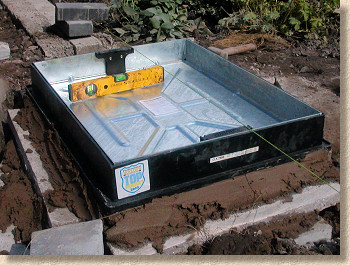
Over the past decade or so, the use of slurry mortars to joint pavements has grown from being a niche technique used only by a few brave souls who understood the methods and materials sufficiently to be able to prevent large-scale staining or wholesale ruination of the paving, to the current situation where we have a wide range of pre-mixed slurry jointing mortars, both cement based and resin based. It is now more common to find the better contractors using a slurry jointing system of some description rather than, say, hand pointing.
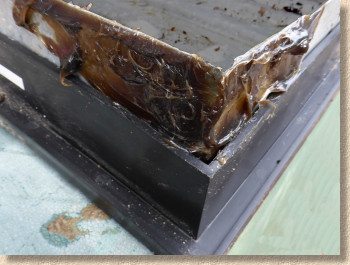
Accordingly, feedback from site users has made it increasingly apparent that one of, if not *the* , most common cause for jamming of tray covers is the improper application of jointing materials. We now have more than 30 reported instances where property owners have found their recess tray covers are jammed in place by mortar which has entered the gap between tray and frame.
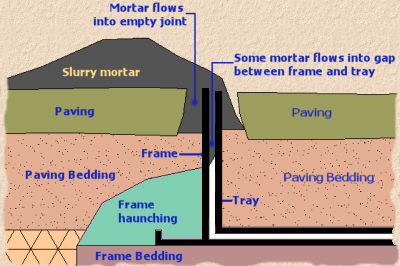
It's easy to understand how this is happening. The sloppy slurry mortar is moved across the wetted pavement surface and encouraged to drop into the empty joints, completely filling them to create solid and reliable jointing between adjacent paving units. As desirable as this may be, the same principle applies when the slurry mortar is moved across the gap that exists between the frame and the tray components of a recess access cover.
Tricks to avoid mortar jamming:
Canny contractors have come up with ways of preventing the mortar getting into the gap. Some use heavy applications of grease or a Vaseline-like jelly to the tray prior to it being jointed so that the goo effectively prevents the mortar getting in. This also has the added advantage of lubricating the tray which will further aid removal. However, a greased-up tray can be messy to handle and the gel actively traps dirt and detritus so needs to be cleaned and replaced fairly regularly, certainly before it all congeals into a solid, tray-jamming mass. Also, in some applications, surface water running across the greased-up gap will pick up that oily-rainbow scum which some feel can disfigure the pavement surface.
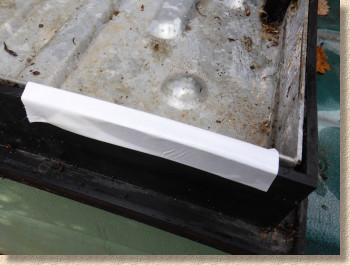
Another trick involves taping-up the gap between frame a tray prior to the paving being laid, and then slicing through the tape, trimming the edges, once the jointing is complete. This works well, as long as a good quality sticky tape (50mm wide Duck® Tape is a popular choice) is used and there are no breaks or unstuck patches in the tape. The only real disadvantage is that the sub-surface tape remains and can sometimes look unsightly if not expertly trimmed back.
Some contractors will remove the tray and joint around the frame, taking care not to allow mortar to enter the chamber, and then joint the tray separately while it is out of the frame, returning it into position once the jointing has begun to cure. The big drawback to this method is that there is a gaping hole in the pavement, just asking for someone to fall into it, or a load of litter to be blown into it, requiring the channel to be cleaned. Further, if the freshly-jointed tray is moved and lifted into place before the mortar has had a chance to harden sufficiently, the twisting torsion on the heavy paved-in tray can cause cracks in the jointing.
Joint and Clean Method:
A method that many contractors find safest, simplest and quickest, is to simply joint the pavement as normal, with the tray cover in place, and once the mortar has had a short period to start the curing process, to then lift out the tray, clean the inside of the frame and the outside of the tray, check the chamber and channel are clear of any spilled mortar, and then pop the tray back into place.
No need for gooey grease contaminating everything around it; no unsightly tape protruding from the pavement surface; no dangerous open hole for the site eejit to fall into. A straightforward methodology that has the added benefit of giving the conscientious contractor a chance to check the chamber and channel before signing-off the project.

Video:
The video below shows this method being used with a two-part resin mortar , but the same principles and procedures are used with basic polymerics (1-Part Resin Mortars) and with all forms of cement mortars, whether they are site-mixed or pre-batched proprietary materials.
Aftercare:
Keeping the gap between frame and tray free of jam-causing mortar is just the first stage in ensuring access covers remain free and accessible. One the pavement is in use, dust and dirt will find their way into that gap of their own accord, whether they are blown in by wind or washed in by surface water.
Consequently, it is considered good practice to lift each cover annually, to clear any accumulated detritus from the frame and the tray edges, apply a lubricant if there are any metallic components, and then replace the tray, safe in the knowledge that, should there be some incident requiring access to the drains or utilities below, there'll be no big bill incurred by paying a contractor DayWork rates to struggle for an hour or more just getting the cover off the chamber!