Introduction:
Edge courses perform a number of functions that are examined in more detail on the main Edge Courses page . However, it has been observed that some contractors, most notably those working in the unsupervised driveway/patio construction sector of the industry, sometimes choose to construct the edge courses after laying the main body of blocks, whereas most contractors working on supervised sites prefer to construct the edge course first, before laying the body of blocks.
There are advantages and disadvantages for both the " edge course first " and " edge course last " school of thought, and these are summarised below. There then follows an examination of a couple of useful methods for using the " edge courses last " option.
Pros and Cons
When working in a bounded area, where edge courses need to be laid tight against a fixed structure, such as house, a garage, walls etc., the edge courses are best laid first because they will then act as a guide when it comes to fitting full blocks into the body of the pavement.
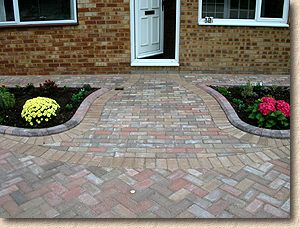
With the garden path shown opposite, by fixing the edge courses first, the screeded bed is easily prepared using the edge course blocks as a level guide and body blocks are readily placed, leaving cuts to one edge only.
When constructing a pavement of pre-determined shape and/or dimensions, laying and haunching the edge courses first helps define the outline and eliminate the need to keep line pins, profile boards, string lines and all the other setting-out accoutrements in place for the duration of the job .
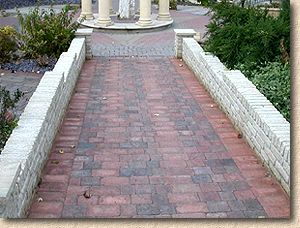
On the pavement shown here, the shape is symmetrical and an essential part of the overall design. Laying the edge courses first allows the shape to be checked for accuracy, both in alignment and level, before placing of the body blocks.
Laying the edges courses first, and having them firmly retained by the bedding/haunching allows them to be used as level guides when screeding the bed for the body blocks, rather than having to go to all the hassle of setting-up and screed rails and titivating when they're removed.
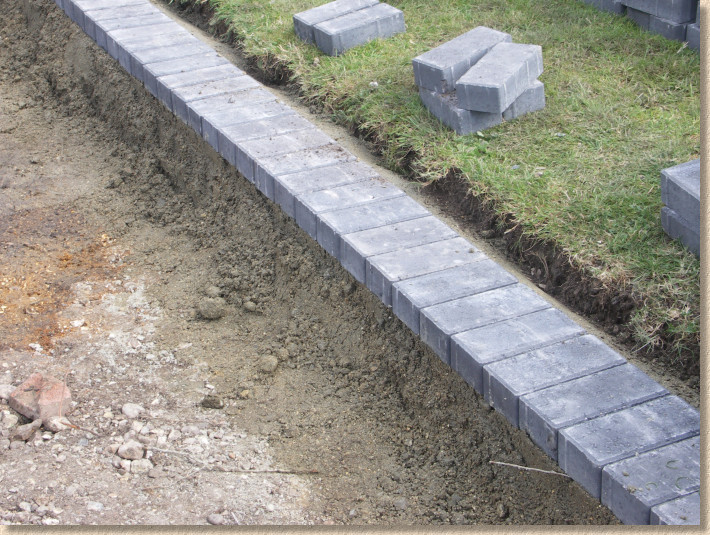
By having the edge courses laid and haunched prior to laying the body blocks, the haunching (assuming a concrete haunch is used, which is not always the case) will have had a reasonable chance to cure sufficiently to keep the edge blocks in place during the final consolidation.
Often, with the edge course first strategy, the sub-base will need topping up and re-compacting so that it is at the requisite level for the eventual laying course. This really shouldn't be a problem, as long as care is taken when compacting close to recently constructed edge courses. Best to give them 24 hours or so to allow the haunching to harden, if at all possible, but if time is pressing, it *is* possible to compact right up to a newly-laid edge without disturbing its alignment or level, as long as care is taken.
And just to be sure, check the alignment and level once sub-base compaction is complete.
On t'other hand, laying the edge courses to suit the body blocks has one main advantage: On a loosely defined, or undefined pavement (ie, one where the actual dimensions are left to the discretion of the contractor), the edge courses can be positioned to minimise cutting of the body blocks.
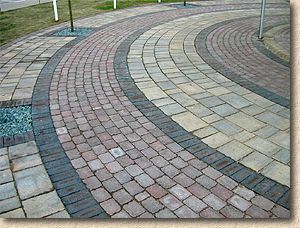
On this circular layout, the edge courses (more accurately referred to as "restraining courses" in this layout) have been positioned to allow the use of full blocks within the paving body, and so eliminate (or drastically reduce) the amount of cuts required.
Unacceptable Construction
The problem I have with the 'edge courses last' approach is that many of the less scrupulous contractors lay the edge blocks on the screeded bed, and then just slap a trowelful of mortar or concrete to the outside edge as haunching. This is bad practice , and does not comply with the requirements of BS7533/3 which states that edge courses must be "sufficiently robust to withstand override by anticipated traffic...and to prevent loss of the laying course material." .
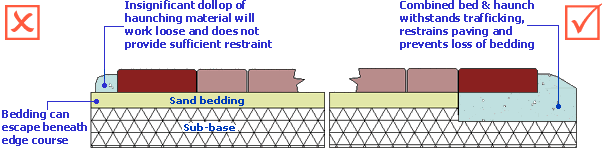
The "haunching" (and I use that term in the most generous sense) is generally just about enough to keep the pavement in place for a couple of months or until the cheque has cleared, but this practice is the underlying cause of many, if not most, of the problems with spread pavements.
This issue is examined in more detail on the main Edge Courses page .
Acceptable Constructions:
Bed Replacement
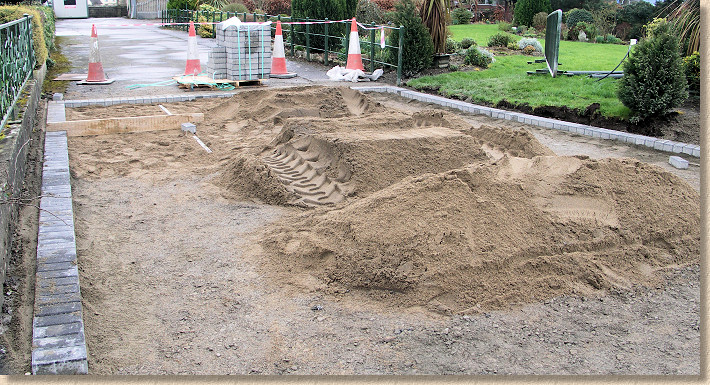
There are a couple of methods that can be used when constructing a block pavement where the edge courses need to be left until last. These are the Bed Replacement method and the Floating Edge method. Bed Replacement works best with irregularly-shaped pavements, while the Floating Edge method is a good option for constructing pavements which have regular sides. As mentioned above, placing the edge course last can be advantageous when working to a free form or forming a path or pavement using full blocks. In such a situation, the unbound bedding material that would be beneath the edge blocks should be removed, a channel scooped into the sub-base (if necessary to provide sufficient bed depth), and suitable cementitious bedding material placed into the channel so that the edge blocks can be placed, aligned and tapped down to level before haunching.
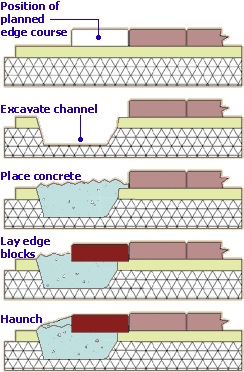
Obviously, this method requires a deal of care. The laid blocks should not be disturbed, so work will need to be carried out from the non-paved edge (the left-hand side on the drawing opposite). Removing the sand bedding and the sub-base material carries the risk of dislodging the blocks, and so it may be necessary to leave 25-50mm of the original bed in situ, to avoid disturbance.
It's also worth noting that the edge blocks are shown tapped down to a level 6-8mm below that of the yet uncompacted body blocks. This is to allow for those blocks being settled downwards when the plate compactor is run over them a day or so later. However, it is sometimes necessary for the body blocks to be compacted as soon as the edge blocks are in place. This presents a problem, in that there is a real risk of the plate compactor nudging the edge blocks out of alignment, and so this practice should only ever be undertaken when there is no other possible option.
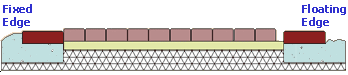
The Floating Edge Method
In those situations where a pavement or path of a specified whole number of blocks is required, we find the following method works well.
One edge of the path is selected as the "Fixed Edge" and is laid in the normal way, as described on the Concrete Bedded Edgings page.
The opposite edge is the 'Floating Edge' and a taut string line is established to act as line and level guide at a distance slightly greater than would be expected for the path if it was to be laid 'tight'. For example, if a path comprising two edge course of soldier blocks with 10 courses of 100mm wide standard blocks between the edge courses was required, the position of the string guide line would be calculated as follows:
10 courses @ 100mm = 1000mm
11 joints @ 5mm max = 55mm
Allowance @ 10mm/m = 10mm
___________
Total = 1065mm

So the line would be established 1065mm from the inside face of the fixed edge course.
The blocks to this floating edge course would then be laid on a concrete bed, but not haunched at this stage. The screeded bed for the body blocks can then be prepared as per usual , using both edge courses as screed guides if necessary, and the blocks laid, keeping them hand-tight to the fixed edge.
When all 10 courses are laid, there should be a gap remaining between the outermost edge of the last course of body blocks and the inside face of the floating edge blocks.

The blocks of the floating edge course can now be pushed over, one at a time, closing the gap. It may be necessary to remove some of the bedding between the edge block and the outermost body block to ensure that a tight joint can be formed between the two with no bedding material trapped between them.
Once all the blocks of the floating edge course have been pushed tight to the body blocks, they can be checked for alignment and level, and then haunched as normal.
