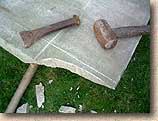
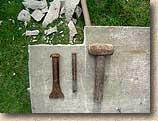
Hand Tools - Hammer and Chisels
There are two basic techniques used to cut paving stones , flags or blocks with hand tools: splitting and trimming. There are other hand tool techniques used in streetmasonry to create a surface texture, such as 'combing' or 'picking', but these are not normally used to reduce a paving unit to a desired size and shape, and so are not covered here.
Splitting involves breaking the unit into two parts, where one part is the required piece and needs to be of a specific size, and the remaining piece(s) is the discard. In some cases, if the discard piece is large enough, it may be further split/trimmed and used elsewhere in the pavement. Trimming is the process of reducing a paving unit to the required size by gradually breaking off small pieces in a controlled way until the required size and shape is attained. Some cutting will involve both elements; the paving unit will first be spilt to as near the required size as is possible and then trimmed to exact dimensions/shape.
Splitting
The basic principle in splitting a paving unit is to 'score' the flag or brick all-round, where it is required to split. By a series of progressively stronger blows from a lump hammer onto the pitcher or bolster, the unit should split along the score-line. With flags, once a good score-line has been achieved all around, the pitcher/bolster can be set aside and a series of heavy blows directly from the hammer along the score-line on the back/bottom of the flag should persuade it to split along the score-line.
The unit being split needs to be supported properly during the cutting exercise. Smaller units, such as blocks, are best sat on a surface with some 'give', such as bare earth, sand or even a piece of old carpet/sacking over a solid surface. Resting the unit directly on top of a solid surface, such as a paved or concreted area, will cause the unit to 'bounce' when struck, which could, and often does, result in the unit becoming damaged or breaking in the wrong place. A softer surface absorbs the energy of the blow and dissipates it once it has passed through the paving unit, so that the energy is not repeatedly reflected through the unit. Also, a softer surface allows the unit to 'bed in' slightly, making it less likely to jump around.
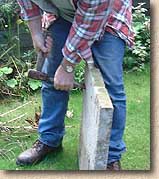
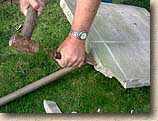
Larger units, such as flags (pressed concrete or natural stone) are usually cut while stood on one edge, often leaning against the legs of the streetmason, who straddles the flag to strike the cutting blows. This positioning, while not the most comfortable for the back muscles of the mason, prevents the energy of the cutting blows being repeatedly reflected within the unit, leading to unwanted fracturing and damage.
In some situations, the flag may be rested on a prop, such as the pavior's mall, although this position is normally preferred for trimming purposes or for cutting with a power saw.
The line of cut is marked onto the top surface of the unit, often with a thin piece of slate or a steel nail. When cutting a piece to fit a known gap, an allowance should be made for the joint width, usually 3mm. For example, if a gap to be paved measures 420mm, the line of cut, allowing for two joints at 3mm would be marked at 414mm. The bottom edge of the unit should be slightly undercut, as this makes fitting the cut piece that much easier.
The line of cut is then scored into the surface of the paving unit by aligning the cutting edge of the pitcher/bolster and striking it with the lump hammer. The usual sequence of strokes is for the line of cut to be scored by alternating the blows between the right-hand and left-hand edge, progressively working in towards the centre.
Once the top face has been scored, the two shorter side faces can be scored with a single blow to each, and then the unit spun around, and the cutting process repeated on the bottom face, allowing for the undercut as illustrated. When complete, the unit should be scored all the way around; top, bottom and both sides.
The blows to the back/bottom face of the unit can now be repeated to encourage the paver to split, hopefully along the score-line. Patience and steady blows of even weight are required. When the unit is ready to split, the ringing tone of the cutting blows can be heard to change in pitch as the fracture develops. Finally, the unit will split and the unwanted piece can be discarded.
The cut edge of the required piece should be inspected, and, if necessary, lain down on a support and any high spots trimmed off with a bolster or a sharp cold chisel, to ensure that the unit will fit snugly into the gap.
Trimming
Trimming is preferred where an irregular shape needs to be cut, or where a relatively small part of the paving unit needs to be removed. For trimming, a Pitcher is far and away the best tool; a bolster tends to distribute the force of the blow evenly in all directions, whereas the Pitcher directs the force in one main direction, allowing small pieces of the paving unit to be nibbled off in a succession of strokes.

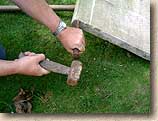
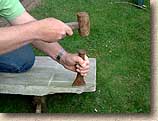
The paving unit to be trimmed is laid down and the required cut is marked onto the unit with a shard of slate or a steel nail. A flagstone is usually laid over the pavior's mall, but smaller units, such as block pavers, may be sat on a bed of sand or soft ground.
The first task in the trimming process is to undercut the paving unit, a pressed concrete flag in the example depicted opposite. This is started by cutting in from the sides of the unit.
The underside of the area to be trimmed out is then removed, again using the hammer and pitcher.
Attention now turns to the surface of the paving unit, with small 'nibbles' being removed with firm, clean blows, gradually cutting back into the body of the paver, until the cut line is reached.
A change of chisels may be required to cut out right angles. At all times, the area being trimmed must be undercut: if the trimming process results in a scalping being removed from the face, but the undercut is not continued, then use an angled blow to re-create the undercut before continuing to trim from the top face.
Finally, a cold chisel is used to tidy up the work and ensure the cut edges are trimmed back so they do not protrude beyond the top edges of the cut.
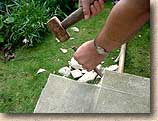
Although the example shown in the photographs above is a simple (that's easy for me to say!) corner cut, the same principles are applied for all trimming operations, whether it be simply reducing a flagstone by a few millimetres along one edge or cutting out a seven-pointed star.

2) Cut off corners 3) Trim to size
Similarly, when using hand tools to trim down a smaller paver, such as a concrete block, the same principles apply. Undercut from the sides first, then from the underside, before trimming down to the required size from the top surface.