Important Health & Safety Information:
Since 2003, EU Law prohibits the sale or supply of creosote-preserved reclaimed sleepers for use...
- inside buildings, whatever their purpose
- in toys
- in playgrounds
- in parks, gardens, and outdoor recreational leisure facilities where there is a risk of frequent skin contact
- in the manufacture of garden furniture such as picnic tables,
- for the manufacture and use and any re-treatment of:
- - containers intended for growing purposes
- - packaging that may come into contact with raw materials, intermediate or finished products destined for human and/or animal consumption
- - other materials which may contaminate the products mentioned above
...Directive 2001/90/EC, if you really want to know.
Technical Info:
One of the most commonly asked questions regarding sleepers, other than where to source them at a good price, regards their dimensions. There is some variation, but the commonest sizes are...
- Approximate length: 2.5 metres - 8 ft 6 inches
- Approximate width: 250mm - 10 inches
- Approximate depth: 150mm - 6 inches
- Approximate weight: 70Kg - 154lb (11 stone)
- Approximate cost: £15-20 - €25-33
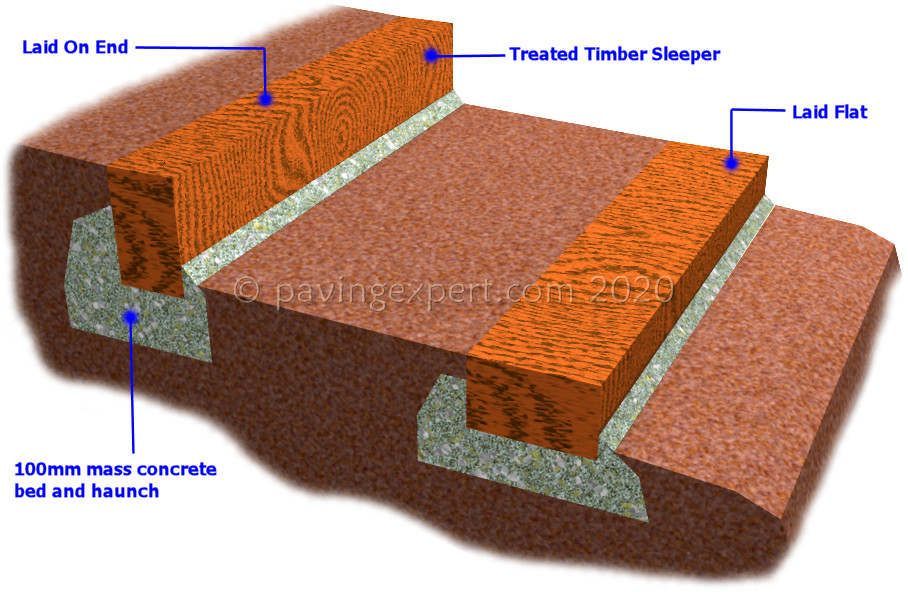
Steps and low terracing
Reclaimed railway sleepers are quite popular for the construction of terracing and steps , however, they can cause more problems than they solve, especially for gardeners, who will probably not appreciate the oils, tars, creosotes, British Rail coffee and whatever else was used to originally preserve the timbers.
They should be laid on a concrete bed , 50-100mm thick, with a full haunch to the uphill edge and a small amount of haunch downhill, sufficient to keep the sleeper in place. For extra security, steel pins or wooden stakes could be driven in front of or through the sleeper, as is detailed below.
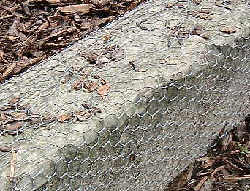
It should be noted that timber sleepers can become quite slippery when damp. This can be ameliorated (albeit only slightly) by sprinkling a coarse grit sand over the surface, by cutting shallow notches into the 'tread', or by stapling chicken wire mesh to the top face of the sleeper. None of these are ideal, it has to be said.
While this may detract from the finished appearance of the sleepers, it's better than having an accident, and should be used wherever there are children, the infirm or the elderly. There are some traction paints available that may also be used, but these are often more noticeable than mesh!
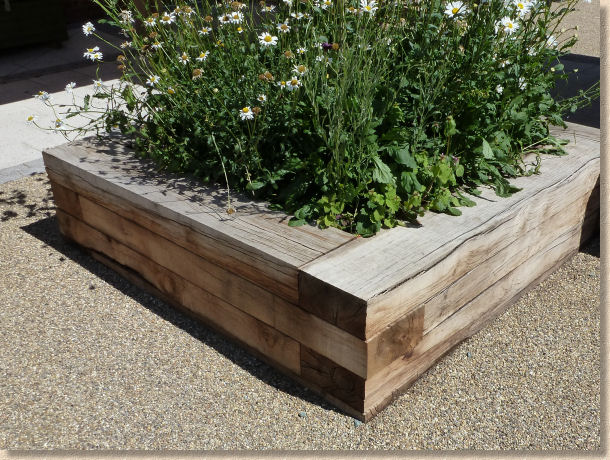
Retainers and Planters
For raised beds or low retainers up to 3 or 4 courses high (about 450-600mm), the sleepers can be nailed or screwed together. It's usual to countersink the nails/screws, to ensure they penetrate the underlying sleeper to a reasonable depth, minimum around 50mm. Typically, these fixings would be positioned about 150mm in from each end of a timber, and one in the centre.
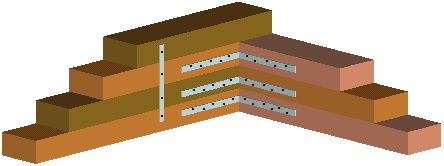
For heavy applications, such as a retainer of 3 courses or more, we prefer to 'spike' the sleepers with 20mm diameter mild steel dowels that are fixed through pre-drilled holes, passing through all the courses and into the foundation concrete. This system works for sleeper walls up to 1200mm in height; anything higher than 1200mm needs to be designed by an engineer to take account of local ground conditions and loadings.
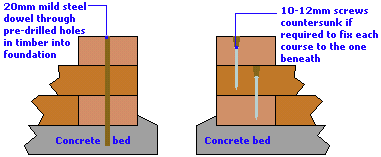
On site, the first sleeper is bedded onto a semi-dry or stiff concrete bed, and the remaining courses stacked on top, making sure that the sleepers overlap, especially at corners. Once all are in position, the spike holes are drilled, through the top course and into the underlying course. The top course is removed and set aside, then the holes are drilled through what was the penultimate course into the one neneath that, the course removed and set aside, and so on and so forth until all courses are drilled. This method ensures the drill holes are properly aligned.
The sleepers are replaced in reverse order of removal and then a 20mm steel dowel can be driven through the lot with a sledge hammer or similar, until it penetrates the bedding concrete by 50-100mm. The top of the spike is cut off level with the top course and driven a further 25mm or so to ensure the top of the steel dowel is within the timber. The hole is then sealed with pitch or other sealing compound.
Another fixing method for non-critical applications, is to use steel straps. Right-angled strapping is used to tie the corners together or straight strapping can be used vertically away from the corners. These steel straps are readily available from most Builder's Merchants and some of the larger DIY sheds, and can be fixed with nails or screws as required.
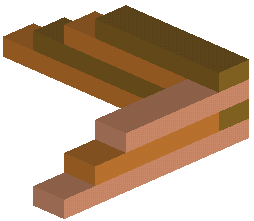
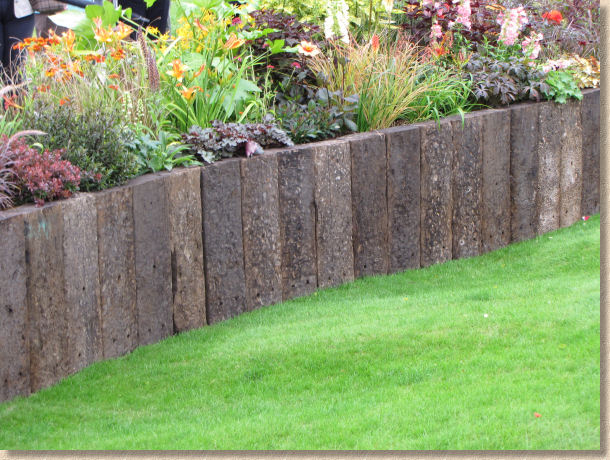
Sleepers can also be used vertically, as fence posts, or to create the look of a breakwater or groynes in themed gardens. When used in this manner, they should be treated much the same fence posts and installed accordingly. See the detail on the Fences page.
It's important that the sleepers are properly "anchored" when used as a vertical retainer, as shown below. The usual 'rule of thumb' is that one-third of the overall height should be buried: So, if a 2400mm long sleeper was to be used, 800mm would need to be inserted into the ground and concreted in place, with 160mm above ground.
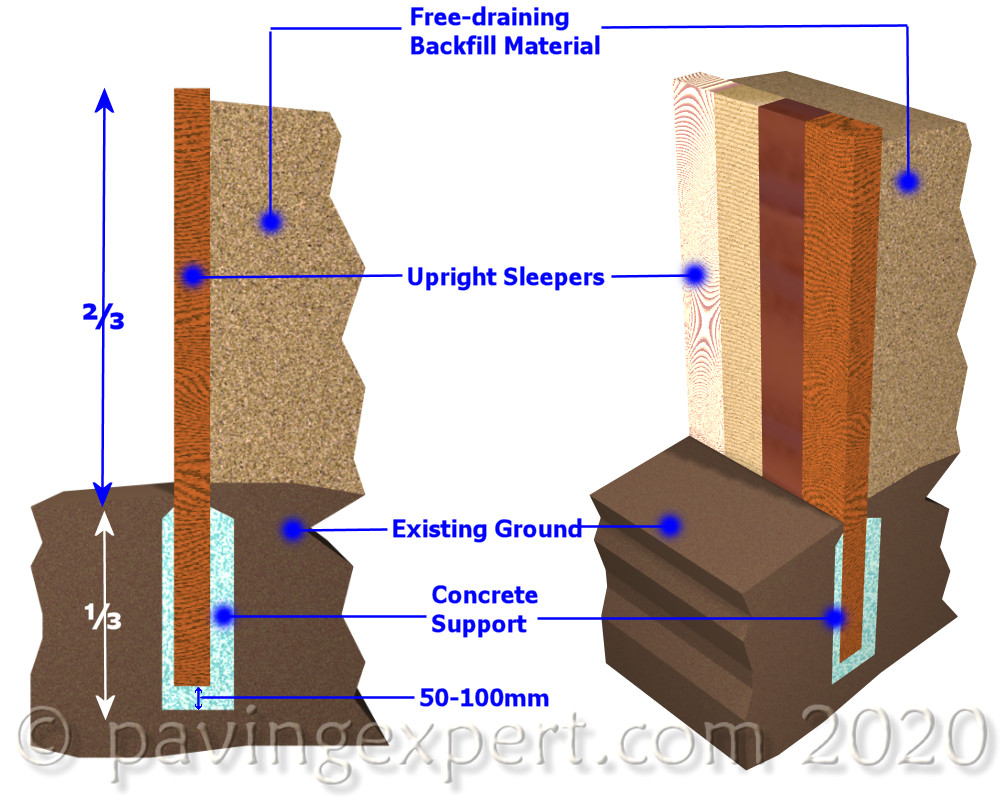
When this type of construction is used as a retainer, adequate time should be allowed to ensure the concrete haunching around the foot of the sleeper has hardened sufficiently. A low-strength concrete, such as a C7.5 (1:3:6) is suitable, but it should be given 3-5 days before building up the levels at the back of the sleepers.
If a series of sleepers is being used, as shown in the illustration above, then it's a good idea to nail a lath or baton to the rear side, to keep the sleepers tight against their neighbours and properly aligned while the concrete haunching goes off.
Caveat: Seeping Goo
Every summer, when the temperature soars and the population of our soggy islands venture outdoors to cook themselves more effectively than a barbecued sausage, a flood of emails arrives here at Borlochs Hall regarding the sticky goo that oozes from some reclaimed or salvaged sleepers. It doesn't (or shouldn't!) affect new sleepers or baulks, and it doesn't effect all reclaimed sleepers, just those of dubious origin, including many of those imported from Eastern Europe and parts of Asia.
The goo emanates because the elevated ambient temperature reduces their viscosity and makes it easier for them to 'flow'. Along with the gloop that you can see, there is also an increased emanation of "volatiles", petrochemical gases and vapours, which accounts for the oft-reported smell.
There is no effective way to 'seal' reclaimed or salvaged sleepers and prevent the creosotes, pitches, tars and other nasties from seeping out in the hot weather. Some people have reported success using epoxy and/or urethane resin-based sealants, but the cost of treatment is often higher than the cost of installing a replacement 'clean' sleeper.
If you have sleepers that are weeping, use sand, stone dust, sawdust, cat litter, or a proprietary absorbent material to "mop up" the mess. Keep children, pets and livestock well away from the sleepers and give serious thought to replacing them.
Sleeper Supplies
Pavingexpert does not supply sleepers (or any other materials, for that matter) but you could try one or two of the links on this page