Introduction:
The increased use of porcelain, ceramic and/or vitrified paving for residential and commercial projects, and their idiosyncratic demands has, almost inevitably, brought with it a wide variation in what is preferred as bedding, priming and jointing materials, not just for these modern materials, but for all paving installations. Site-mixed or pre-batched bedding mortar? SBR, SBR+cement, or a proprietary primer? Sand/cement jointing, gunned mortar, or tiling grout? What about the brush-in compounds, or would a 2-part slurry be better?
The old line comes to mind about getting 10 installers to give their recommendations and them coming up with 11 different options – it really is that much of a minefield.
It seems no two installers agree on what works best, and with so much variation in materials comes the inevitable variation in performance. Does an exterior grade tiling grout work well with sand+cement bedding? Can a permeable resin compound be used over an impermeable bedding mortar? Is SBR enough to give adequate adhesion?
What would be really helpful is a simple system, a 1-2-3 suite of products, a bedding mortar, a primer, and a grout, that were all assured to work together, and to give reliable, consistent, problem-free results no matter whose paving was being installed, and no matter whether it was a patio, a courtyard, a driveway, or a piazza.
That’s where the FUGA PAVE System comes in. FUGA PAVE is that suite of products, the bed, the primer and jointing as wholly compatible products, and as easy to use as ABC.
And while the FUGA PAVE was initially developed for porcelain (or ceramic, vitrified, etc.), it works perfectly well with all other types of paving, regardless of format or material. Sandstone flags, concrete pavers, granite setts, porphyry cubes, quartzite cobbles….anything and everything can be laid using the FUGA PAVE System.
The System:
Speaking of ABC, that’s the concept behind the FUGA PAVE System.
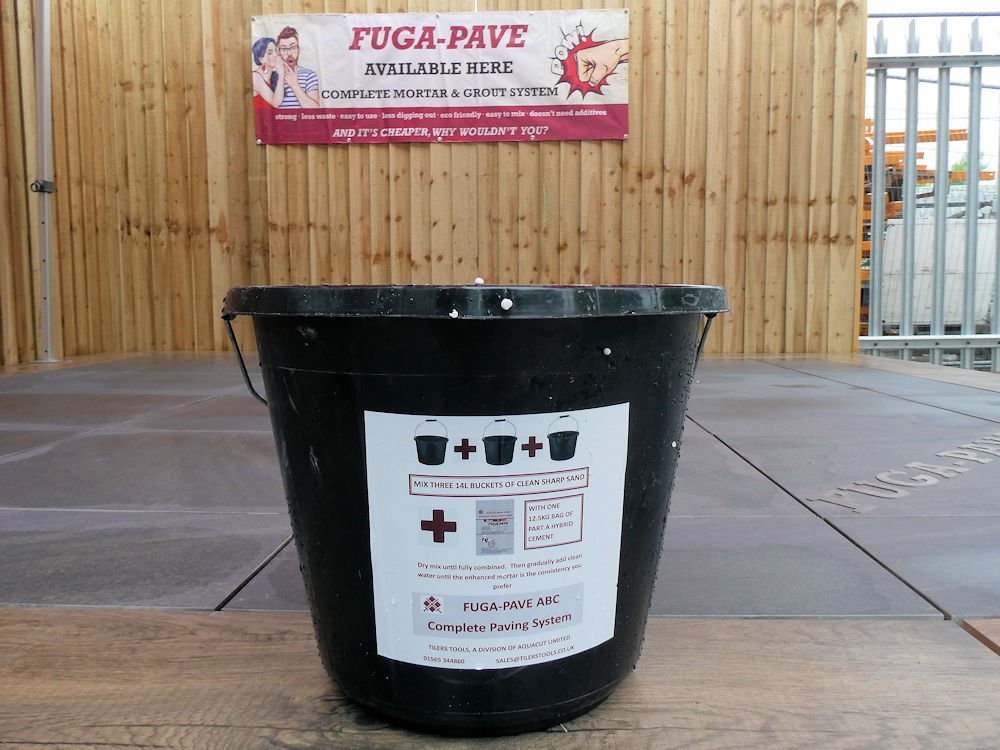
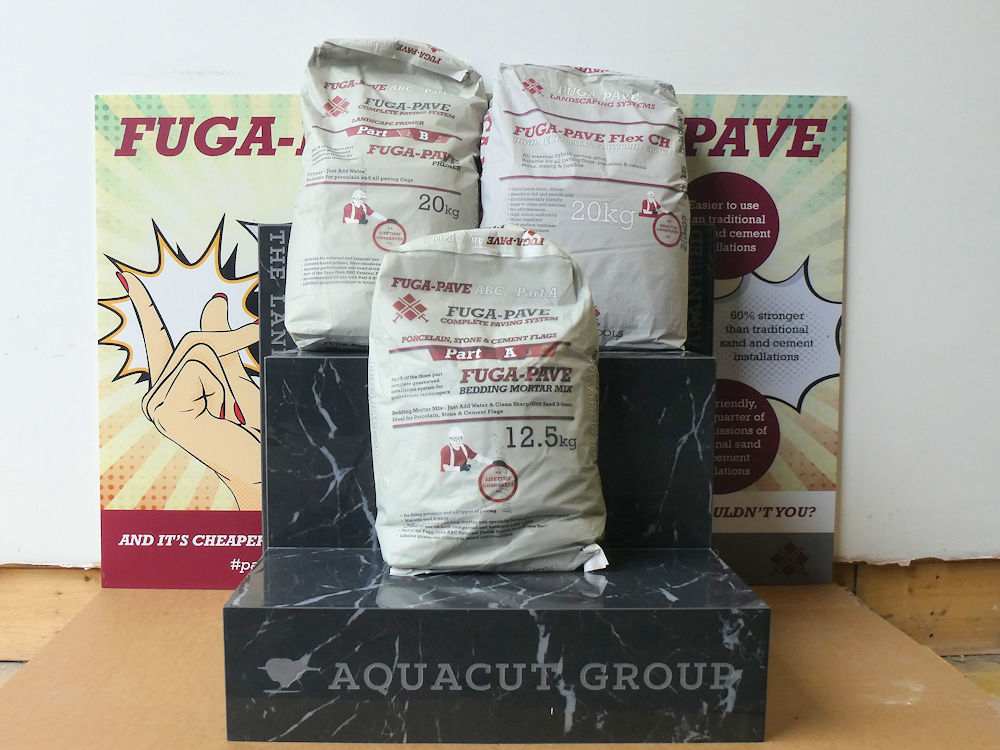
- Part A is the specially blended hybrid cement-based binder, which is used to prepare the permeable mortar bedding.
- Part B is the high-performance primer used to ensure strong, monolithic adhesion between the tiles and the bedding.
- Part C is the specially developed polymer modified hybrid grout used to fill the joints and complete the perfect paving.
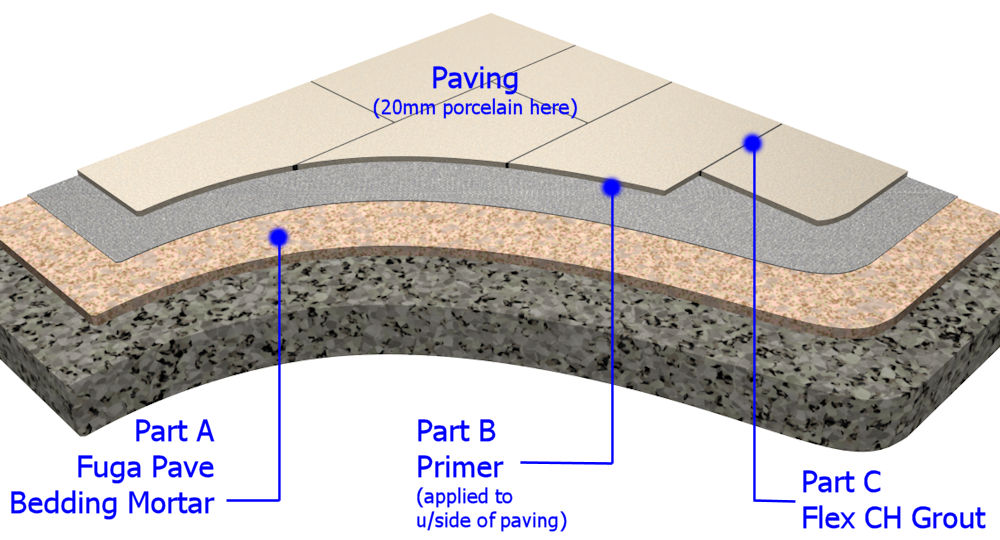
All three components are intended to work with each other, so no performance clash, no conflict of flexural strengths, just a straightforward, consistent result every time.
The FUGA PAVE System has been designed exclusively for Tilers Tools by a leading tiling adhesive manufacturer specifically to work with external porcelain and other paving materials) in the idiosyncratic weather conditions we endure in Britain and Ireland. It relies on combining their decades of experience in the industry with their ability to source the best quality materials, and to incorporate the latest developments with polymer technology to create the ideal suite of complementary products anywhere on the market.
The challenge was to create an integral system that provided four essential components:
- Simple, straightforward usage – easy as ABC
- Consistent performance to the highest standard
- Permeable for reduced moisture migration through capillary action
- Cost savings by using a suite of products rather than individual elements
FUGA PAVE from Tilers Tools delivers on all four, as we shall see.
FUGA PAVE in action:
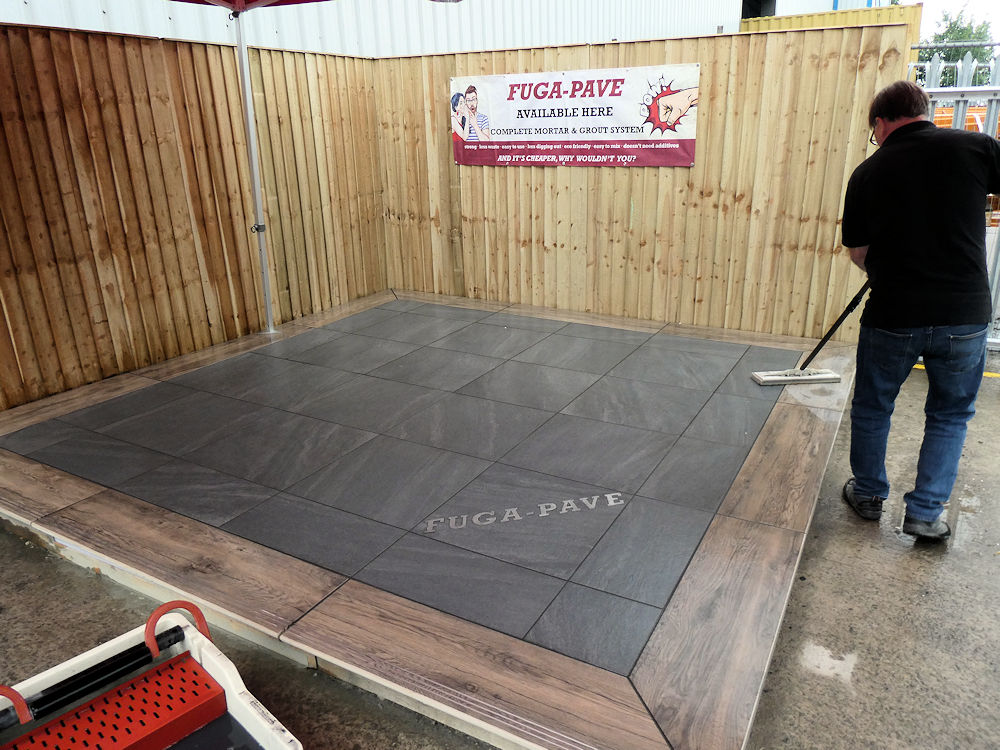
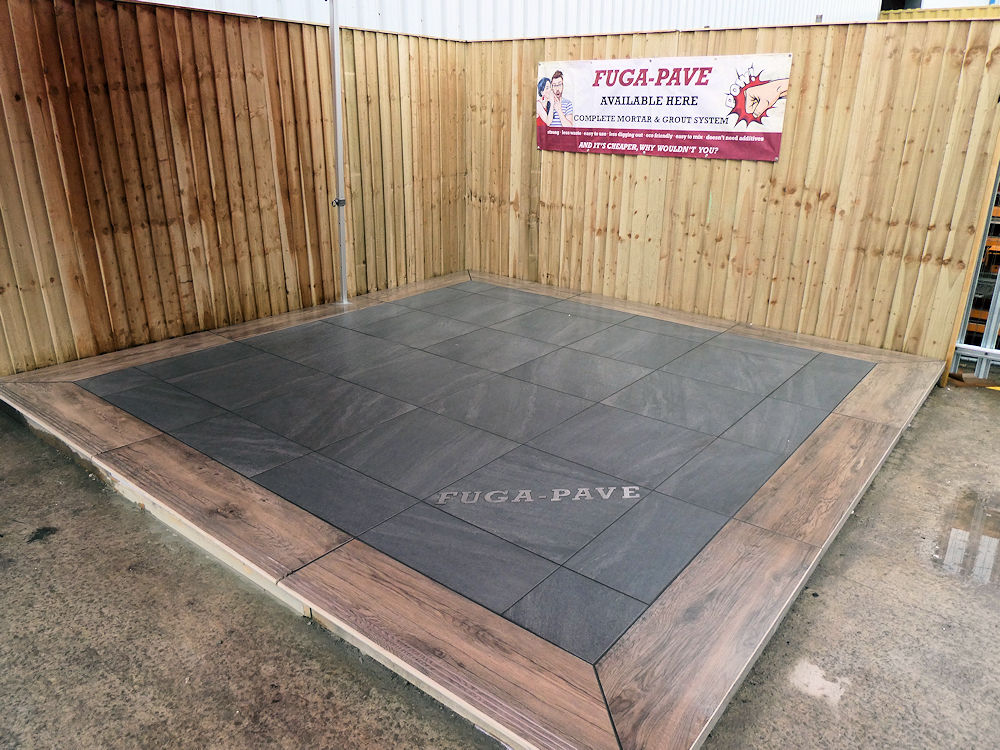
In order to illustrate how the FUGA PAVE System is used, and to better explain the benefits of the three component parts, a demonstration “Test Panel” was set up.
A Test Panel enables the individual components of the FUGA PAVE System to be examined in closer detail than is usually possible with a site installation. With a Test Panel, there’s no pressure from the installer to get the work completed as quickly as possible so they can get paid. Instead, each stage of the installation process can be carried out with precision to allow accurate photography and filming, and plenty of time to fully explain both the materials and the process, without the distractions of cutting around drainage fittings, or worrying too much about falls.

The Groundwork:
All paving needs a sub-base to give it stability, strength and the ability to support loads, even if those loads are nothing more than a couple of garden loungers and a bird bath.
For a fully permeable pavement, a sub-base of Type 3 aggregate is required. This is a no-fines material that enables water to pass straight through, virtually unimpeded, direct to ground (the sub-grade) beneath. A permeable-ish sub-base would use a Type 1 aggregate, which while not as free-flowing as a Type 3 material, should be adequate for most smaller patios and the like.
Regardless of whether it’s a fully permeable or semi-permeable sub-base, it needs to be not less than 75mm compacted thickness, preferably 100mm, or 150mm where there are any concerns whatsoever regarding the sub-grade (made-up ground, soft spots, backfilled drainage trenches, etc.) and for driveways.
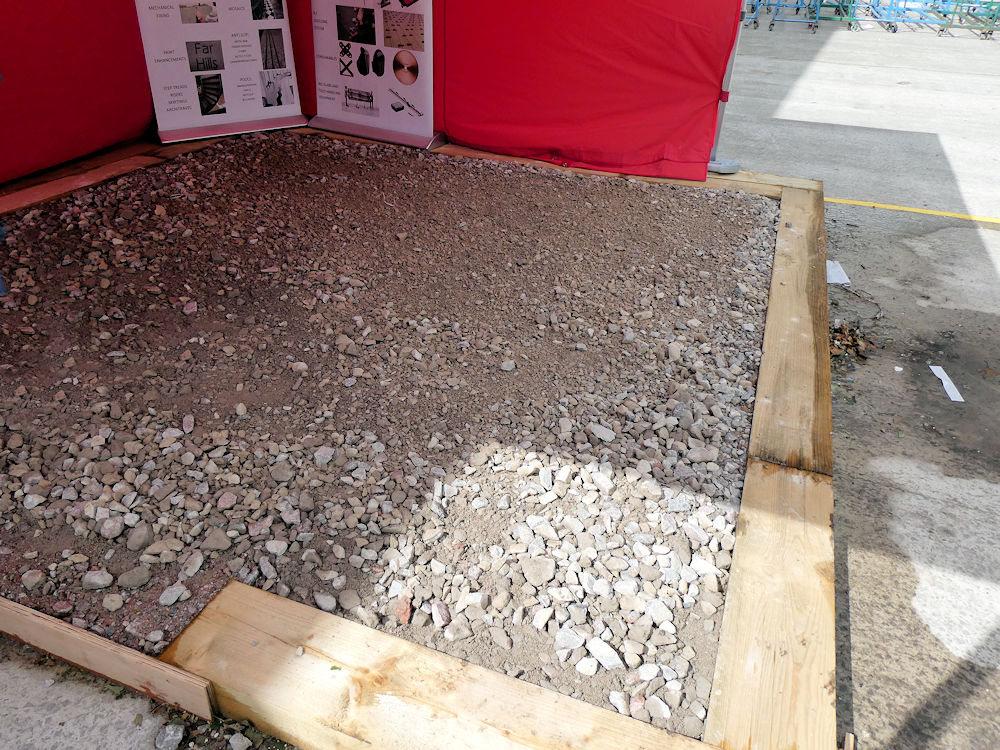
A construction grade geo-textile may also be used between sub-grade and sub-base to reduce the risk of mingling, the mixing of the two layers which inevitably reduces the critical performance of the load-bearing sub-base.
Fully permeable pavements do not require falls to drain surface water, but all sub-bases should be constructed to levels that will ensure the eventual layer of bedding mortar (the laying course) will be of a consistent thickness. A reasonable tolerance for a sub-base would be ±10mm. It’s always cheaper to build-up levels with sub-base aggregate than with bedding mortar, so a few extra minutes spent checking the accuracy of the sub-base levels will usually pay for itself by eliminating overly deep bedding.
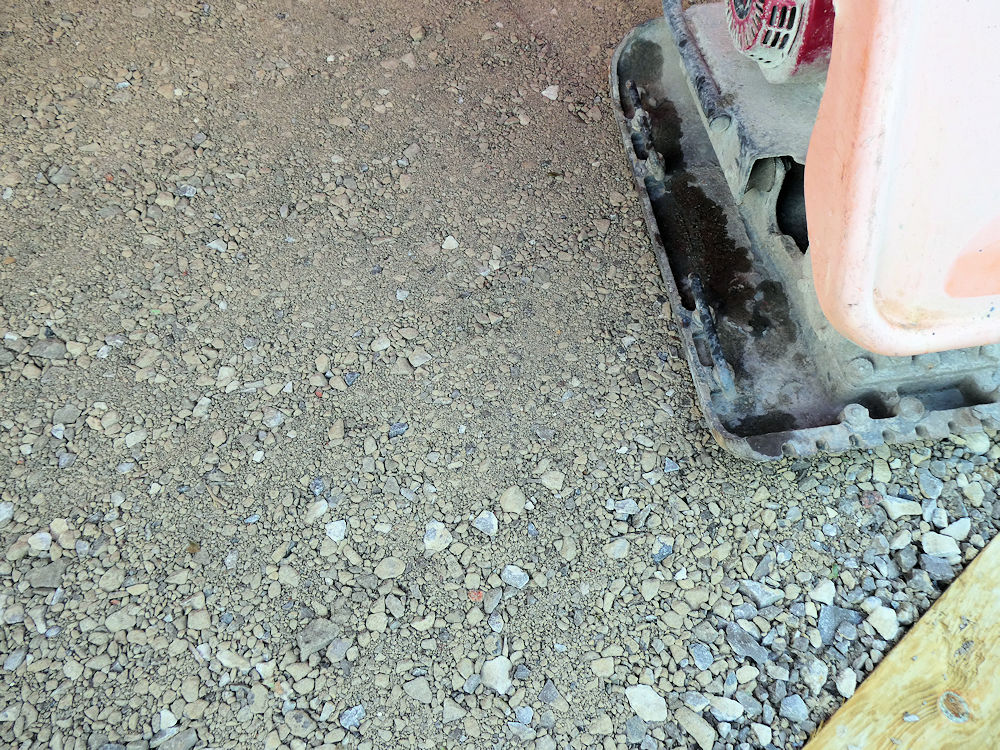
On the Test Panel, the sub-base was placed, levelled, repeatedly compacted, and checked before any of the paving work started. Remember: using a compliant vibrating plate compactor, a 100mm depth sub-base will require AT LEAST eight passes to ensure full compaction. Tickling the sub-base with a couple or three passes of a lightweight plate achieves nothing.
Step A: The Bedding Mortar:
Part A of the FUGA PAVE System is the bedding.

As with all paving installation using cementitious mortars or concretes, work should only go ahead when the ambient temperature is at least 3°C and rising (not dropping towards freezing), and that there is certainty that there will be no frost in the first 8-12 hours following installation.
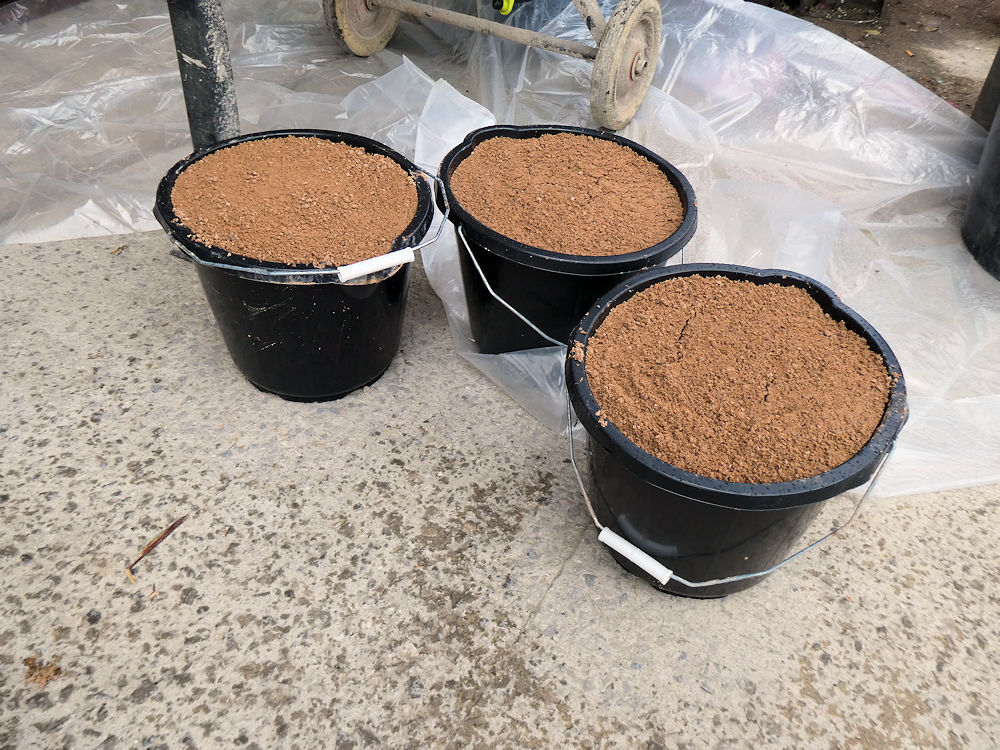
Rather than spend lots and lots of money shipping the fine aggregate (the sand or grit) all over the country, the FUGA PAVE System keeps costs to a minimum by allowing the installer to source their own suitable sand/grit locally at a sensible price, and then mixing that aggregate with the supplied FUGA PAVE binder, which is a fibre-reinforced hybrid cement.
The fibres, which you can barely see, significantly increase the 28-day strength of the mixed mortar, while the selective additives (which are why it is referred to as a ‘hybrid cement’) boosts strength, bonding and the freeze-thaw resistance, as well as acting as a general plasticiser to improve general workability.
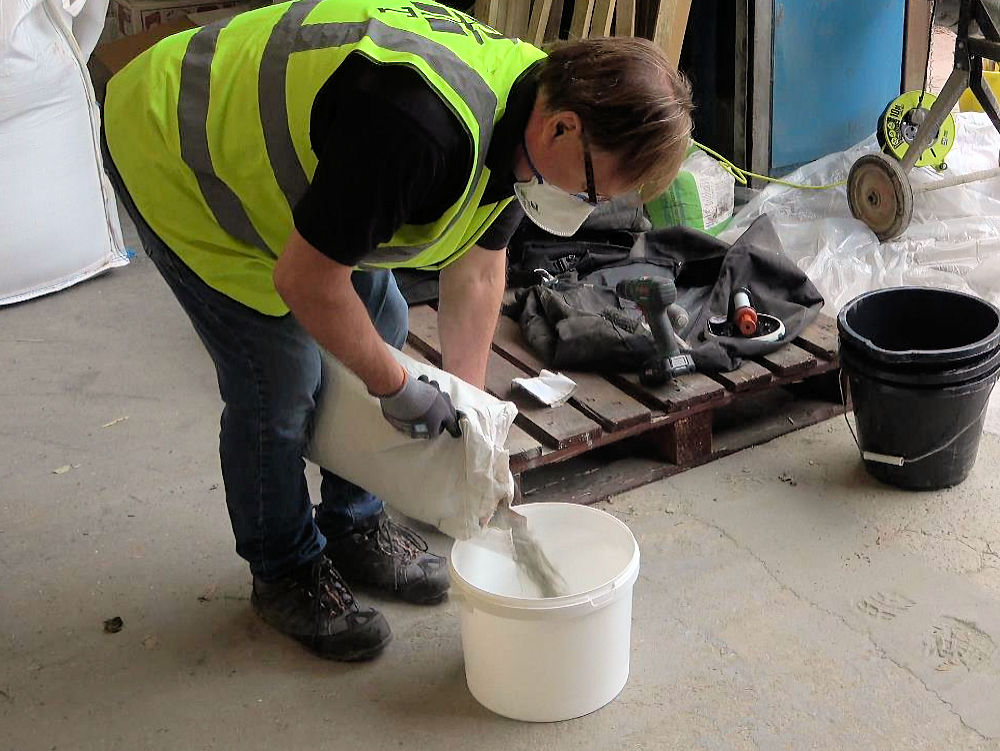
The Part A Hybrid Cement comes pre-batched in a 12.5kg moisture-resistant bag. One bag of the Hybrid Cement is mixed with three buckets of the suitable sand provided by the installer. Each bucket (the standard “builders’ bucket” found in the back of almost every van) should hold approximately 14 litres of the fine aggregate when full and levelled off. It’s probably worth double-checking the capacity of your chosen bucket or weight of a single bucket when filled, as there is some variation across the country. However, on average, for most of Britain and Ireland, a typical bucket of suitable fine aggregate (sand) will contain around 14 litres.
That fine aggregate should be the usual clean sharp or grit or coarse or concreting sand that is normally used for laying paving. Its correct specification is the rolls-off-the-tongue….
G f 85 0/4 (MP) fine aggregate
….which essentially means a gritty sand with particles up to 4mm in size, so NOT a building or plastering sand.
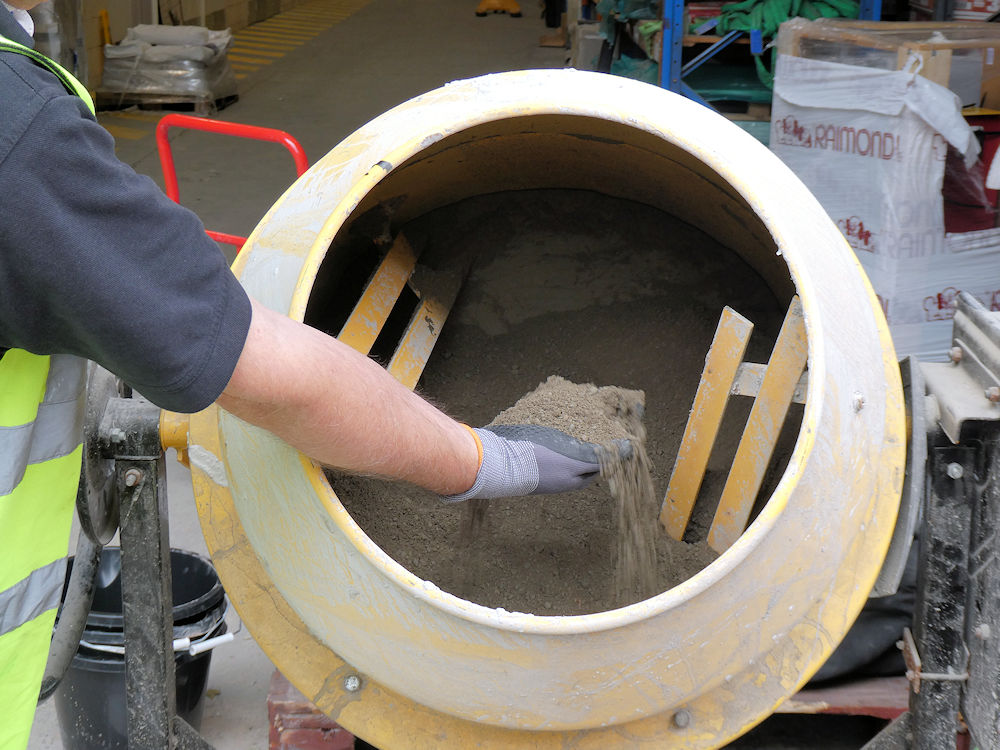
The bedding mortar can be mixed in a standard tumble action mixer. A forced impact mixer can be used, if preferred, but perfectly adequate results are obtained using the basic builders’ mixer.
To start preparing the bedding mortar, add one of the buckets of sand to the mixer. Then, open the Part A bag of Hybrid Cement and carefully tip-in around a third of the bag to be mixed with the sand. Next, another bucket of the sand, followed by a further third-of-a-bag of the Hybrid Cement, and then the final bucket of sand and the remaining contents of the bag of Part A Hybrid cement.
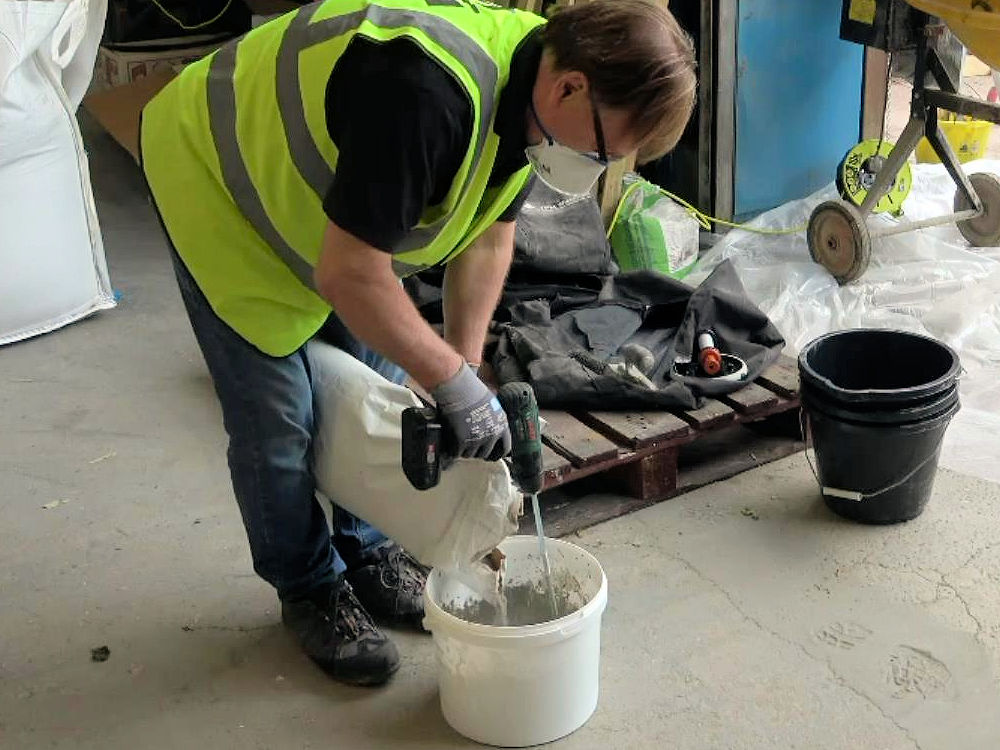
Allow these ‘dry’ ingredients to thoroughly mix, which usually takes a couple of minutes, and then start to gradually add clean cold water a little at a time, allowing it to spread throughout the churning mortar before adding any more. With practice and experience, it becomes reasonably obvious just how much water is required to obtain a mortar of the ideal slump (wetness), but when first working with the FUGA PAVE System, or when using it with an unfamiliar sand, add half-a-litre or so at a time, giving it 30 seconds or so to mix through, until the desired slump is achieved.
That “ideal slump” will vary slightly from installer to installer, and with ambient temperature, but, as a general guide, a correctly prepared bedding mortar will:
- Be of a uniform consistent colour throughout
- Have no streaking or blotching of sand (or cement!)
- Hold itself together as a ball when compressed in a gloved* hand
- Have very little or no water run out when squeezed in a gloved* hand
* (Why gloved? You’ve obviously never had cement burns!!!)
Once thoroughly mixed, the Part A bedding mortar can be tipped out into a barrow or larger bucket for transport to where it’s needed – the laying face.

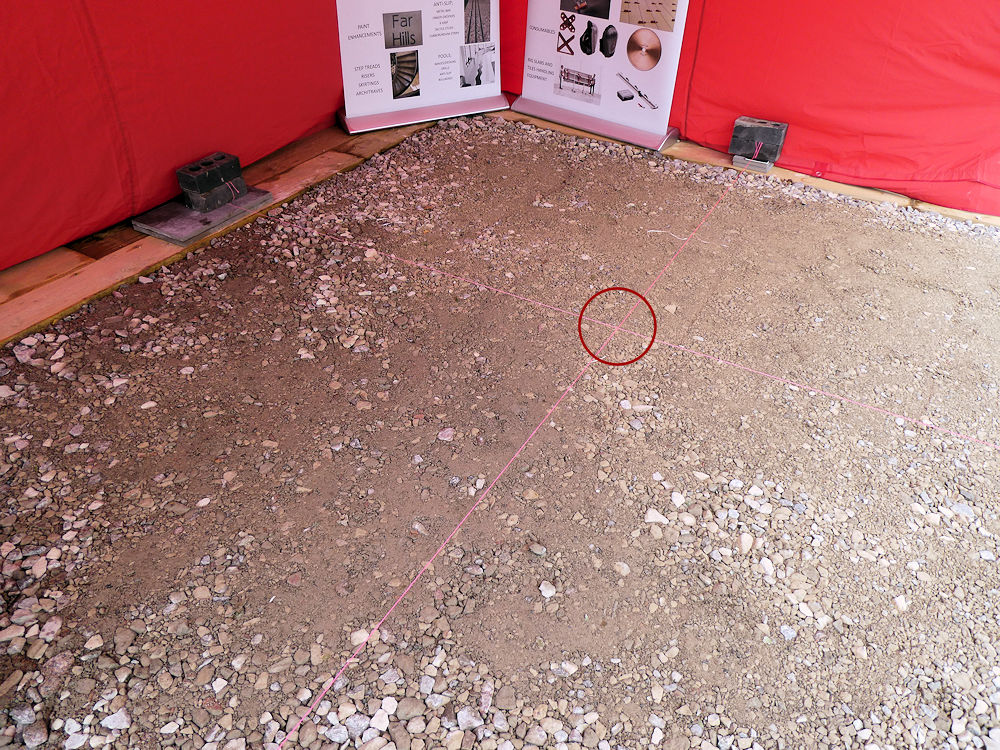
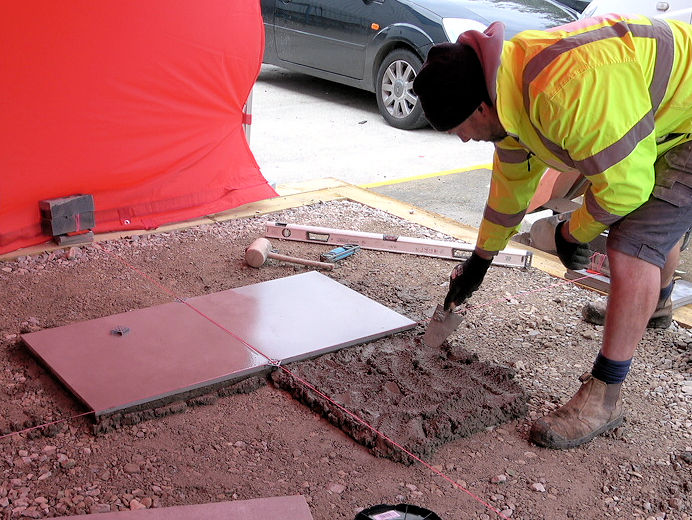
At the laying face, a pair of string lines have been set up to pinpoint the exact centre of the planned Test Panel.
Whenever setting out any paving, and especially with porcelain et al, accurate setting-out and pre-planning to minimise cutting and to ‘balance’ the layout so that it doesn’t end-up looking lopsided or skewed to one side or the other, is an essential part of a professional project. By starting the laying in the exact centre of the panel, the end result should look balanced, and, if all goes to plan, there will be half-tiles to the entire perimeter on completion.
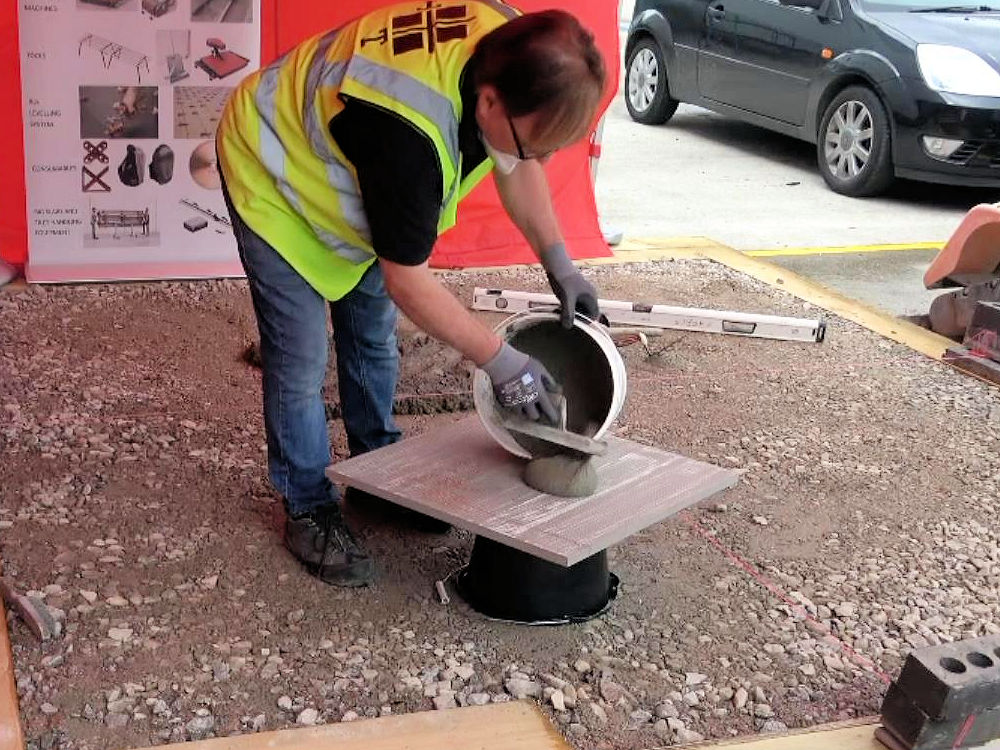
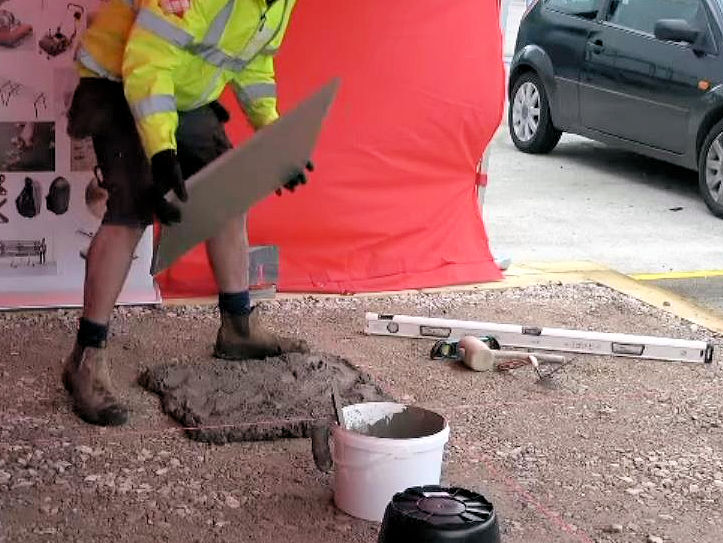
The freshly mixed mortar is brought over to the laying face, and a bed is prepared.
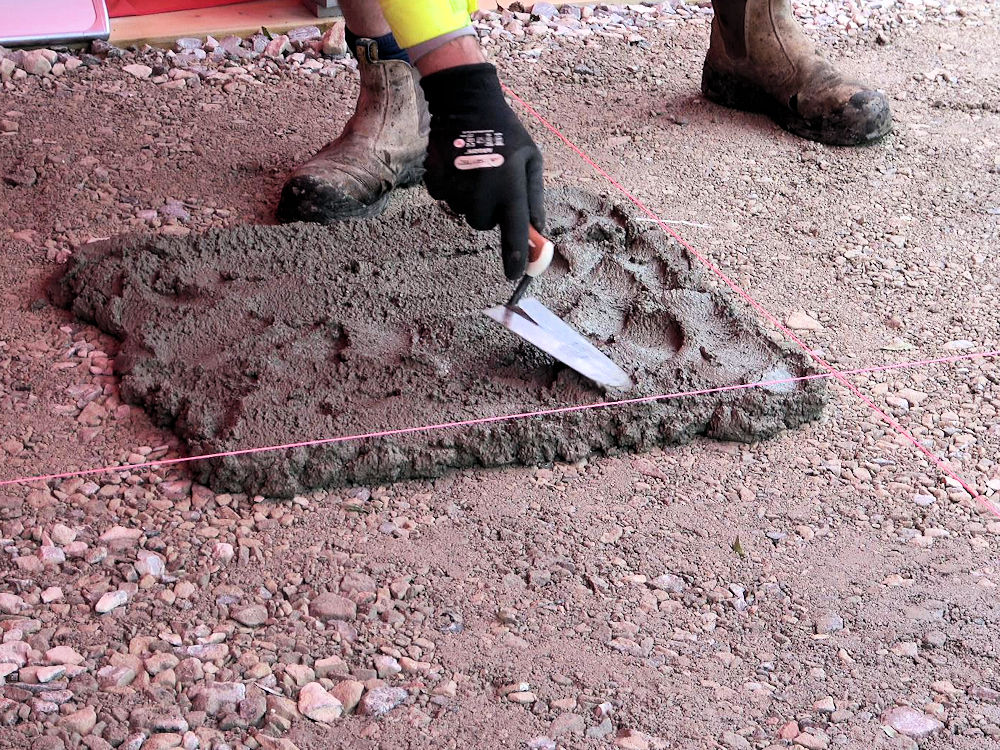
Ideally, the bedding mortar will be 25-40mm in thickness when compacted. Based on a 25mm thick bed, a single mix of bedding mortar (3 @ 14 litre buckets of sand plus 1 @ bag Part A FUGA PAVE CH) should cover around 2m².
The bed is prepared exactly as it would be when using any “traditional” mortar bedding, by being spread with a shovel or a trowel so that it provides a platform for the whole of the intended paver. This is the required “Full Bed”, that is, there are no gaps in its coverage, no use of spots or dabs of the mortar. A bed that will be in contact with the whole of the paving unit when installed.
Step B: The Primer
One of the biggest changes over recent years has been the use of primers, slurries, bond bridges or whatever you call them when laying paving. It’s a technique that has been in use for many, many years and their use is now being recommended for almost all forms of bound (ie: mortar bedded) paving, regardless of whether it’s porcelain, natural stone or concrete.
Some installers are still making their own primer using what is usually a far less precise version of what we had back then. It’s usually a splosh of SBR to a dollop of cement and may be anything from a sloppy, dripping liquid to a stiff, butter-like paste. This continued use of site-mixed primers is becoming something of a concern as we identify more and more failures of paving that are caused by an unsuitable primer.
These inconsistencies in the performance of primers are a growing problem, which is why the industry is keen to get professional installers to switch to using propriety, pre-batched, consistent-performance primers where all the guesswork has been taken out of it.
So: The FUGA PAVE System includes, as Part B of the ABC, a high-performance primer that is perfectly matched to the bedding mortar, and also to the eventual jointing.
The FUGA PAVE Part B primer is, like the bedding, a fibre-reinforced, polymer modified, hybrid cement, but, unlike the Part A bedding, no additional aggregate is to be added. Other than water, everything that is needed is provided in the 20kg moisture-resistant bag, which is sufficient to cover approximately 28m² of paving.
Preparing the Part B Primer:
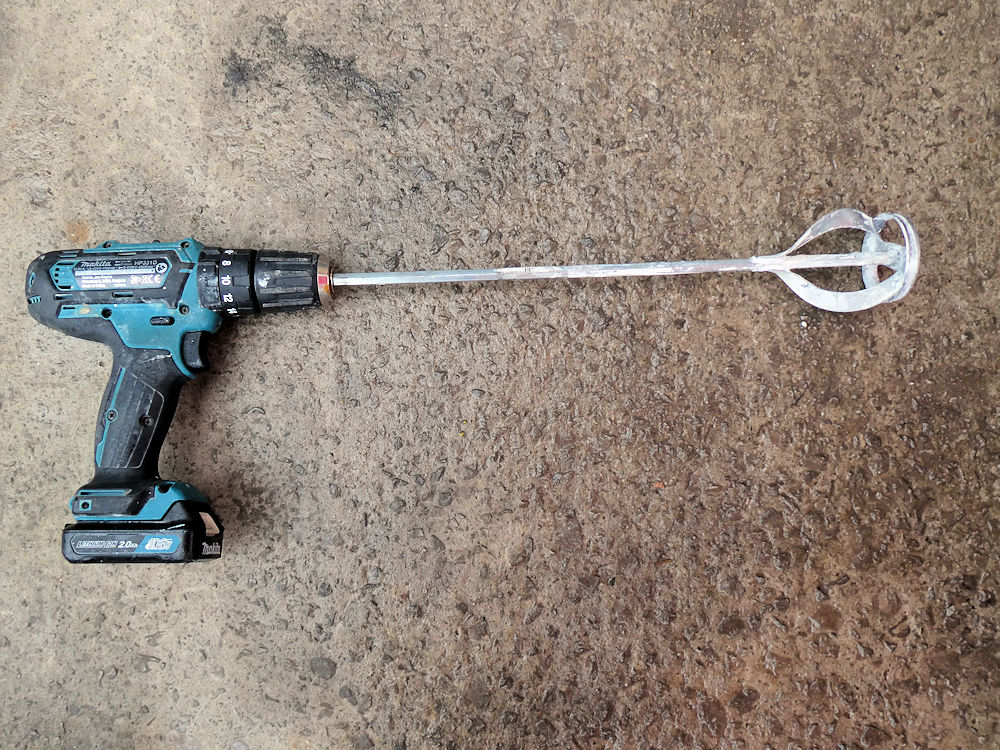
It’s a really simple process, and all that’s needed is a bucket and a paddle mixer.
A small quantity of clean, cold water is added to the bucket. Somewhere around half a litre to a litre will be sufficient to start. As installers become more familiar with the FUGA PAVE Part B primer, and its working life (pot life), they will come to know how much of the primer they require for each session of laying the paving, and may decide that they can make up, say, 3 litres at a time. However, start small and see how it goes.
So, the water is in the bucket, and the Part B powder is now added, a little at a time, and mixed in. It’s best to add powder to water, rather than water to powder.
Also, wear a mask. The fine nature of the Part B Primer in its powder form can result in a dust cloud and it’s not a good idea to inhale any cementitious product.
When the primer is ready to use, rinse off the paddle attachment. Don’t leave primer on the paddle (or any other tools). Once cured, it will be almost impossible to remove!
The primer is now ready to be used at the laying face….
Applying the Part B Primer:
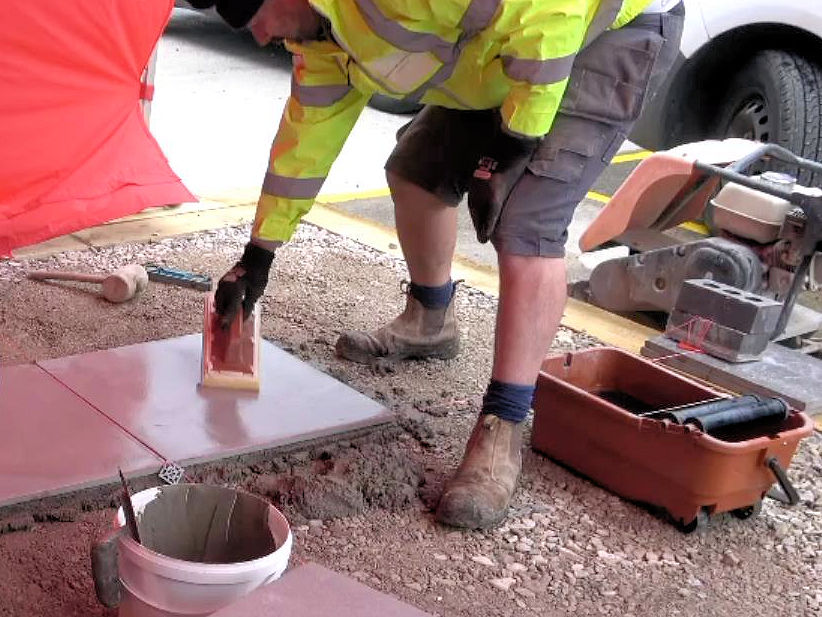
No matter what type of paving is being installed, it’s best practice to prepare the bed face (the underside) of the paving unit before applying the primer. This will ensure the best possible surface on which the primer can adhere. Using a stiff wire brush, scrub the whole of the bed face to remove any larger loose material, dust, or any other undesirable material.
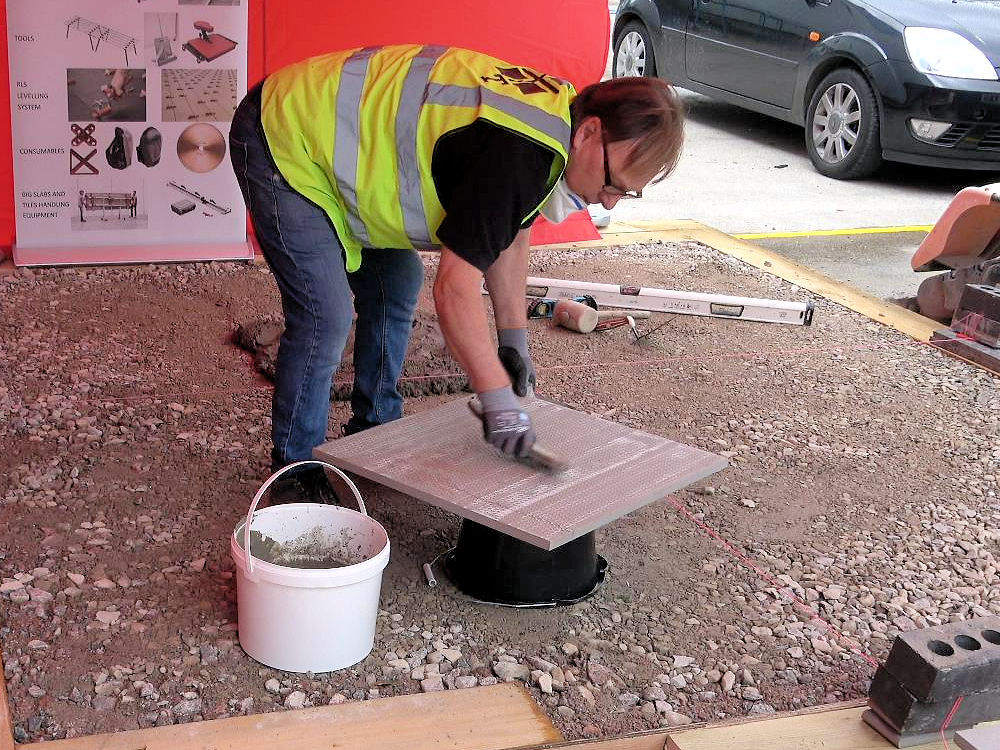
The primer can now be applied. Again, there is considerable variation on what’s the best method to use when applying a primer. Some will use a small, soft-bristled hand brush, others will use a float or trowel. The operative here prefers to use a bucket trowel of the type preferred by tilers. All are fine, as long as the primer is applied evenly to the whole of the bed face, as a layer roughly 1mm thick.
Having the tile/flag/paver balanced upside down on an upturned bucket (have you noticed how useful buckets can be?) makes it easier to apply the primer. Pour a little directly onto the bed face, or dip a brush and ‘paint’ it on, but be wary of drips and splashes. Any accidental spills or drips must be wiped with a damp cloth immediately.
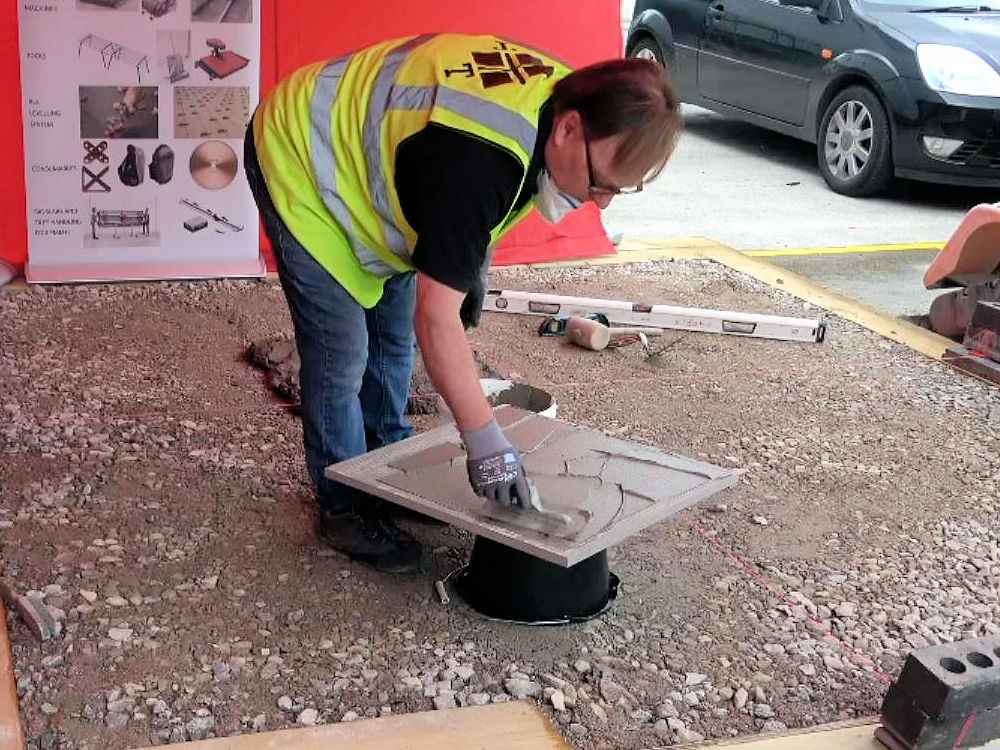
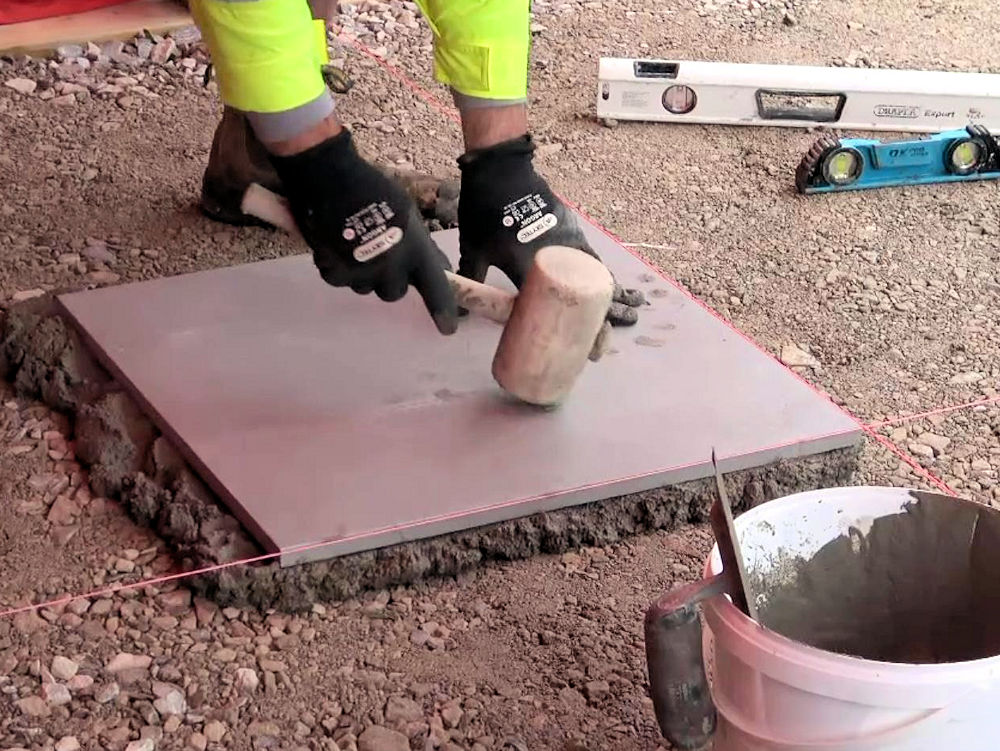
The primed tile/flag/paver can now be laid onto the bed that was prepared previously.
Note that the primer is applied immediately prior to laying. This ensures “wet-on-wet” contact: the wet primer is in direct contact with the wet bed, and so there is no joint, no interface, no barrier or break between the two. They become a single, homogenous mass.
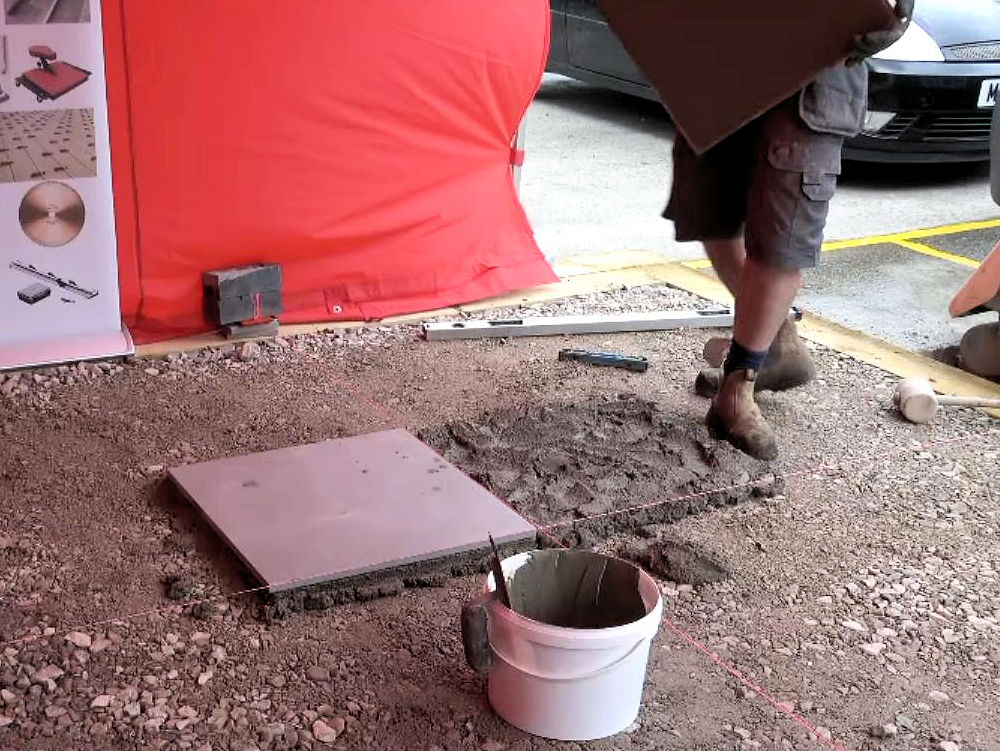
That’s the first piece in place, and it’s simply a matter of repeating the process of clean, apply primer, lay over and over again to cover the whole of the intended area.
Using spacers, or a levelling kit, especially with porcelain paving, can be incredibly beneficial in maintaining a consistent joint width. Most spacers can be salvaged for re-use once the laid paving unit is securely in place, so there’s no significant additional cost, but the finished job will look so much better.
It’s also critically important to keep the work clean. As mentioned previously, any spills, drips or splashes should be wiped up immediately using a clean damp sponge or cloth. Any cementitious material, whether it’s the Part B Primer or the Part A bedding will be incredibly difficult to remove if allowed to harden on the pavement surface.
Work continues, gradually working out from that starting position, preparing the bed, cleaning and priming the tile, laying, levelling, cleaning and then moving on to the next.
A methodical approach using quality materials is the mark of a professional installer, and it doesn’t take long before this phase of the paving installation is complete.
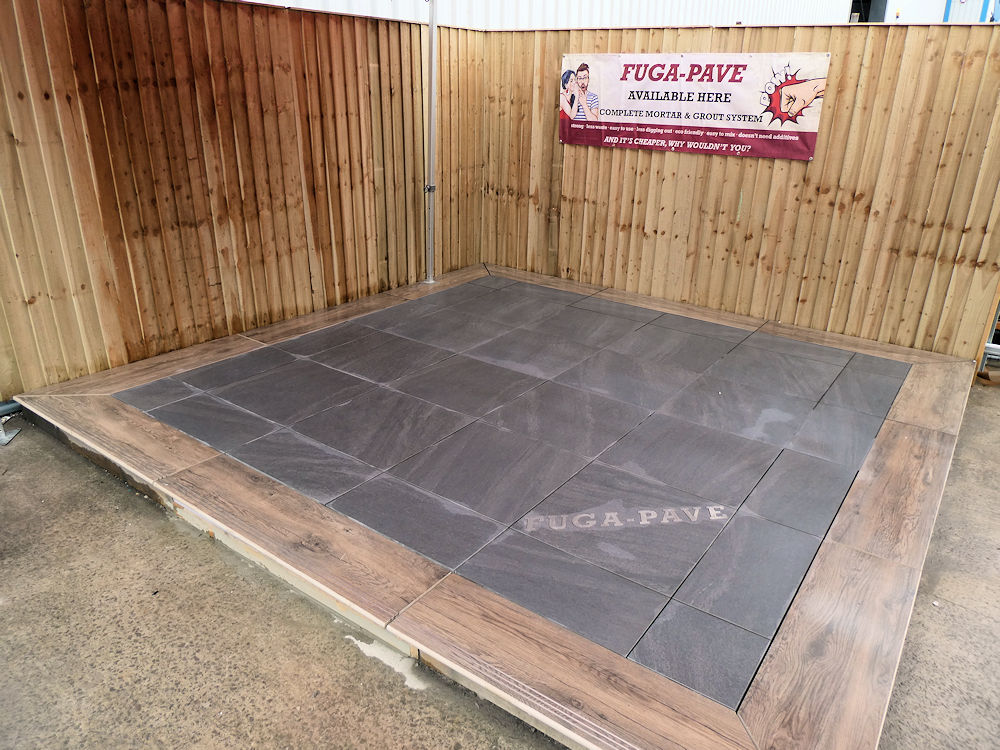
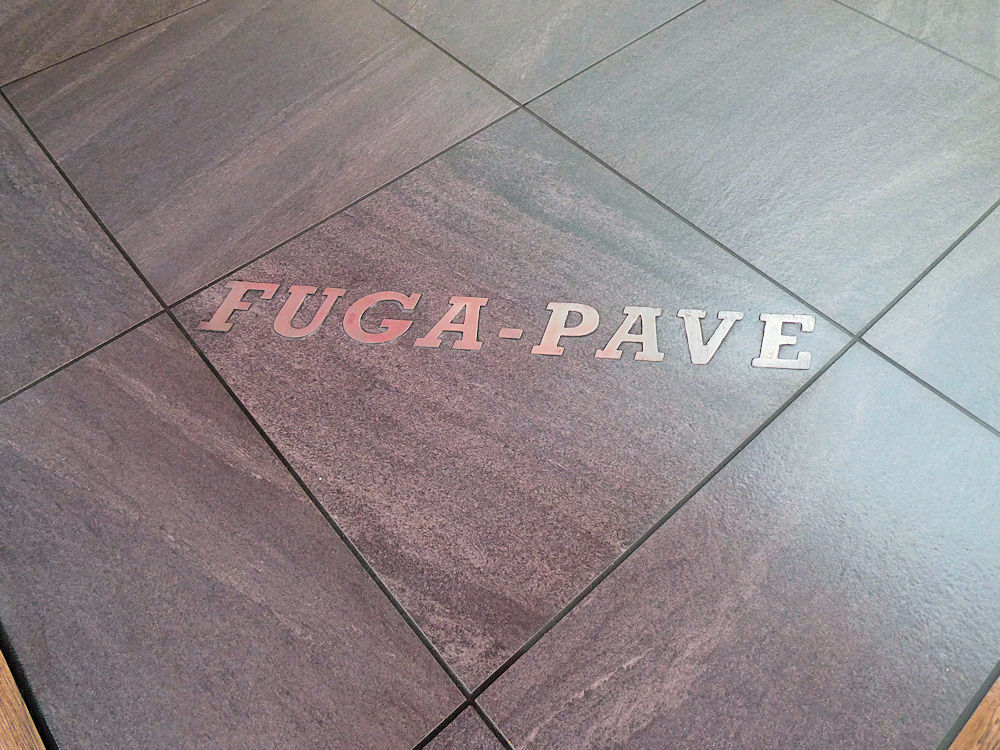
On this Test Panel, it was decided to finish off with a contrasting timber-effect edge course, and to embed a polished steel effect logo, all of which allowed the FUGA PAVE distributor to showcase their professional bull-nosing and profiling services.
All that remains is to carry out the jointing, which is where we meet Part C of the FUGA PAVE System.
Step C: The Jointing
With the paving complete and looking good, the final task is to get it all jointed, or grouted, whatever term you prefer. For that, we’ll be using the final part of the FUGA PAVE System, Part C, the Flex Cement Hybrid Grout.
Bear in mind that it is best practice to allow bedding mortars to cure for at least 7 days (14 days in cooler/wetter conditions) before undertaking the grouting stage of the works.
As with Parts A and B, the grout relies on a high-quality cement with selected fine aggregates, colourants, and polymers – that’s why it’s referred to as a “Cement Hybrid” (CH).
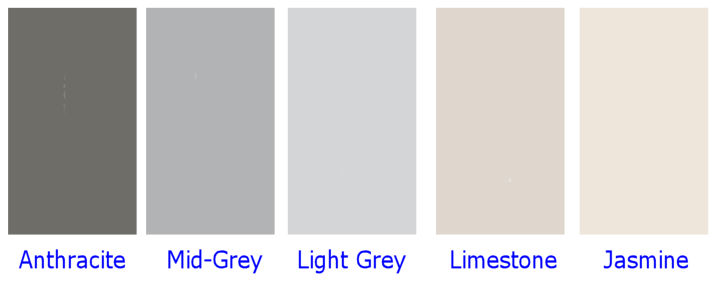
The benefits of the FUGA PAVE Flex CH grout are that it is specifically designed to be wholly compatible with the Part A and Part B components discussed above, but more than that, it’s a superb high-quality grout for all types of paving projects. It’s suitable for use in all joint widths ranging from 2mm to 20mm, and, ideally, at least 20mm depth. When cured, there is no efflorescence, the surface is naturally anti-bacterial, it passes the drop water test, and the range of five colours are all UV stable.
Part C comes as a dry powder, packed in a 20kg moisture resistant bag, which is to be mixed with water on site when required. Coverage obviously depends on the amount of jointing per square metre, as well as the width and depth. A square metre of 100x100mm granite setts will clearly use more grout than a square metre of 600x600mm porcelain tiles. Thankfully, there’s a handy coverage calculator on the Tilers Tools website.
The tools:
Grouting does require a few special tools, but none are expensive and by acquiring quality tools, they’ll repay you with years of trouble-free service.
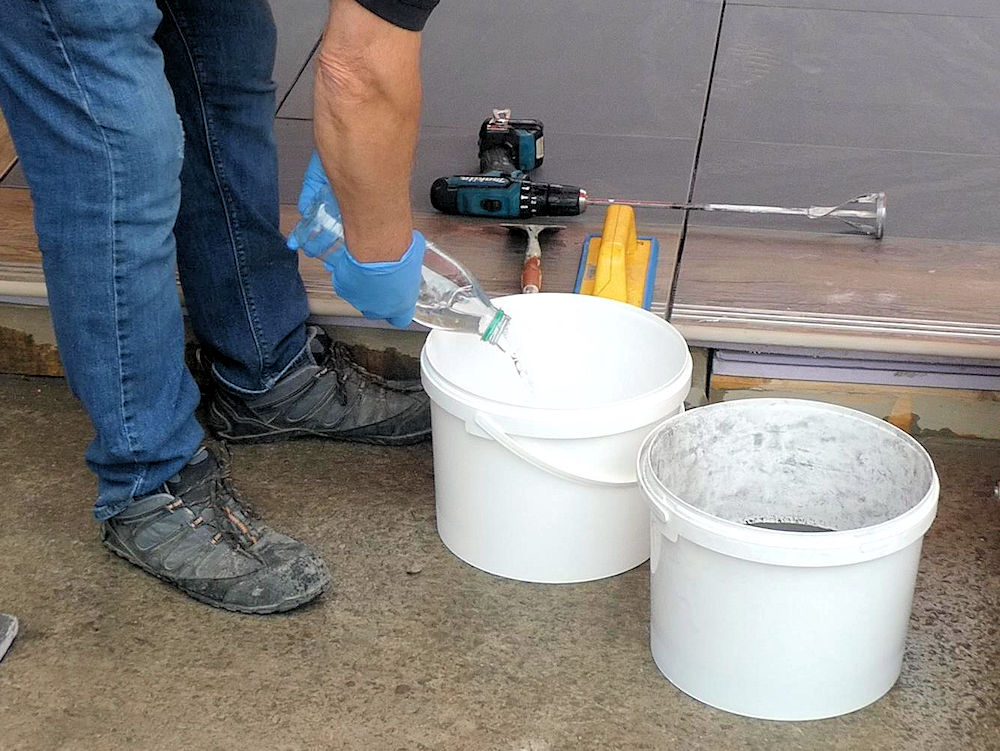
To mix the grout, we’ll need a couple of buckets, a measuring jug, and a small paddle agitator attached to a power drill. Part bags can be added to water to achieve a thick creamy consistency.
For this project, the handy coverage calculator has worked out that we don’t need a full 20kg bag to be mixed. We actually need less than 10kg, so the installation operatives decide to prepare two 5kg batches, one at a time, only mixing the second batch when the first batch is used up. The remaining Part C powder can be kept in its bag, sealed up, protected from moisture, and suitable for re-use on a later project.
A full 20kg mix of the Part C Flex grout requires 2.8 litres of clean, cold water. The quantity of water to be added is fairly critical: not enough and the result is a stiff, hard-to-work paste; too much water and we get a runny, sloppy soup. 2.8 litres for 20kg of dry powder produces the ideal mix, a wonderfully workable and easy-to-clean mortar.
So, for the first 5kg mix, just 0.7 litres of water will be required (2.8 ÷ 4).
5kg of Part C is weighed out into a clean, dry bucket, while 0.7 litres (700 millilitres) of clean cold water is measured out in a jug. The operative transfers the water to a drinks bottle for convenience and marks to side of the bottle to record the level of 700ml. This can be used again later when making up the second batch of grout.

With the water in the mixing bucket, the measured quantity of 5Kg of Part C powder can be carefully added, a little at a time, taking care not to splash it everywhere.
Initially, it’s best to stir in the Part C powder using a gauging or bucket trowel, to gently blend it with the water until a reasonable paste is formed.
However, to achieve a truly smooth, homogenous, and workable grout, it will need a short blast with the paddle mixer to ensure all the powder is thoroughly blended into all of the water.

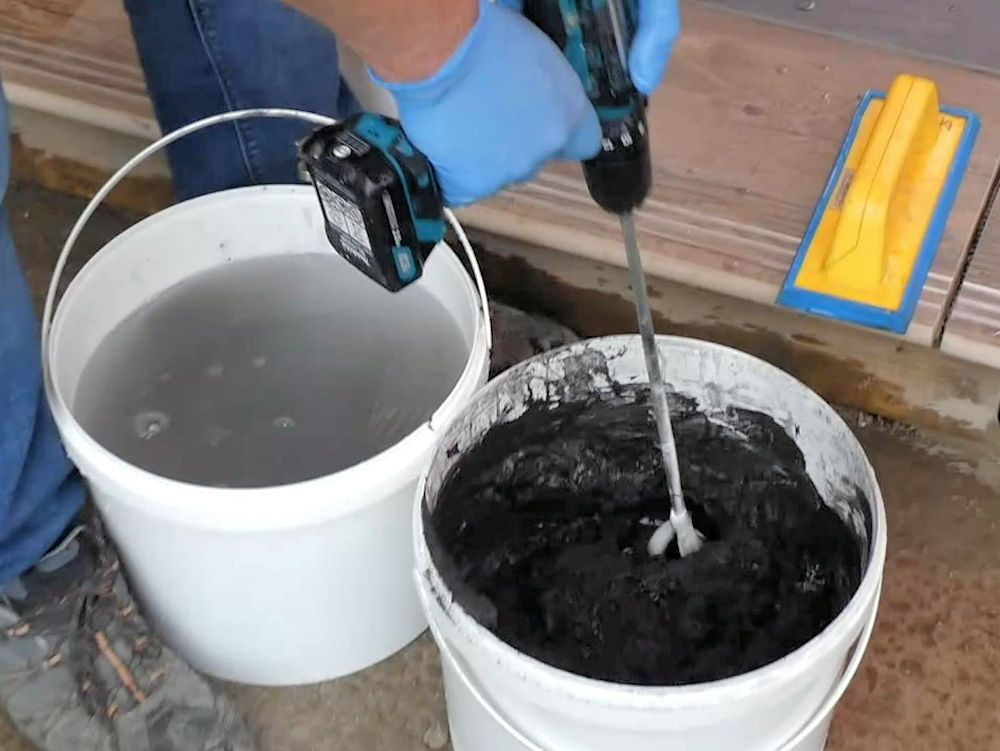
The Part C Jointing Mortar is now ready to use but be sure to rinse off the paddle mixer before moving on to undertake the grouting.
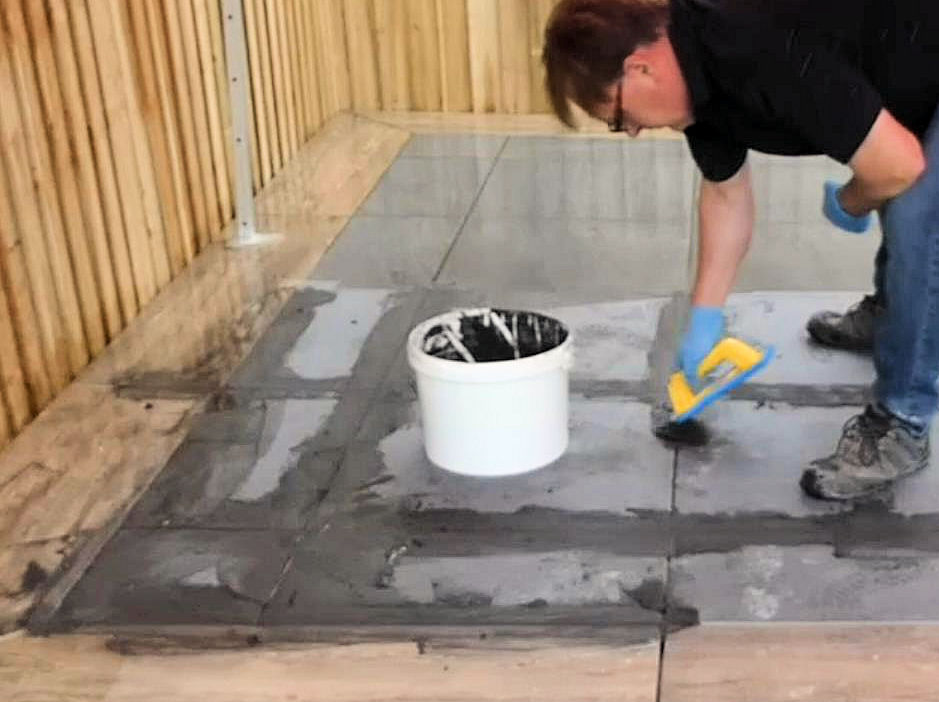
The Grouting:
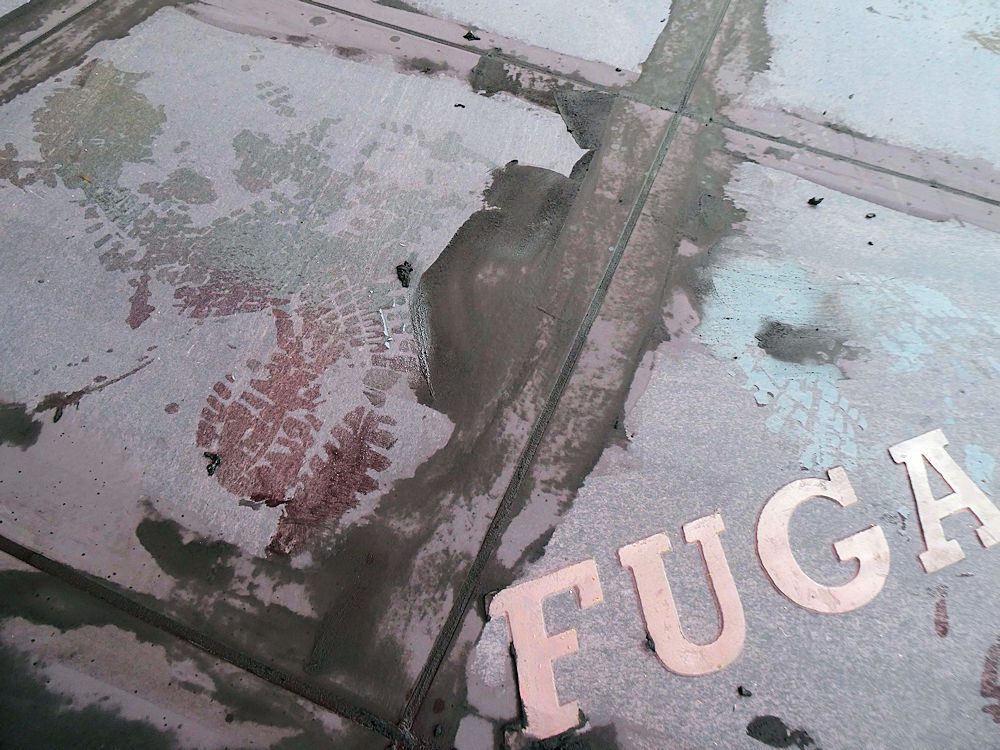
Before the grouting commences, ensure the paving is thoroughly clean. There is no sense in applying a grout to dirty, dusty or just plain grotty paving. Sweep off any loose material and wash down if necessary to ensure a completely clean surface.
The grout is applied using a sponge-squeegee, aided by a small trowel. A small quantity of the grout is loaded onto the leading edge of the sponge-squeegee and then pressed into the empty joints, working methodically along the joint. Use the sponge-squeegee to wipe off any excess grout, and to smooth of the joint.
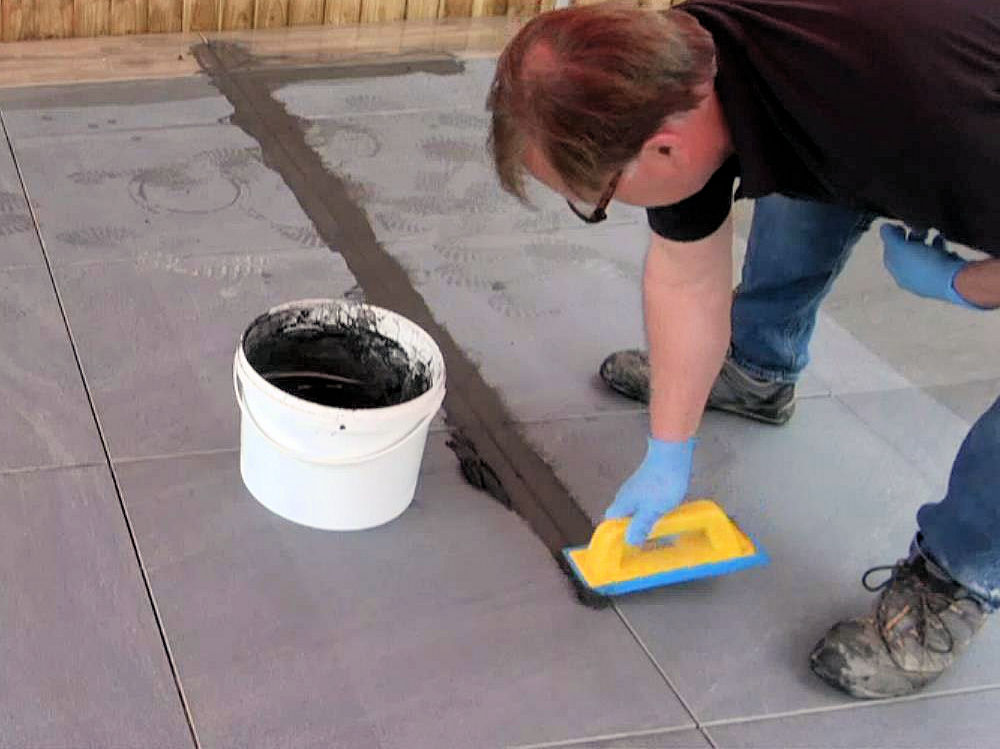
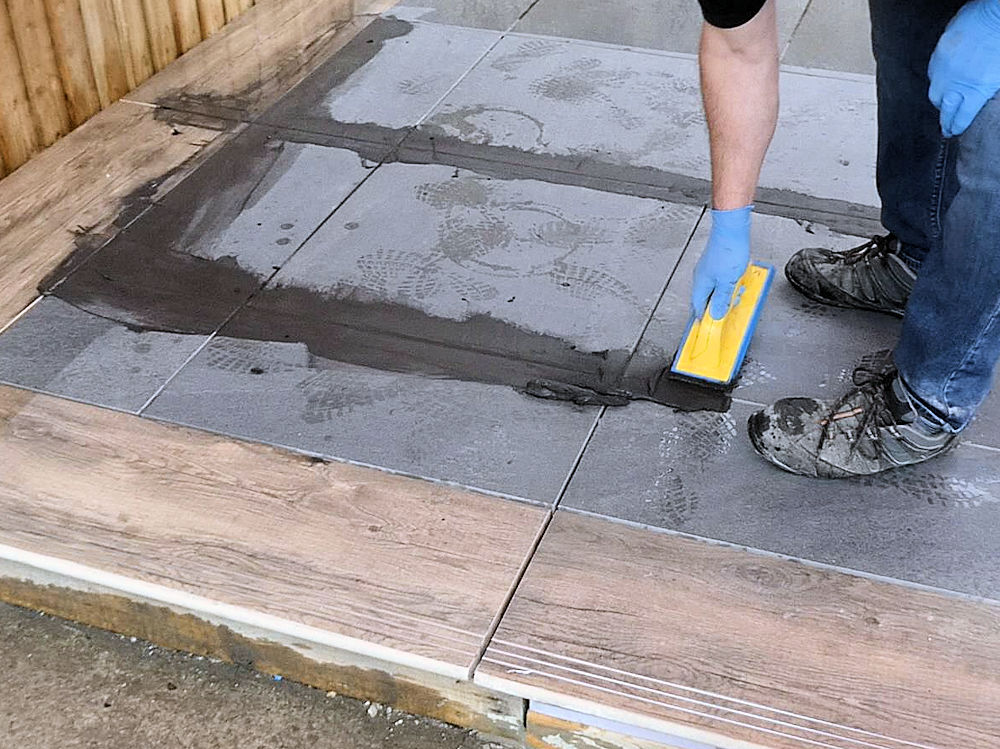
Continue to press the Part C grout into the empty joints, ensuring there are no air pockets or voids within the joint, and that the upper surface is smooth and flush with the surface of the paving.
Continue sequentially, working along the joints, chasing out any air pockets, and then move on to parallel joints. With more random layouts, you could work on adjacent joints as best suits the paving, but always work continuously to eliminate any voids.
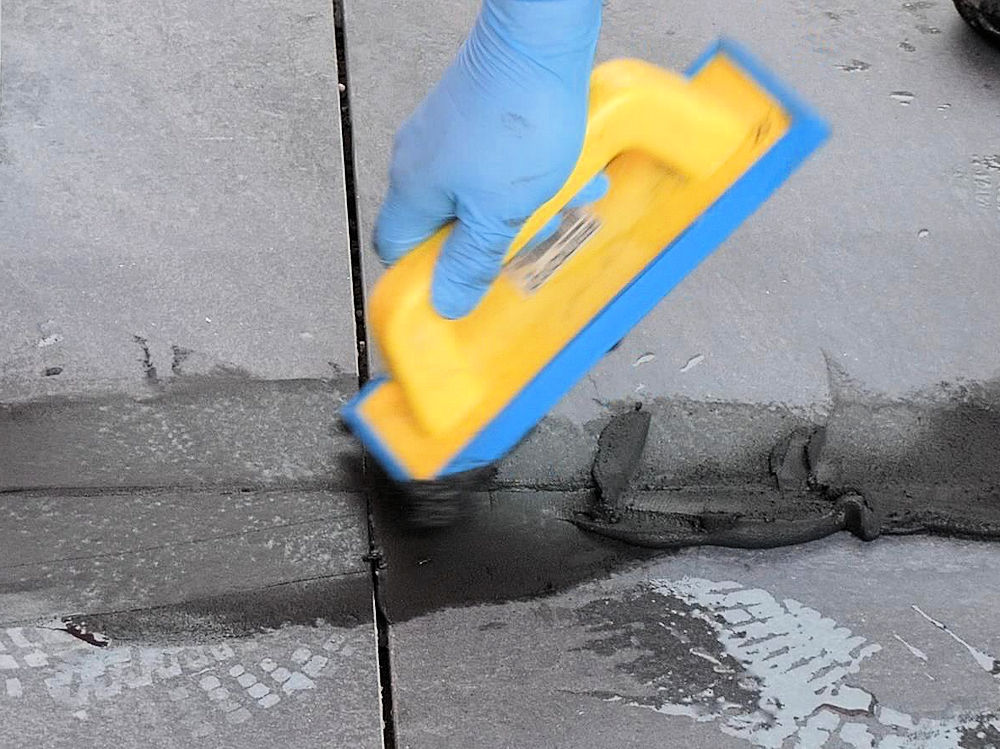
Remove as much of the excess grout as possible: this will make the eventual cleaning process so much easier.
Note also that it is only the joints that are grouted. Unlike the brush-in jointing compounds or the slurry grouts, there is no need whatsoever to smear the grout over the entire pavement – doing so simply multiplies the amount of cleaning work to be done and is a needless waste of grout. There are specialist machines which may be used for grouting large areas.
The Cleaning:
The grout is given a short period of time to commence the curing process, and also to allow any unexpected voids or air pockets that were missed to make themselves known by the grout dropping within the joint. These can be topped-up with a touch of fresh grout if and when they are spotted. However, after around 30 minutes, once the grout is touch dry, the cleaning can get underway.
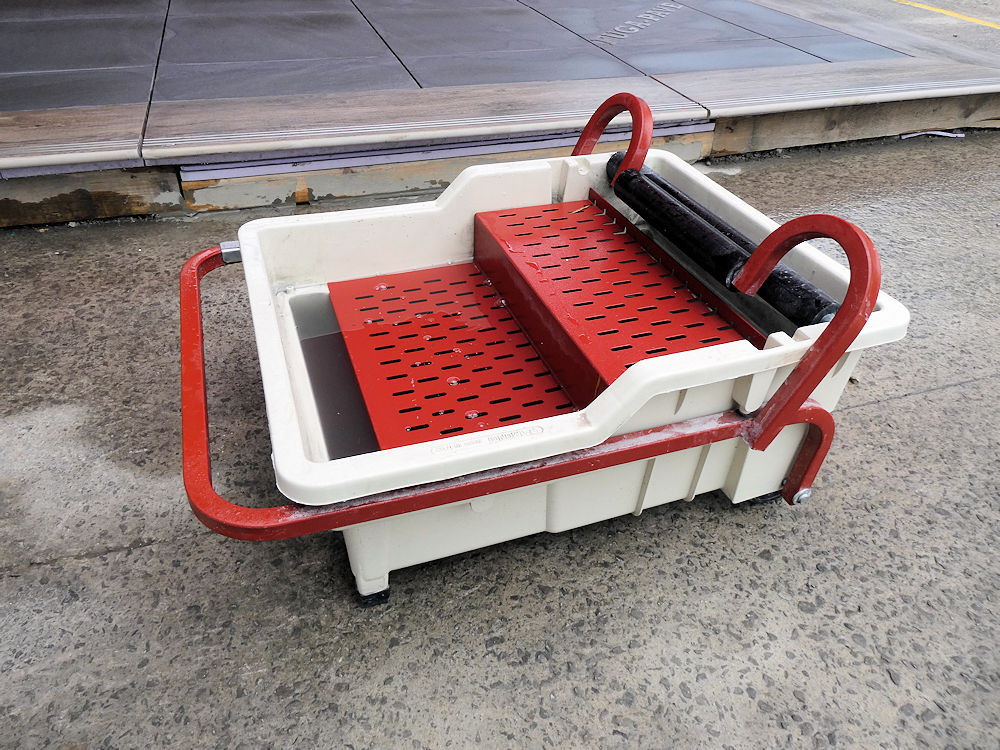
Two essential pieces of equipment will make the cleaning process simple, quick, easy, and trouble-free.
The “Pedalo” is a clever bit of kit from the indoor tiling industry. Essentially, it’s a fancy mop bucket with a neat pedal-operated squeezing gizmo attached, which is used to press excess water from the squeegee, ensuring it is at the ideal level of ‘dampness’ before cleaning the surface.
And that squeegee is also a little bit special, being a segmental sponge (individual, adjacent small blocks of high-quality sponge) developed for cleaning grout from tiling and paving, and all attached to a long handle which helps eliminate the need for bending or working on one’s knees. Both tools are available from Tilers Tools, the distributors of the FUGA PAVE System, and once used, you’ll wonder how you ever managed without them!
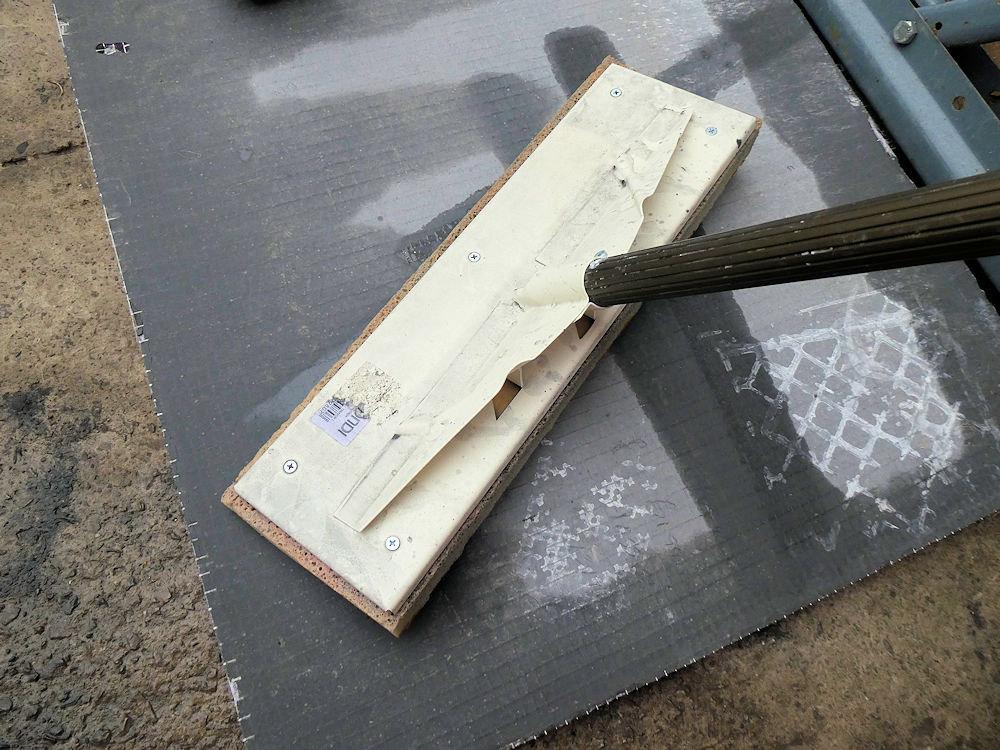
Dampen the long-handled squeegee in the Pedalo, and then use it to wipe across the filled joints. Work diagonally across the joints as this reduces the risk of removing the grout, which happens when working directly along a joint. Don’t apply excessive pressure to the sponge-squeegee: it’s weight alone has been designed to apply the ideal pressure to effect best results with each pass.

Regularly rinse the sponge-squeegee to remove the collected excess grout. The submerged grating within the Pedalo will help dislodge grout from the sponge sections, and the pedal press will then squeeze out excess water and ready the sponge-squeegee for another few passes. Bit by bit, the grout is removed and the surface becomes ever cleaner.


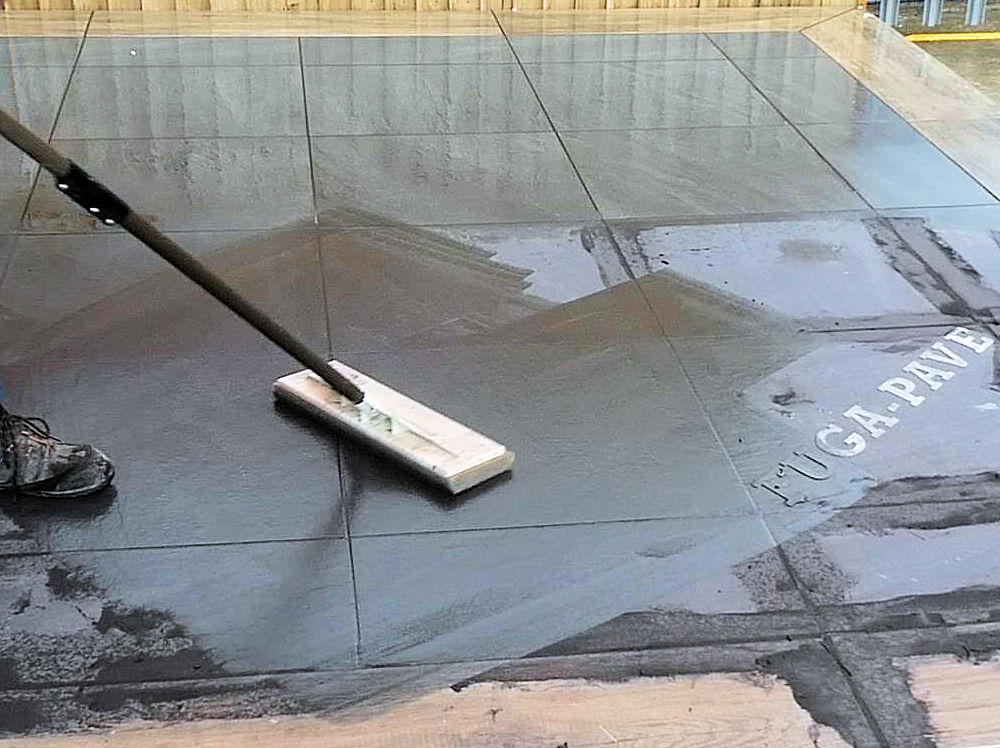
Once most of the grout has been removed from the surface, a final, single, reverse pass, drawing the sponge-squeegee towards yourself slowly and carefully, at a diagonal to the joints, will leave the paving in pristine condition. Make sure it is a single pass, just one pull of the sponge-squeegee across the surface, then rinse and repeat.
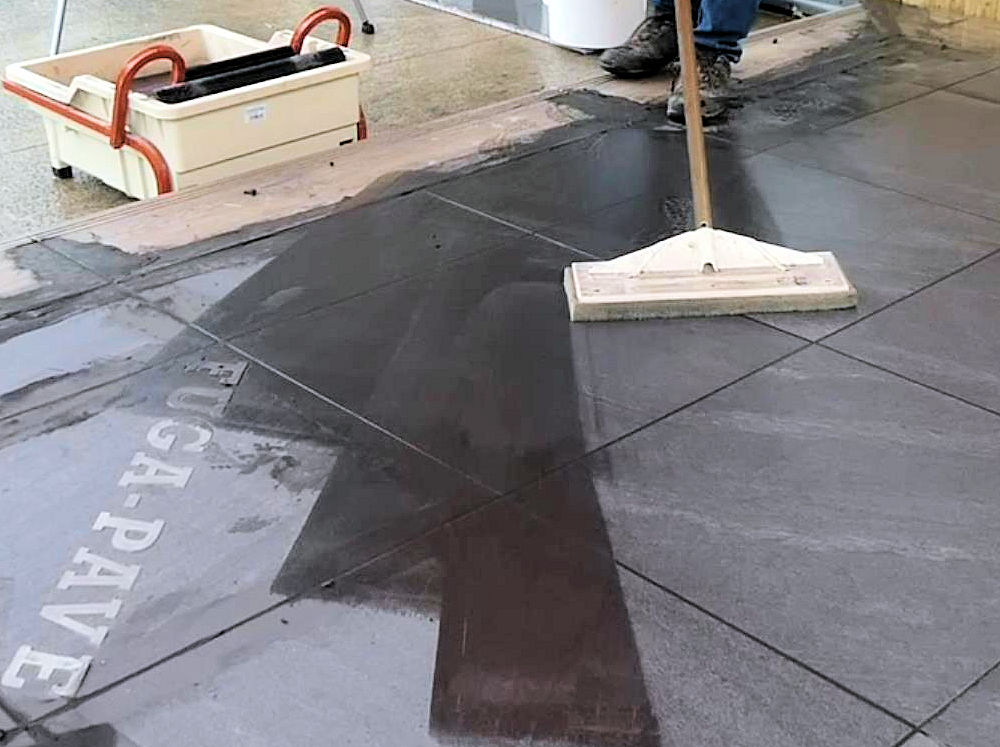
To finish off, it’s simply a matter of cleaning every part of the paving, using a hand-held sponge, if necessary, to get into hard-to-reach angles and corners, or around posts and upstands. The quality of the finished paving is dependent on how effective and thorough is this cleaning process. It’s not difficult. It’s not awkward. It’s just a matter of being patient and thorough. The end results speak for themselves…
Video:
Here's a short video recorded during the initial installation and the subsequent jointing...
Summary:
The beauty of the FUGA PAVE System is the simplicity – it’s a easy as A-B-C.
A for the Bedding: B for the Primer: and C for the Jointing.
Everything is compatible, everything is optimised for performance, everything is geared towards the best possible results from a single suite of products. Rather than being a product from an existing range tweaked to cope with the demands of the modern paving trade, it has been designed, developed and manufactured from the ground up to make life as simple as possible for today’s installers, and all at a cost that can give traditional products a genuine run for their money!
Downloads:
Further Information:

Aquacut t/a Tiler's Tools
Unit 4a,
Stretton Distribution Centre,
Appleton,
Warrington
WA4 4QT

Tel: 01565 344860


Visit Tilers Tools YouTube channel to view instructional videos.
Tilers Tools is a division of Aquacut Limited.