Uses
When laid properly, ducting will alert future excavations to the presence of a cable, and will allow replacement or additional cables to be installed quite easily. For domestic applications, such as a power feed to a shed, garage, or garden feature, 40 or 50mm diameter black or grey plastic ducting is readily available from most builders' merchants, and is relatively cheap, around 75p per linear metre.
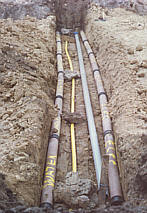
There are larger diameter plastic and vitrified clay ducts available for public works and site installations. As in the photo opposite, the ducts can be placed as a road crossing, prior to the actual road construction on new sites, thereby eliminating the need for the utility companies to dig up the road at a later date.
Most of the utility companies supply ducting to their own specification free of charge to builders and developers, or utilise an ex-stock product, such as the vitrified clay pipes and reimburse the contractor.
With the exception of water pipes, there is no standard depth for a duct, regardless of what service it may be carrying. They can be, literally, just below the surface, but are more usually 300-450mm deep or more.
Colour Coding:
Many of the utility companies use colour coded ducts to aid identification of their equipment; the colour scheme is as follows...

Blue = Water

Red = Electricity (See Note Below)

Yellow = Gas

Grey = BT/telecomms

Green = Cable TV/Fibre Optics

Orange = Railtrack - signalling

Purple = Motorway - usually lighting cables
Paul King, a director of Easigate, gate automation specialists, suggests that BS7671:2001 (aka IEE Wiring Regulations 16th Edition) should be consulted for full guidance on the use of ducts for electrical cabling. Basically, there are different requirements for cables carrying lower voltages, which would normally be channelled via a BLACK duct, while those cables carry higher voltage loads would use RED ducts.
The ducts should be buried at a depth of not less than 450mm and follow the most obvious route, such as a straight line or following the alignment of a footpath, running parallel to a wall, etc. There should also be a warning tape bearing the legend "DANGER ELECTRIC CABLE" laid directly above the duct, but only 150mm below pavement level.
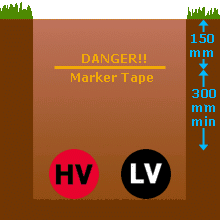
Mike O'Rourke BEng CEng MIEE, is the Technical Director of CHS Engineering Services Ltd and he comments that black ducting is normally used for all “Low Voltage” ie up to 1000v including 415v three phase supplies. Red is normally used for “High Voltage”, ie over 1000v.
He adds, "The only thing BS7671 says about buried cables is about the depth and protecting them or marking them. It doesn’t mention sheath or duct colours. Colours and locations of buried services (under pavements) are contained in the NJUG guidelines ."
Installation
Installation is simple, but requires a deal of digging. As with all excavations into unknown ground, you should be alert to any possible hazards that may be found in the course of your digging - refer to the Working Safely Page for more information.
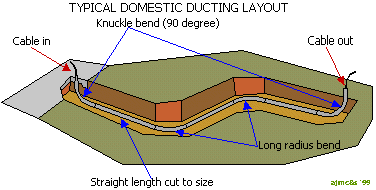
The trench for a duct should be 300-500mm deep, and as wide as you need to work within the trench, say 300-450mm. Lay your ducting out on the surface, in the position you require it to be. Use pre-formed ducting bends to create changes in direction, and then mark your planned trench with sand or similar. Dig your trenches in straight lines, and dig the curves to accommodate the pre-formed bends. Use long-radius bends whenever possible, as the cable will pass more easily through these than through tight 'knuckle' bends.
Once the trench is dug, the bottom should be covered with 35-50mm of sand, to cushion the ducting and protect it from sharp stones, etc. Thread a length of 6mm polypropylene rope through the first length, you can tie a screwdriver or chisel to the end of the rope and 'jiggle' it through the duct until it emerges at the other end. The ducting can then be placed into the trench.
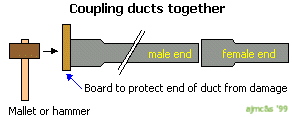
Thread the draw rope through the next length, ensuring that you are matching male to female duct ends, and then force the two lengths together, as tight as possible, by covering one end with a board or piece of timber to protect the ends, and then hitting with a mallet or hammer until driven home. Ducting is not intended to be water-tight, but tight jointing will prevent the ingress of particulates that could block the duct. Continue this process, feeding the draw rope through each length of duct as you proceed.
When all the ducting is in place, it should be covered with 100-150mm of a 'distinctive' sand. The purpose of this is not only to protect the duct but to alert future excavations as to its presence. For extra safety, a length of marker tape or tiles can then be placed over the sand before backfilling commences.
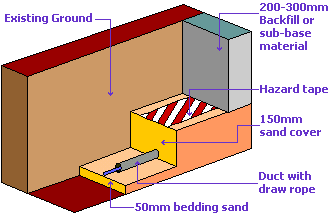
A suitable outdoor/weatherproof cable, and a second length of draw rope, is then tied to the threaded draw rope, and pulled through the ducting until it emerges at the far end. The second draw rope is left in place, in case any future or replacement cables need to be installed. The trench is backfilled and compacted with excavated material or a selected fill. Marker posts can be placed above the line of the duct, as a surface indicator, if required.
SAFETY NOTE - As with all outdoor electrical cabling, the cable must be protected by a RCD or equivalent, for your own safety. If in doubt, consult a qualified electrician.