Introduction:
Most flagstones, whether concrete or stone, have what we refer to as "straight sides", which means the plan dimensions of the face (the top) of a flagstone are identical to those of the bed (the base) and the edges are perfectly vertical. Other flags, particularly those of imported stone, feature bases smaller than the head, so the sides taper inwards. This page3 looks at the issues faced when installed flags with sides that are flared, drawn or 'sloping outwards'.
Read more about the Terms and Definitions used with Flags and Slabs


One obvious exception to the 'straight sides' norm for pavings, are the hand-cut natural stone flags , particularly those coming in from Asia, but also many of the older, reclaimed yorkstone flags salvaged from the streets and buildings of Northern England. These have "undercut sides", so the bed is actually smaller than the face, and the sides creep inwards.


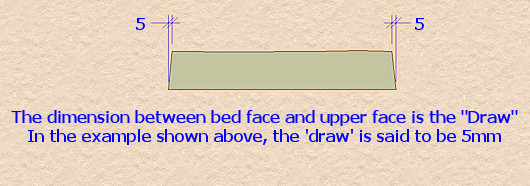
The other exception, which is less commonly seen, and mostly exists in wet-cast concrete format, is the "flared-side" flagstone, also known as "Drawn Side" flags. With these units, the bed face is actually larger than the upper face.


Read more about the the forms of arisses used with flags and slabs
Why the different formats?
The manufacturers of flare-sided flagstones and slabs would have us believe that this is a great advantage as, when the flags are laid butted against their neighbours, the flaring of the edges results in a standard width joint at the face. Many examples of flared flagstones feature a 5mm flare or "draw" which means there would be a 10mm joint width at the face, but there are some products that have 8mm flares or even more, so be aware.
The truth of the matter is that flared flags are actually much easier to de-mould. This is the process whereby the now-hardened concrete is removed from the mould that gives it shape, size and textural detail. For hopefully obvious reasons, undercut-style flagstone would be very difficult to de-mould, but even straight-edge flags can be awkward to remove cleanly and without damage from a mould. There can often be minor spalling or damage to the arisses which could result in the affected flag being binned.
Meanwhile, a flared flag, being narrower at the bottom of the mould (which is the top face of the flag) than at the bed (which is at the top of a mould, are incredibly easy to de-mould, with much less damage to edges and arisses.
A final variation of the ‘flared’ flagstone is the type of paving unit that has a lower half or base that is stepped out by several millimetres, creating a lower portion, or 'shoulder' with a square edge on which the flared edge upper portion sits, creating a paving unit that has very definite edges to be butt-jointed but presents an open joint of consistent width at the surface. This format is quite popular with certain types of ‘sett-effect’ block paving products.


How should they be laid?
Regardless, when laying flared-side or 'drawn side' flagstones, some people are confused whether it’s acceptable for the bed arisses to be in direct contact, as a variation of the ill-advised butt-jointing , or whether there should be some separation between adjacent flags.

The simple answer is that it’s all down to personal taste. When the flags are laid tight to their neighbours, with bed arisses touching, any spalling or other damage that would be a problem on the top face arisses are well-hidden at the bottom of a joint, covered over with mortar, never to be seen, so they don’t really matter.

However, when laid ‘tight’, flared-edge flags have a joint width of practically zero at the base and this can be problematic for the jointing medium. Cement mortars, in particular, are fragile when there is less than about 6mm width. The mortar, in effect, isn’t strong enough to hold itself together. The same can be true with some of the resin mortars, particularly the one-part polymerics and some of the more coarsely-grained two-part mortars.
With cement mortars, it may be possible to overcome any fragility by using a strengthening additive, such as SBR mixed in at the time of preparation, but for a really solid joint, it’s probably better top spread the flags a little and so ensure the lower end of the joint is at least 5-6mm in width.

For those that prefer a slightly wider joint, it’s perfectly fine to space the flags further apart and create a 12mm or 15mm joint at the surface, if that’s your preference. Be aware that overly-wide joints can look bloody awful when pointed with a mortar, so try not to have joints wider than around 18-20mm.
In situations where wider joints are required, filling the ‘gap’ (I’m reluctant to refer to anything more than 25mm wide as a ‘joint’) with an alternative medium, such as decorative gravel, can work quite effectively.