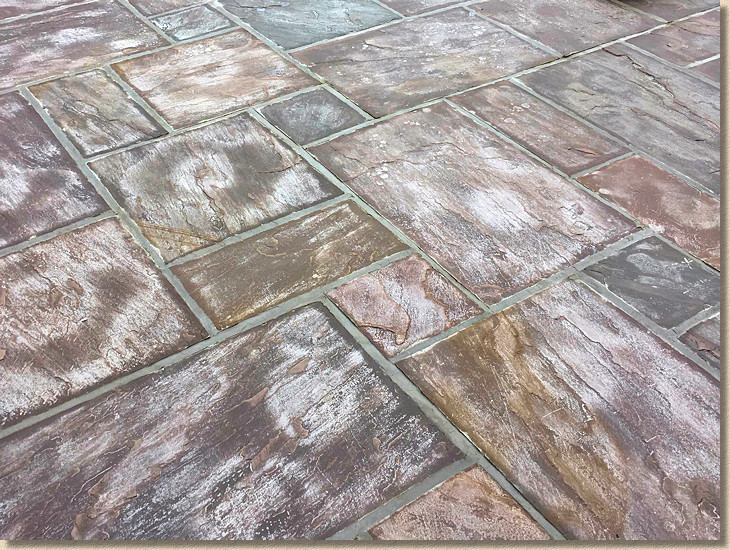
Introduction:
There are four main reasons why sealants go wrong when applied to paving:
- 1 – there is residual moisture within the paving
- 2 – it rained/snowed/drizzled/precipitated during or just after applying
- 3 – it's the wrong type of sealant for the paving
- 4 – the paving wasn't prepared properly
There are other reasons, such as not following manufacturer instructions *to the letter* , rain too soon after application, dodgy contractors diluting the sealant to extend the coverage and save money, and applying a good sealant to a badly or incorrectly installed pavement, but the four key reasons stated above do seem to cover around 80% of the failures reported to this website, and the first one is, by far, the most common.
1 - Residual moisture:
If only I charged a tenner every time this problem came up on the website. I could retire in a life of luxury!
With the exception of some water-based sealants, most acrylic, Polyurethjan (PU), monofluoroethane and silane/siloxane sealants really don't get on with water until they have cured, and most installation guides will state that the paving should be dry before applying the sealant.
Sadly, too many people believe this means that only the surface of the paving should be dry. Or sort-of dry. Ish.
The manufacturers really should make this clear: the whole upper layers of the pavement need to be completely dry. That's the surface of the paving, the interior of the paving, the bedding and, importantly, the jointing. If there is moisture within the paving units, within the bedding or within the jointing, it will wick its way to the surface via capillary action and react with the uncured sealant.
As another rough-yet-reliable rule of thumb, all paving should undergo at least three consecutive bone-dry days during summer, and five during the cooler months, before applying any sealant.
Where mortar or cementitious bedding has been used, three days in summer is the minimum period required for the material to cure and for any residual moisture to be driven off. The same applies to cementitious or resin jointing – minimum three days to cure and to dry out. In the cooler months, it takes longer because the ambient temperatures are lower and the evaporation needed to drive off moisture is nowhere near as powerful.
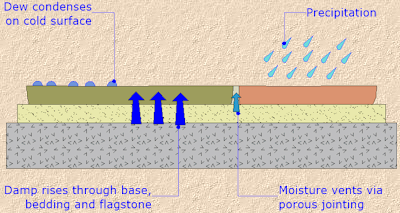
Where unbound bedding has been used, it may need less than three days to dry adequately, but is it worth risking it for the sake of 24 hours or so? And trass bedding should be treated the same as a cement mortar, so three days.
The paving itself needs to dry, both on the surface and internally. Different types of paving will dry out at different rates, but generally speaking, most residential paving exposed to three good drying days (five in cooler months), with no precipitation, no dew, no accidental sprinkling by the hose pipe, will be adequately dry for sealing purposes.
Many of the better quality two-part resin jointing mortars rely on the paving being saturated with water prior to the joints being filled. Not just wet, but dripping; saturated in the true sense of the word, where no additional water could be absorbed by the units. On such projects, even in high summer, be aware that it may take more than three days for the paving and the sub-layers to adequately dry.
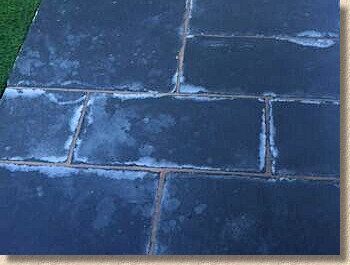
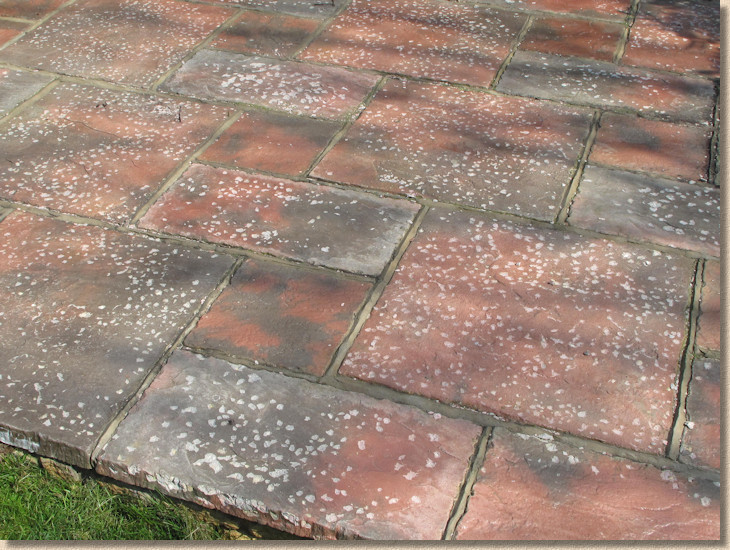
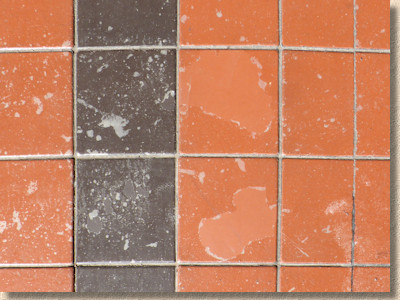
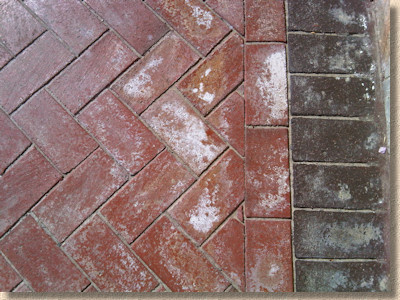
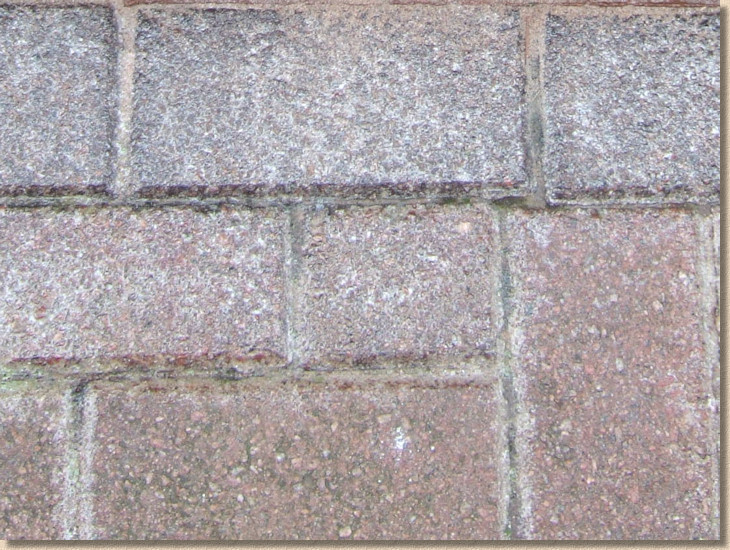
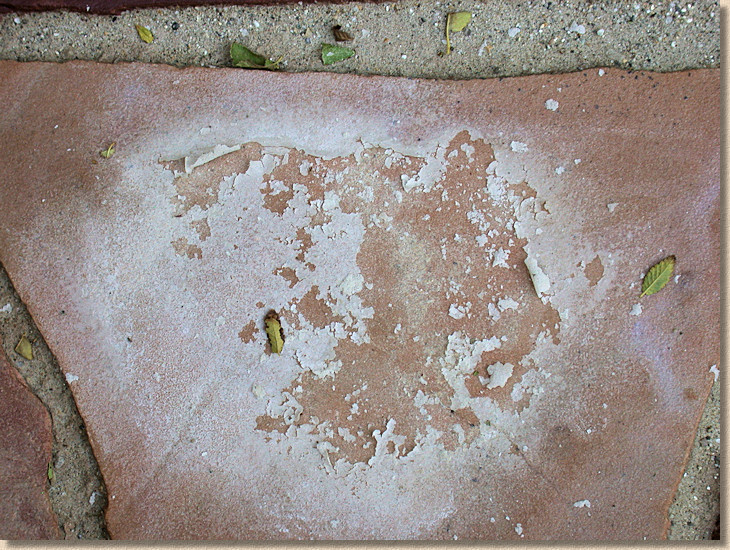
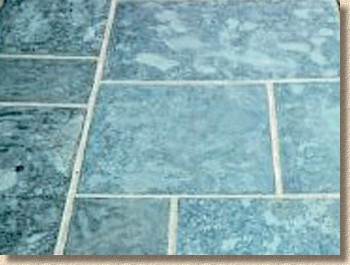
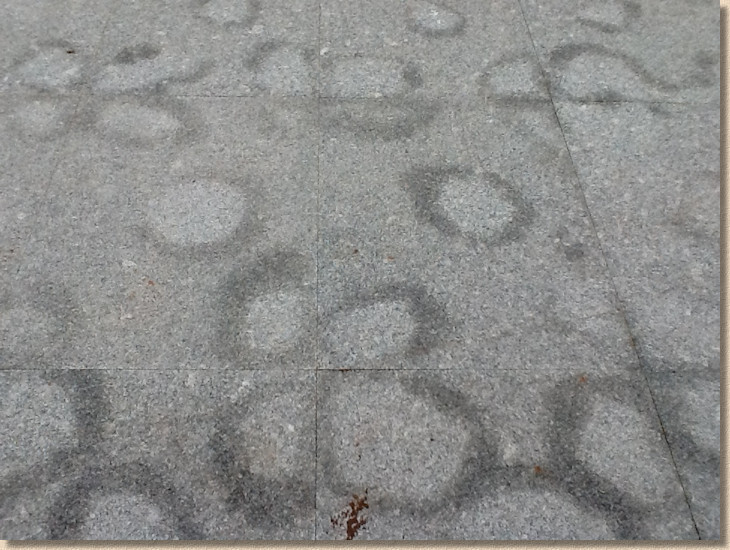
Moisture reacts with many sealants, regardless of type, and this is usually displayed as blotches, or as a cloudy discolouration or 'milkiness' to the finished appearance. In the vast majority of cases, this is a permanent and irreversible effect. The sealant is effectively ruined and that, in turn, usually ruins the appearance of the paving.
It does not, in most instances, adversely affect the structural integrity or performance of the paving. It's purely aesthetic although the service life of the sealant might be impaired, meaning that it may need re-doing or replacing sooner than should be expected.
It is sometimes argued (usually by contractors responsible for milky sealants) that because the performance and 'fitness' of the pavement is not adversely affected, there should be no claim made against them when a sealant fails in this manner. This is not correct.
Most residential paving is required to be decorative and attractive, as well as functional. When that decoration or attractiveness is spoiled, the pavement no longer meets the homeowners' understanding of 'fit for purpose'. Had a stained, spoiled or ugly pavement been required, it could usually have been obtained at much lower cost.
With residential paving, appearance is as important as functionality. Consequently, a decorative pavement that has its appearance impaired by a faulty application of sealant is not fit for purpose, as defined by consumer law.
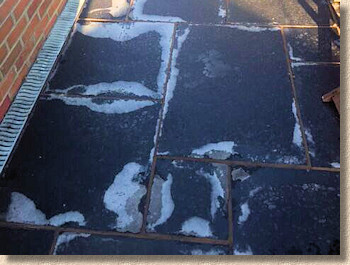
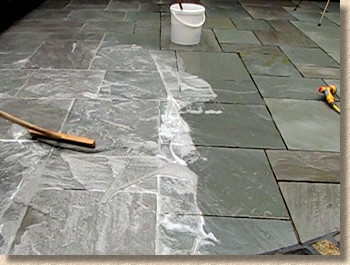
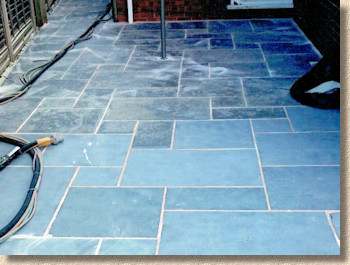
Sealant applied to black limestone while the mortar jointing is still fresh. The sealant around the jointing has turned milky and is starting to peel
2 - Rain
For all of the reasons outlined above, it should now be apparent that moisture and sealants make poor bedfellows. While it's often moisture *within* the pavement structure that does for a sealant, there are far too many instances of sealants becoming ruined because someone forgot to read the installation guidance and/or the weather forecast, and the heavens conspired against them.
Whether it rained during the installation, or it rained in the first 24 hours, the result is a mess. A heavy downpour will devastate a freshly-sealed pavement, and a shower will often cause intense 'spotting'. Even a light drizzle can, and often does, cause a milkiness to the finished result, and there have been cases where an overnight fog, mist, or dew has wreaked havoc.
The simple rule is: don't use sealants when there is any chance, however remote, or rain, drizzle, fog or even a brief shower. It WILL go wrong!
3 - Wrong Type of Sealant:
Sealants are sealants, aren't they? How can it be the wrong sealant?
If only it was that simple!
As explained elsewhere on this site , there are sealants which aim to be a Jack-of-all-Trades, and often fail miserably, and there are sealants that have been specifically formulated to suit certain types of paving, whether that's porous stone, impermeable stone, pressed concrete, cast concrete, fired clay or pattern-imprinted concrete.
The Jack-of-all-Trades, by definition, have to target the lowest common denominator, which means they claim to be suitable for any surface, regardless of its porosity, its usage, its chemistry (or petrography) and its age. Just daub it on and hope for the best.
To be fair, there has to be a real mismatch for a sealant to go dramatically and visibly wrong when applied to a less-than-ideal substrate. Some of the heavy polyurethane (PU) sealants can look waxy, yellowish or even cloudy when applied to less porous paving such as clay pavers, porphyry or some decorative concretes, while some of the one-size-fits-all acrylics can all but disappear or go 'blotchy' when applied to really thirsty stone, such as some of the imported sandstones.
As a rough but reliable rule of thumb, for more valuable or prestigious paving, a specialist sealant formulated for use with that particular type of paving is always the better choice. For budget projects, for areas of paving that are of lesser importance, or for simply extending the life and/or looks of an older project, a 'generalist' sealant may be appropriate.
4 - Ill-prepared Paving:
The third major cause of problems with sealants is a failure to properly prepare the pavement prior to applying the chosen jollop.
As with so many other tasks in life, the key to success is preparation, and failure to thoroughly prepare the paving is essential if the sealant is to form a proper bond with the surface and provide years of reliable protection.
All paving needs to be clean, free of dust, grease or any other contaminants. Problems often arise because some contaminants are difficult to see with the naked eye, and the amateur DIYer or lazy, rushed or untrained contractor often fails to understand just what is meant by "clean and free from dust".
Natural stone paving often has a layer of very fine dust clinging to its surface, so fine that it can be practically invisible. This dust comes from the environment, and some is a consequence of the actual installation works, but most of the superfine dust comes from the processing of the stone. As stone is quarried, sawn, trimmed, fettled, textured and all the other processes it undergoes before arriving on the job, teeny-tiny particles of stone are generated and some of these lodge themselves onto the freshly exposed stone surface.
Some stones and certain processes are more prone to creating a dust coating than others. Softer sandstones often churn out more dust during processing, while some limestones act like magnets for a fine lime dust that is almost impossible to see. Dust that was part of the wet slurry used during processing of polished or honed stone often coats the prepared surfaces, and while the really heavy deposits can usually be seen, it should be assumed that it is present on all such processed stone, even if it looks superficially clean.
If dust is the bane of natural stone paving, efflorescence is the biggest problem for concrete paving, and can also affect any paving bedded on, or jointed with, cementitious material.
As explained elsewhere, efflorescence is endemic with most concrete or cement-bound materials, whether it's block paving, wet-cast flagstones, mortar bedding or sand-and-cement jointing. Given enough time, it does dissipate, but there's no sure way of predicting how much time. It's a matter of wait-and-see.
The generally accepted advice is that any cement or concrete paving should be given at least 12 weeks (3 months) to allow efflorescence (or the worst effects of it!) to weather out. The same thinking should also apply to any paving that is bedded on or jointed with a cement mortar.
Note also that clay pavers, for completely different reasons, is also affected by a 'leaching' problem similar to (and sometimes mistaken for) efflorescence. In this case, it's an emanation of alkali salts which are drawn out of the fired clay as water evaporates, and often washed back in when the paving is repeatedly wetted, which is why the symptoms seem to temporarily disappear at certain times.
While the chemistry may be different, the treatment should be the same: don't seal until the 'bloom' has gone for good. Actually, there has to be very, very good reasons to seal clay pavers in the first place. Of all the manifold forms of modular paving, clay pavers are the ones least in need of a sealant!
So: to ensure paving is properly prepared, clean and free from dust, it needs to be cleaned before sealing.
Cleaning generally involves washing down with water, and possibly some form of detergent. The fact that water is needed immediately send us back to item 1 above: the critical need for paving to be dry prior to sealing. So, thorough preparation takes place some days before applying the sealant (usual exceptions apply for water-based sealants.)
It's not simply a case of washing down the paving in the morning, letting the surface dry over lunch and then slopping on the sealant in the afternoon. The paving MUST dry thoroughly (see above ).
What else can go wrong?
Oh! Where to begin? There are so many causes of problems with sealants. Some are obvious, when you think about it; others are almost beyond imagination.
Over the years, hundreds of site users have reported issues with paving sealants, problems that arose before, during and following installation. The most common have been detailed above, but just to give a flavour of what else can go wrong….
- Unseen oil contamination
- Visitors/children walking across uncured, freshly-applied sealant
- Bird droppings
- Pet fouling
- Overly heavy application (pooling)
- Neighbour washing car and accidentally spraying new sealant
- Dust storm peppering tacky surface with grit and detritus
- Litter blowing onto surface
How to put it right:
There is no magic fairy dust that can be sprinkled onto failed sealant to make it right. Regardless of what a contractor may say, simply applying more sealant over the top of a bad coat will NOT rectify the situation. In fact, all it will do is preserve the bad coat making effective rectification even harder.
When a sealant has failed, for whatever reason, the only fix is to remove it, or to remove the paving it has ruined.
Using a solvent:
Most sealants will have a solvent which can be used to loosen and/or liquefy the original coating, rendering it easier to mop up or rinse away. Different sealants have different solvents used in different ways. There is no single methodology which works 100% of the time on 100% of sealants. Advice should be sought from the sealant manufacturer.
Many acrylic sealants use xylene as the solvent, while polyurethanes often need something much more aggressive such as Dichloromethane (AS10) or N-Methyl-2-Pyrrolidone (NMP) , which are not particularly pleasant and should be used with extreme caution. Water-based solvents are much harder to shift. Too many manufacturers suggest trying Caustic Soda, despite knowing that it will do very little, if anything at all. Some need an aggressive acid to loosen the sealant, but this can have a deleterious effect on the paving beneath, so might not be the best option.
With so many different sealants on the market, it's not possible to give a comprehensive list of possible solvents for every product. It's always best to contact the manufacturer and seek their advice as a first resort, even though it might not be particularly useful.
A preferred choice of 'stripper' for one of the regular users of this site is Mira-Strip which can be bought online and is said to work with many of the more popular sealants used in Britain and Ireland.
Using brute force:
When it's impossible or impractical to chemically remove the sealant, the next stage is considering either removing it by mechanical means, such as high-pressure water jetting or shot blasting, or even replacing the paving units completely. As daft as it sounds, with shot blasting working out at up to 50 quid per square metre (or even more on smaller jobs) it becomes more cost effective to replace the paving units themselves, which may only cost 10 or 20 quid per square metre (plus the cost of labour, bedding and jointing, obviously) and so becomes a viable option in some circumstances.
High pressure water jetting and/or precision shot/sand/grit/bead blasting has to be undertaken by specialists.
Some cleaning companies will undertake a free or 'low-cost' trial on a small area first to determine whether their method of cleaning will actually work. Oftentimes, if the brand or type of sealant is not known, or if it's a deeply penetrating sealant/colour enhancer, even high pressure blasting with water, grit or shot might not be enough.
Before re-sealing:
Once the bad/failed/crap sealant has been removed, there's no point in applying a new sealant unless you are certain the paving is in pristine condition.
As should be obvious from what has been discussed above, the paving must be bone dry, but even before that stage is reached its's worth checking other aspects of the pavement.
- - The jointing should be sound throughout, with no cracks, loose, crumbling or missing sections.
- - The surface should be dust free
- - The surface will probably benefit from a thorough cleaning with an *alkaline* specialist cleaning product.
- - - - Check that the cleaner is NOT acidic or acid-based before use
- - - - Look for products such as Grundreiniger or Mira-Clean
When all else fails:
You either learn to live with what you have or you fork out again to have it taken up and replaced.
In some cases, it may be that there is a claim against the sealant installer (if it was applied by a contractor), but be aware that many small one-man-band contractors and odd-job landscapers (rather than professional paving installers) may not have adequate insurance cover to protect them from a claim and so they have a tendency to become aggressive, deny any responsibility, or to disappear completely from the face of the earth (mainly by not answering your calls and emails).
Remember, many sealants have a limited lifespan. Even the very best of them don't last forever, so it may be that in two, three, five or so years, the upsetting appearance will have weathered away. Maybe you can put up with it until then?
However, the last resort really is, as Edwyn Collins and Orange Juice said back in the 1980s, 'Rip it up and start again'. Generally speaking, most customers are exceptionally wary when it comes to sealants the second time around!
An extensive independent and impartial trial featuring 24 different sealants has been carried out by pavingexpert.com.
The procedure and results can be read starting at this page - Sealant Trials