Introduction:
Let's start with a pictorial definition....

Edge courses provide a number of functions in a properly constructed block pavement. These functions can be divided into the structural, the functional and the aesthetic.
Structural:
- They form the restraining edges for a pavement
Functional:
- They eliminate the need for cut blocks at the edge of a pavement.
- They can be used as level guides for preparation of the screeded bed
- They facilitate cutting-in procedures
- They can act as drainage channels, directing surface water to a suitable disposal point.
Aesthetic:
- They form a frame to the pavement that gives it definition and shape.
As a retaining structure:
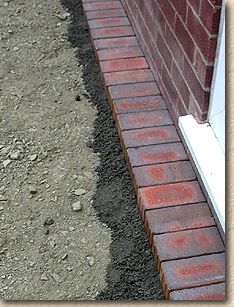
This is the primary function of the edge courses, yet, on many pavements, the edge courses are not actually a retaining structure at all, but are included for one or more of the other reasons given above. A good example of this is when the edge course lies against a wall or a kerb. In such a scenario, the wall, being a fixed and immovable object, provides the restraint on the pavement and the edge course is there for functional and/or aesthetic considerations, not for structural reasons. Similarly, when a kerb is present, that may be the actual agent of restraint rather than the edge course units.
So, we have two main structural designs available: a true retaining structure for use with free edges , and a simpler non-structural but decorative option for use where some other fixed structure provides the restraint.

The key feature of the retaining edge course is that it must be capable of withstanding the lateral pressures exerted by the pavement and its traffic. There are a number of ways of achieving this, but the most commonly used method in Britain and Ireland is to use a mass concrete bed and haunch. Other options are considered on the alternative edgings page.
The concrete bed holds the edge units in a fixed position in terms of surface level and adds mass to the retaining structure. The haunching holds the edge units in a fixed position in terms of lateral movement, and also adds mass to the retaining structure.

The bedding for an edge course should be not less than 75mm in thickness, although this can be reduced when the edge course is not a retaining edge. Where an edge course will be trafficked by vehicles, such as at the threshold with a public footpath or highway, or at the entrance to a garage, we would recommend that the bedding should be not less than 100mm thick, and should be a concrete with a strength of approximately 20 Newtons (approximately a 1:2:4 mix). For a fuller explanation of mixes and strengths, refer to the Concrete Mixes page.
The haunching should be not less than 75mm in width and should extend to within 15-25mm of the top surface of the unit to allow for soil cover or dressing with decorative aggregates.
Ideally, the bedding and haunching should form one mass, with no construction joint (day joint) between them. This gives a stronger structure. Where a construction joint is unavoidable, then the surface of the bedding should be roughened prior to placing of the haunching in order to ensure there is a good 'key' between the two, thereby maximising the bond.
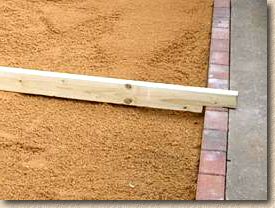
In situations where the edge course is not a restraining edge, laying the edge units onto a cementitious bed has the advantage of ensuring that the units can be accurately laid to the required surface level and alignment prior to laying the body of the paving. Once the bedding has hardened, the edge units can be used as a guide and an invaluable aid to screeding of the bedding layer, without fear of disturbance. In our experience, we find this to be of greater benefit than relying on screed rails or other temporary measures to establish the screeded bed.
Refer to the Laying Concrete Bedded Edgings page for a guide to the methods involved in laying edge courses.
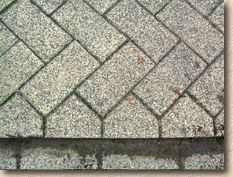
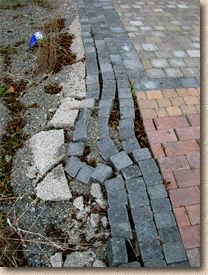
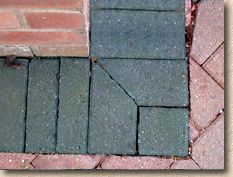
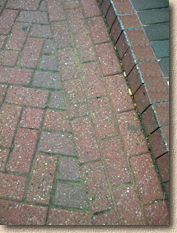
Unacceptable Construction
Some contractors are known to lay the edge units onto a screeded sand bed and then add haunching. This is often done as policy to make the edge course fit the paving rather than the paving fit the edge course, and is generally a good indicator that the contractor has little or no understanding of the principles involved in block paving.
Using this type of haunch-only construction is bad practice and should be rejected if encountered on a block paving project for the following reasons:
- It does not comply with the requirements of BS7533 Part 3 Clause 4:2:1 which states that edge courses must be " sufficiently robust to withstand override by anticipated traffic...and to prevent loss of the laying course material. "
- It further fails to meet the requirements of the above Standard which goes on to state that edge restraints should "present a vertical face down to the level of the underside of the laying course.”
- The concrete haunch is generally too thin to support itself and is liable to crack and/or break up if subjected to pressure.
- There is insufficient mass in the retaining structure to restrain the paving.
- The bond between the haunching and the edge units is a weak joint that is easily broken, allowing the edge units and the haunching to separate and thereby compromise the structural integrity of the edge course.
- The laying course material is not contained, and can escape by being washed out by groundwater, for example.
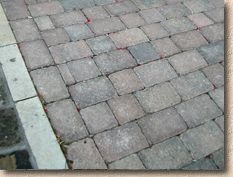
In many cases where the edges of a block pavement have collapsed, as in the photo above, it is because the edge blocks were laid on a sand bed and the haunching was a token gesture at best.
There are no excuses for this type of workmanship. It is shoddy and would not be acceptable under site conditions. If your contractor uses this method insist that the work is taken up and laid properly.
This problem is examined further on the Edge Courses:First or Last page.
Eliminate cuts at pavement edge
This function of an edge course is fairly self-explanatory. By using full blocks (or other units) to form the edge course, there is no risk of having small or cut pieces of paving at a free edge, where they are more likely to work loose.
Screed Guide:
As mentioned above, properly bedded edge units make an excellent guide to screeding of the bedding layer.
Assuming the edge units have been hammered down to the finished level on a cementitious bed, they are unlikely to move, even while the concrete is still relatively plastic . A screeder board can be prepared, as described on the Screeding page , and by keeping the notched end of the screeder board in contact with the surface of the edge units, a highly accurate bed can be prepared.
Cutting Aid:
A lesser known benefit of an edge course is that they make the process of cutting-in much, much easier.
Consider, first, a section of pavement with standard edge courses. All the full blocks have been laid and it is now time to cut the blocks to fit in at the edges. As described on the Cutting-in page , the blocks to be cut are positioned where they are to fit and the line of cut marked onto the surface of the block, so that the block can be taken to the splitter or saw and accurately cut before final fitting.
However, where a pavement lies adjacent to a fixed structure, such as a wall or a lighting column, then it's just not possible to position the block directly over the gap, as the wall (or whatever it is) is in the way.
And with a free edge, the edge to be cut would need to be laid out, and then marked using a taut string line or a straight-edged rule to guide straight lines, and an accurate eye to guide arcs and curves.
It's far easier if an edge course is in place!
As drainage channels:
Some pavements, particularly those for commercial or industrial projects, are constructed with a camber, and so the main body of paving is shaped to drain towards the edges. These edges need to be accurately laid to ensure that they direct the surface water to a suitable disposal point, such as a gully or linear drain . Even on smaller pavements, laying the edge courses to pre-determined falls and levels can help ensure that the completed pavement will drain, and that there will be no puddles or standing water.
Edge courses can be formed using, for example, dished channels or even linear drains, but, in most cases, standard blocks will be used, and so, by laying these on a concrete bed and haunch, their role in directing surface water and generating the correct falls within the body of the pavement can be assured.

Where an edge course lies against a wall, it can be laid with a slight crossfall to ensure that the surface water runs along the joint between the edge course and the paving body, rather than against the wall. With double or triple channels, the blocks can be profiled to create a shallow channel.
Pavement Frame:
Although it's easy to write off this function of an edge course as being a fancy detail, the difference made by using a contrasting edge course should not be overlooked. By establishing firm and definite edges, the eye can be tricked into believing the paved area looks bigger than it actually is, and the paving as a neat and tidy look to it.
There are three main methods for creating a contrasting edge course:-
- Use a contrasting colour, such as charcoal with brindle
- Use a contrasting pattern, such as a soldier course with a 45° herringbone
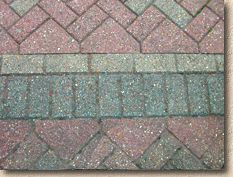
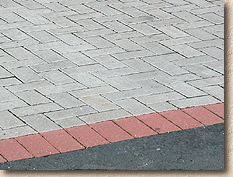
- Use a contrasting material, such as a granite sett with a standard 200x100 block
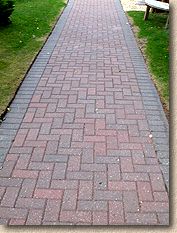
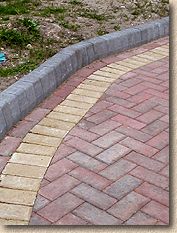
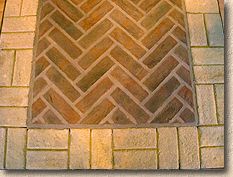
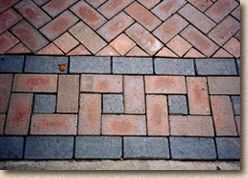
These methods may be combined, so that,, for example, a contrasting colour AND pattern can be used - this is the basis of the most popular driveway choice, namely a 45° herringbone in brindle with a 200mm wide charcoal soldier edge course, shown opposite.
Or a contrasting material in a contrasting colour can be used, maybe a tumbled charcoal/dark block to form the edge course with a red standard block for the body.
Or even a completely different material to form the edge course. Granite setts could be used, or strips of yorkstone flags - as long as the edge is firm and secure, anything can be used.
However, if the end-user wants to avoid any form of contrast, there's no structural or functional reason why the same colour, same block laid in the same pattern can't be used to form an edge course - there's no accounting for taste!
Popular Choices
There are a number of 'standard' layouts for edge courses. The most popular choices are shown below, but this is by no means a comprehensive display.
Soldier Courses
Although some people mistakenly refer to all edge courses as "Soldier Courses," a true Soldier Course features a single course of blocks all laid in the same orientation, with the blocks adjacent to each other, stood up straight like a line of soldiers - hence the name!
Soldier Courses offer a contrasting pattern, as very few block pavements would be laid in the matching layout (known as 'Stack Bond'), and are very simple to lay and reasonably simple to detail, as shown on the detailing page.
Here's a selection of Soldier courses...
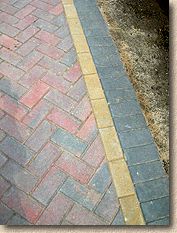
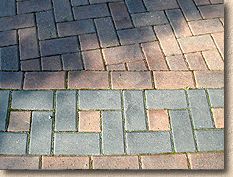
Although Charcoal is probably the most popular choice for a contrasting edge course with brindle paving, buff is a popular second choice. On this driveway, a buff soldier course has been separated from the charcoal kerb (the alignment of which leaves something to be desired!) by a 100mm stretcher course of the brindle block.
Here's a variation of the standard brindle and charcoal option. By introducing a 100mm wide line of buff blocks, the contrast is enhanced and the whole job looks a little bit classier.
A double soldier course using charcoal and buff. Having such a relatively wide edge course can look out-of-scale on some jobs, but it's a nice detail on larger pavements.
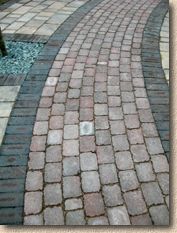
This is a clay paver pathway at a large shopping centre and a double soldier in contrasting colours has been used to emphasise the styling.
Note how the path gently curves to the right, and that the red and blue soldier courses contrast in both colour and format from the multi-sized brindle pavers that have been used as the body.
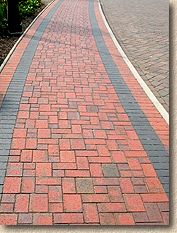
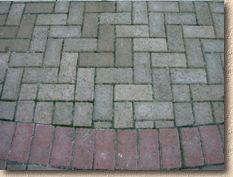
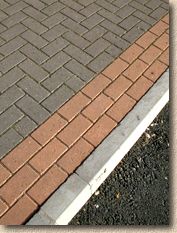
After brindle, red is the most popular choice for the main colour on a driveway, and the contrast between the red and the charcoal of the edge course is very striking.
By using a red kerb, the colour scheme is maintained and the charcoal soldier course is emphasised even more.
Natural coloured block paving is not normally used for driveway projects in Britain, its main market being utilitarian commercial projects where the performance and convenience is the only consideration, and the few pence per square metre that can be saved by using a non-coloured block can add up to a respectable amount of dosh when you've several thousand square metres to cover. However, by using a red soldier course, what would have been a terminally plain and uninteresting pavement has been given an enormous lift.
Some combinations seem, to my eye at least, to make strange bedfellows. This red soldier course with a multi-brown block is a prime example of such a mismatch, but someone must have thought it was a good idea!
Detailing Soldier Courses
Soldier courses are very simple to detail, and it's the level of detail put into a block pavement that promotes an average job to a classy, professional job. The principles behind the detailing features are given on the Detailing page , but these images are included here to show what is possible.
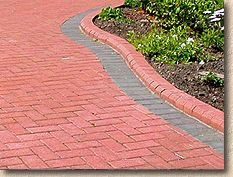
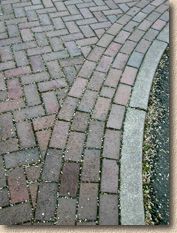
Curves:
When a soldier course is laid to a curve, the block may need to be cut to avoid overly wide joints. The joint width is determined by the size of the radius, with faster radii resulting in more open joints. Generally, any radius of less than around 2 metres will need the blocks to be trimmed to avoid glaringly wide joints.
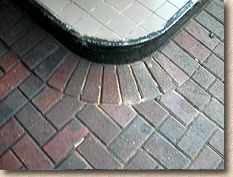
Mitres:
And when two soldier courses meet at a 90° corner, then they should be mitred to form a neat corner detail. The mitre shown in the photo on the right only works with 90° angle, although it can be adapted for use with angles from 70° to 110°. For other angles, standard mitres (left) are preferred.
Stretcher Bond edge courses
Stretcher bond is the second most popular choice of pattern for edge courses. Again, they are simple to lay, and quite distinctive. However, they are harder to use with fast radii, although mitres are very straightforward.
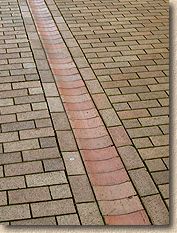
A single stretcher laid against a dished channel. In such a situation, a double stretcher or a soldier course to each side of the channel would have resulted in an overly wide band of paving, distracting too much from the main body.
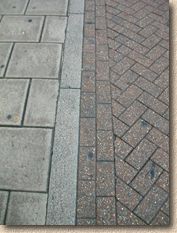
A double stretcher edge course is seen in this example from a pedestrianisation scheme. Double Stretcher courses are the most popular version of the stretcher edge course.
A triple stretcher edge course. Edge courses wider than 200mm are generally better suited to larger projects, such as car parks or small access roads, where they invoke the memory of the standard 3-sett channel that is found on many sett or cobble pavements.
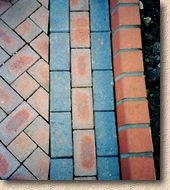
A variation on the triple stretcher edge course is to use two different colours. In this example, from a clay paving project, blue clay pavers have been used for the outer courses, with a single brindle course down the centre. This contrasts well with the brindle body paving, and the Accrington Red kerb units.

A sharp contrast - using charcoal with a buff paver brings a high level of definition to an edge course, as seen with this 200mm double stretcher edge course.
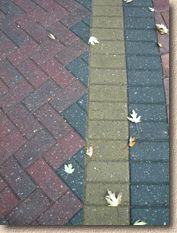
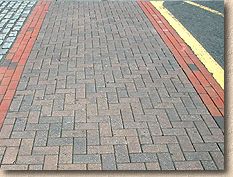
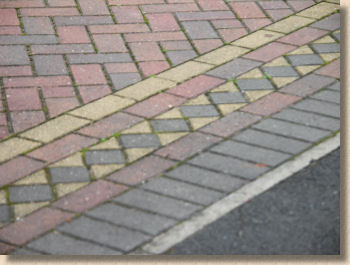
A multi-red clay paver in a 3-wide stretcher band has been used as the edge course to this concrete block pavement. The strong contrast between the strong red tones of the clay paver and the muted colours of the multi-brown concrete paver emphasise the pavement as being distinct from both the asphalt surfacing of the main carriageway and the sett paving on the left-hand side. This pavement is intended to be used as a pedestrian crossing point at the entrance to a bus station.
Another triple stretcher course, using marigold (buff-orange) blocks to contrast with the charcoal body of the pavement.
A quadruple stretcher edge course is about as far as is reasonable for an edge course. In fact, there's a case to be made for laying only the outer two courses as a trued edge course and then laying the inner two courses as part of the body of the pavement.
Basketweave Edge Course
This choice of patterning is rarely seen, but it's an interesting choice for pavements with rectangular or orthogonal layouts. It's easily adapted to mitres, but curves, particularly the faster arcs, are difficult to lay out in this pattern.
Tumbled Paver Edge Courses
With tumbled pavers, the usual edge course choice is a single course of one block size. Most of the tumbled blocks available in the UK and Ireland come in a number of sizes that are mixed when laid to give a random layout, but the multi-colours don't offer much of a contrast. By using a single size, laid longitudinally, a contrast can be achieved.
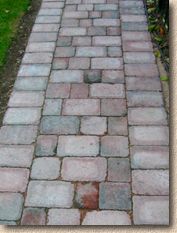
Where a tumbled paver has been laid longitudinally to a narrow path, as in this example, using a contrasting brick laid as a soldier course, that is, lying transversely, will help accentuate the contrast....
...and conversely, where the body of a tumble-block pavement has been laid to a transverse stretcher course, using a single block edge course with the blocks laid lengthways will emphasise the difference.
Other Details
Obviously, it's not possible to show every edge course on a website such as this, but the above has, hopefully, given a taste for what is possible. However, there are just a couple of other detaiuls that are worth mentioning in conjunction with edge courses...
Decorative Edge Courses:
This layout is sometimes known as a 'Dutch pattern' and it's an attractive choice to use as an edge course at the threshold of a driveway or pavement. In this example, a charcoal block has been used with brown-multi.
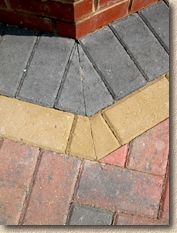
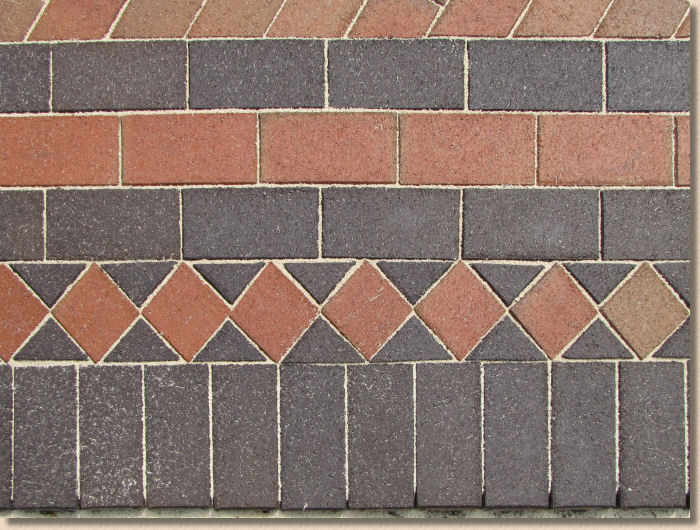
Harlequin Edges:
A detail that is normally reserved for thresholds as it is visually striking but quite demanding in terms of time and skill. In Europe, where pre-cut triangular pieces are often available 'off-the-shelf', a simple version of the harlequin edge is sometimes used at other perimeter positions, but in Britain and Ireland, where we have to cut all those pesky triangles ourselves, it looks best as a standalone feature right at the front of a driveway, or when bounding feature panels within a larger area of plain paving.
Starter Blocks
When a 45° laying pattern is to be used, a special starter block, known as a "Bishop's Hat" can be used to ensure accurate setting out and reduce the amount of cutting required. Use of these blocks requires highly accurate setting out and there are a few tricks to their use that will be covered on a separate page (eventually).