Introduction:
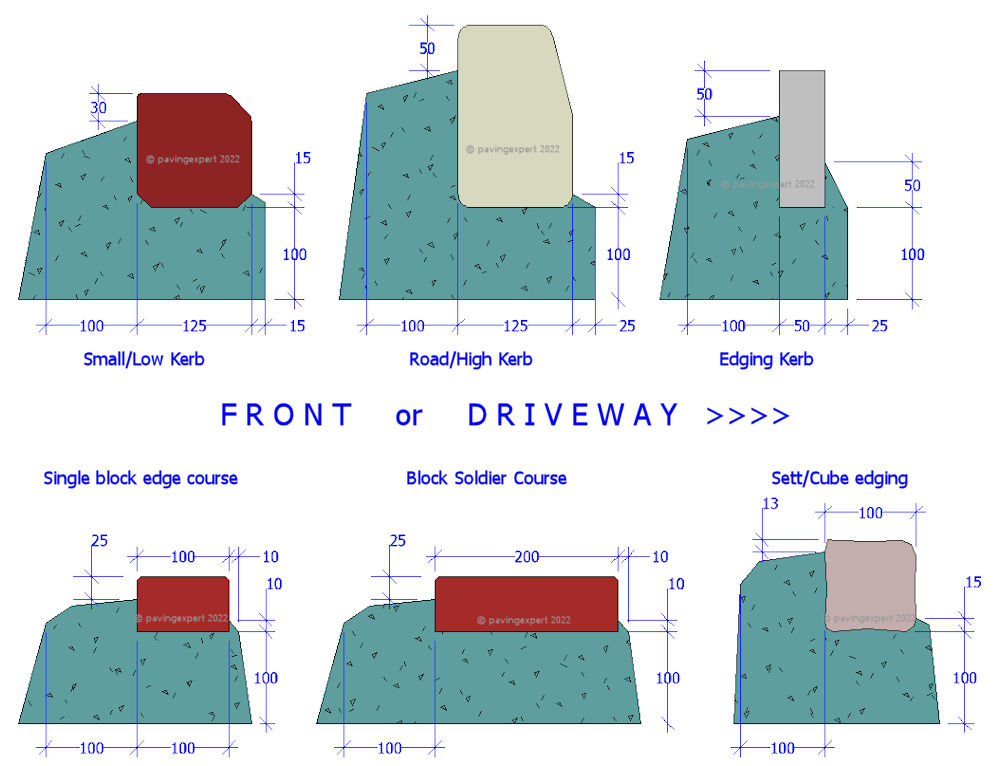
Concrete bedded edge restraints are essential for block paving and tarmacadam driveways, and can be used for all other types of paving. All edgings or kerbs, other than mowing strips , need to be bedded onto a medium strength concrete base.
For quantities in excess of around 1m³, it's best to bring in ready-mixed concrete. For smaller quantities, it is possible to make up concrete as follows or refer to Mortars & Concretes page for notes on bedding concretes.
Using ready-mix
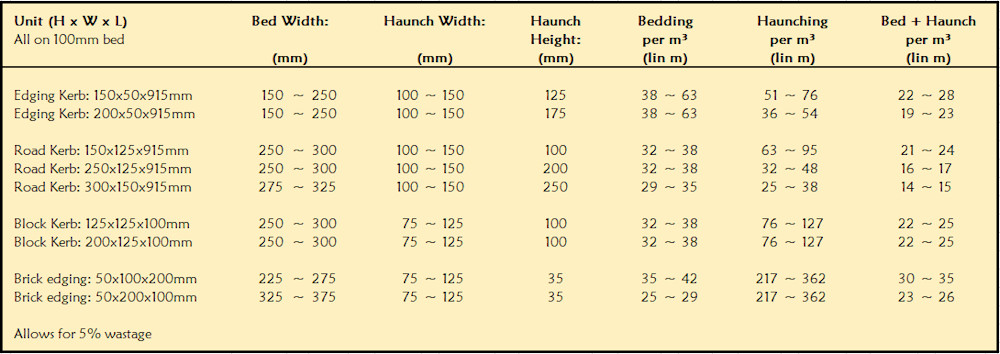
The table below gives coverage rates for various edging types. Use a C7.5P semi-dry concrete (alternatively 'E mix' or 'Kerb mix') for bedding and a C20P concrete at 25-50mm slump for haunching.
See Mortars and Concretes page for more information on ready-mix.
Mixing on-site
Use 6 measures of small gravel (6 or 10mm) with 3 measures of sharp sand and 1 measure of Ordinary Portland Cement. These dry ingredients are thoroughly mixed together before adding water, a bit at a time, until the mixture is damp throughout. The mix needs to be reasonably stiff, or the edgings will 'float' and lose their level setting. The mixed concrete should be damp enough to be moulded into a ball without falling apart. Mix in a mixer or it can be mixed by hand, by continually turning over the sand, gravel and cement until thoroughly mixed, and then adding water.
Use this calculator to estimates the quantities of aggregates and cement required to mix a C7.5-equivalent concrete, suitable for bedding edgings and kerbs.
As with all mortars and concretes, wear protective gloves, avoid contact with wet cements and wash off all tools when finished.
Laying:
The following method can be used with all concrete, fired clay or stone edgings. It can be split into 3 simple operations...
1) - Lay out bedding material.
The bedding concrete should be laid out, approx 100-150mm thick before compacting, along where the edging is required. This is sometimes known as ' Windrow Bedding '. Lay out 10 or so linear metres at a time and compact by trampling. Prepare the bed with a trowel or spade so that it is approximately 25mm proud, adding extra bedding if required. Then the edging is laid as shown below before continuing with the next section of concrete bedding
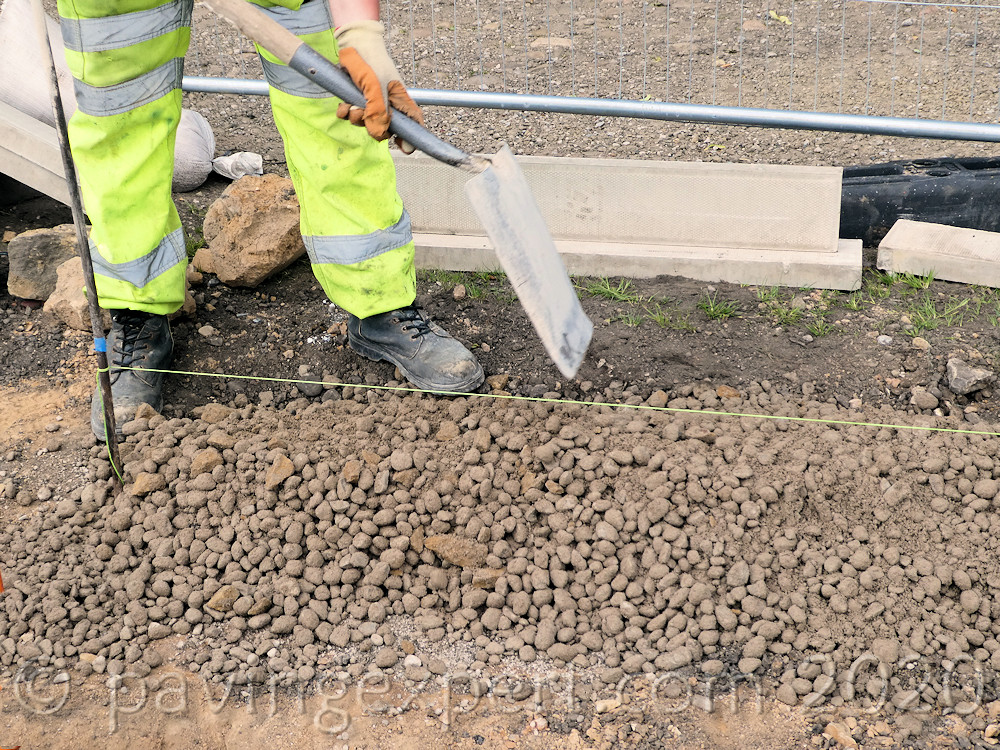
This image shows 150mm Type EF Edging Kerbs being laid to a public footpath.
Note the windrow bedding, and that the concrete has been brought up the front face of the edging, to help keep it in place. The depth of bedding is excessive in this particular example - I'll have to have a word with the lads about wasting concrete! The sub-base should have been 'topped-up' to ensure that only 100-150mm of concrete bedding was used, rather than the 300mm or so that is evident in this image.
2) - Lay edgings/kerbs
Place the edging or kerb on top of the concrete bedding, and tap down to the required level using a small rubber mallet , or use a lump hammer to tap a piece of timber held on top of the edging, so that there's less danger of spalling the surface. The string line guide should be followed as closely as possibly, and the seated edging/kerb should never be more than 3mm above or below the line.

It is important to be as accurate as possible to ensure levels and gradients are as planned, and the top face of the edging/kerb should be checked for level across the kerb/edging, not along the unit.
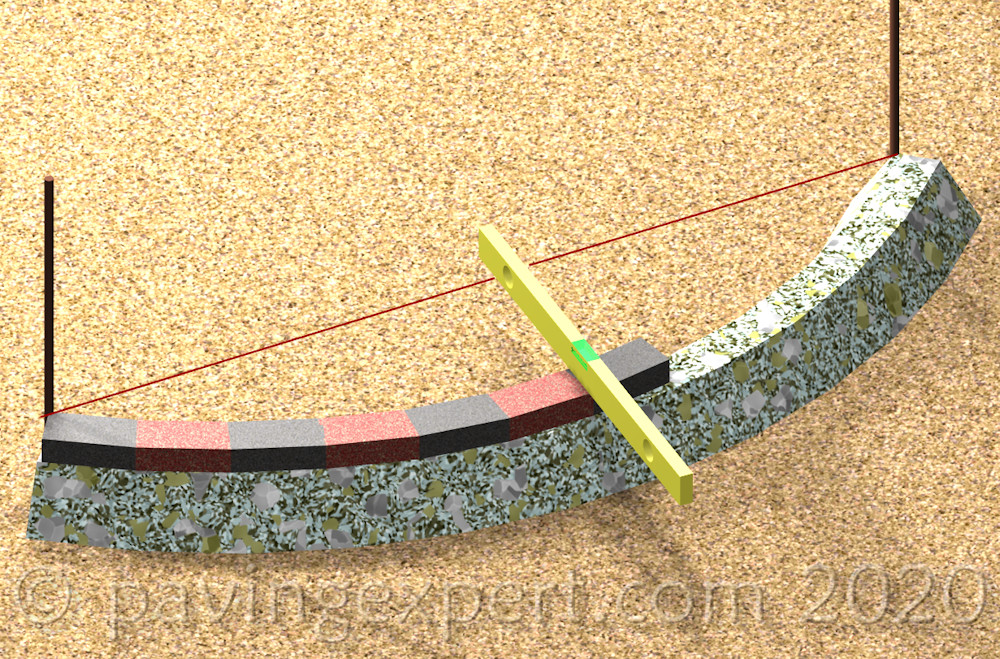
If an edging is not directly adjacent to the string line guide, as when creating a curve, use a spirit level to check levels back to the string line guide. Use a straight-edge timber as a further aid to profiling the laid edgings - see Profiling section on next page.
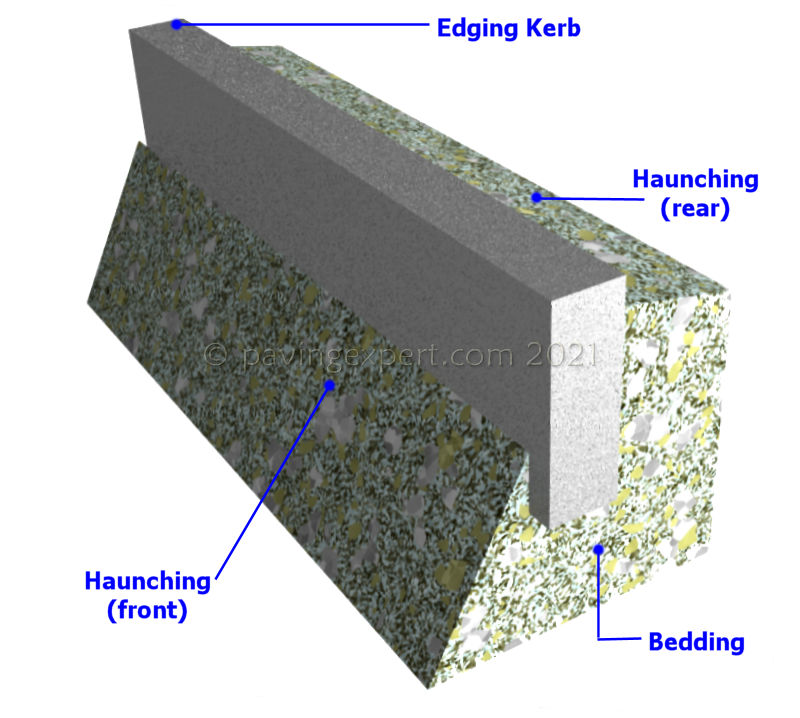
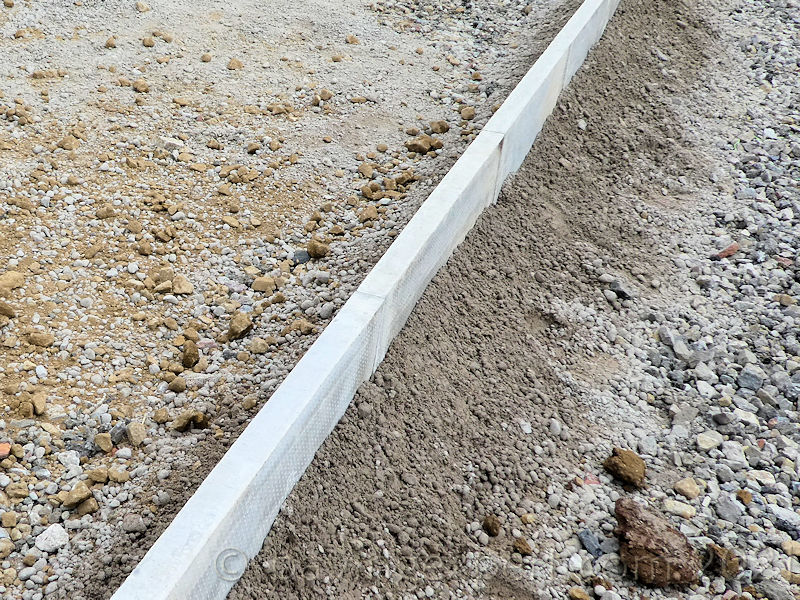
3) - Haunching
This step of the process should be undertaken once the laying process is completed, and the edgings have been checked for alignment both along the face and over the top surface. Make any adjustments to the alignment before placing the haunching. This is covered in more detail on the next page, Profiling and Alignment .
While the bedding concrete holds the edging firmly at the correct level, the haunching concrete holds the edgings in the lateral (side-to-side) plane, and prevents them being 'pushed' out of alignment by the weight of the contained pavement and its traffic. The concrete mixed for bedding is ideal for haunching garden edgings, or you may add a little more water, to aid final smoothing-off of the haunching. Road kerbs and other heavy applications should use a concrete of at least C20 strength for the haunching.

Place the haunching concrete at the back (i.e. outside edge) of the edging. As a rule of thumb, the haunching concrete should be at least the width of the edging it is supporting, or 75mm minimum for residential footpaths, 100mm minimum for driveways, and 100-150mm wide for highways. Compact and smooth the haunching concrete with the back of a trowel or spade.
The tighter this concrete is compacted, the stronger it will be when it finally sets. Smooth off the haunching to between 25-50mm below the top of the edging unit, ensuring that at least half the edging's depth is haunched.
Laying to curves and arcs
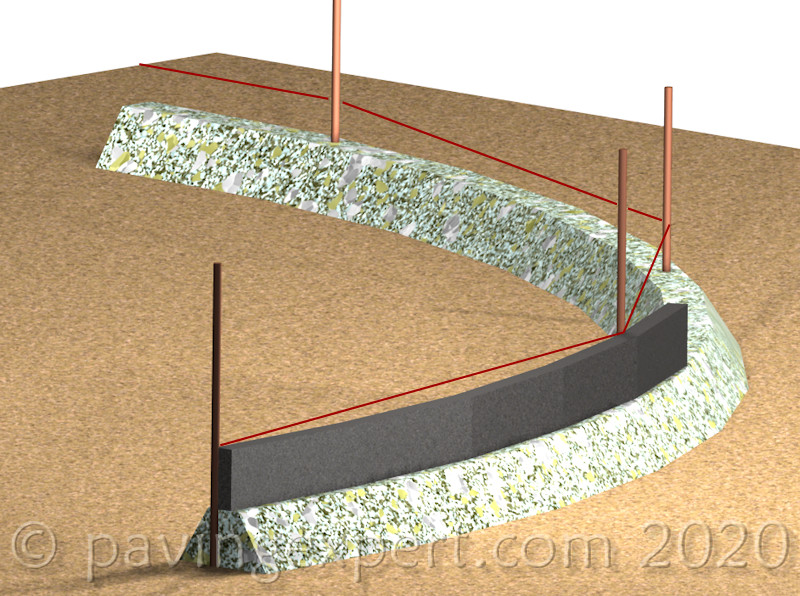
Laying edgings and kerb in straight lines is fairly straightforward, but what about laying curves and arcs? The accurate alignment of arcs is considered on the Profiling page, but this section will act as a basic introduction to laying the units.
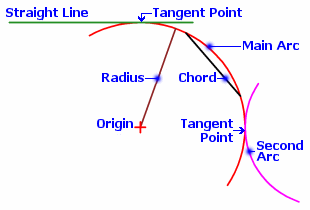
An arc comprises a number of important features, and these are shown in the drawing opposite. The Origin is the centre of the arc. The radius of the arc is measured between this point and the face of the kerb unit. The Tangent Points are the start and end points of the arc, the points where they join a straight line or another arc. A chord is a straight line between any two points on the arc.
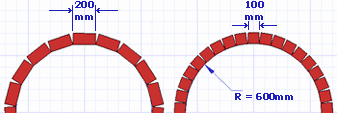
The size of the arc will determine the best way of setting-out, particularly establishing any intermediate points that may be used as guides during the laying of the arc. For example, consider the 600mm arc shown here on a layout for 100mm block paving kerb units.
The purple line, representing the working line/level guide, is stretched from Tangent Point B to Tangent Point C. However, by establishing an intermediate point, marked on the diagram as E, accurate laying of the kerb line becomes much easier.
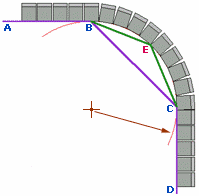
On larger arcs, with larger kerb/edging units, the distance between these intermediate points can be extended, but, ideally it should never exceed approximately 4 metres. This is covered in more detail on the Setting Out page.
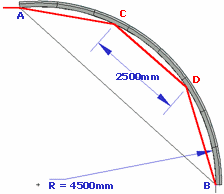
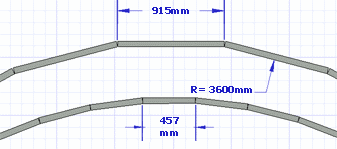
On the 4.5m radius of road kerbs illustrated opposite, intermediates have been established at points C and D, reducing the distance between reference points to around 2.5m and bringing the level guide considerably closer to the work than would be the case with a line strung from the two Tangent Points at A and B.
Many curves and arcs can be laid using standard kerbs and edgings. However, there comes a point when the individual units are skewed to such an extent that an unacceptably wide joint is presented between adjacent units. Just when this wide joint occurs depends on the size of the radius and the size of the units being used as kerbs or edgings.
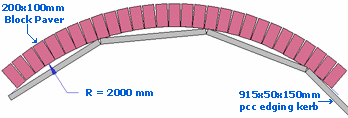
For example, a 2m radius laid with a soldier course of 200x100mm block pavers will look fine with standard units, but the same radius could not be kerbed with 915x150x50mm pcc edgings without looking awful.
There are two ways of resolving this problem.
- Radius Units
- Reducing the length of standard units
Radius Units
Some kerb and edging units are available as radius units, that is, they are specially shaped to form a sweet curve, without open joints. Road kerbs are a good example of these, as they come in a variety of radii, from a ' fast ' 600mm radius, up to the much slower 10m radius units. These are detailed in the relevant section of the Road Kerbs page. Some of the more decorative kerb and edging units are also available as radius units, notably the block paving kerbs, which make them very useful for construction of Block Paved Steps .
Reducing the length of standard units
Where no radius units are available, faster arcs can be achieved by cutting or breaking the kerb/edging units into shorter lengths.
This is a common solution for arcs kerbed with 915x50x150mm pcc edging kerbs, but can be used with any kerb or edging unit, such as the 600mm long decorative concrete edgings or even block pavers laid to very fast arcs.
The best method of cutting/breaking these units is to nick them with a power saw to a depth of around 20mm or so, and then hit on the reverse with a lump hammer. This gives a presentable face to the unit without obliging the kerb layer to waste time (and blade) cutting all the way through a kerb or edging unit.
Minimising Wastage
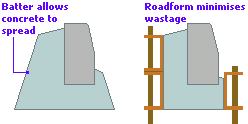
On large kerb or edging laying schemes, the amount of concrete that is wasted because of the 'batter' effect of windrow bedding and of haunching can become significant. Also, on certain road schemes, it is important that this 'batter' does not continue beneath the surfacing by more than about 25mm, as this can lead to 'differential settlement. The solution for both these problems is to use some form of shuttering to contain the concrete when it is first placed, and then to remove the shuttering once the concrete has set.
The most commonly used type of shuttering used like this is known as 'Road Form' and is available from civil plant hire companies for around £2 per 3 metre length per week, or less. It is a steel shutter that links together with adjacent units by means of a tongue that slides behind a bracket on the adjacent unit, and the whole lot is held in place by steel pins driven into the sub-base. Generally, they are 100, 150 or 200mm high and they can be 'stacked', as shown in the diagram, to accomodate greater depths of concrete. There are also flexible versions available for creating curves.
Mortar Bedding
One final method sometimes used to lay kerbs or edgings, is the mortar bedded method. This is usually only seen when laying very large, heavy kerbs, such as the Trief safety kerbs, and is more expensive than the other methods seen here, mainly because of the extra labour and the use of steel dowels.
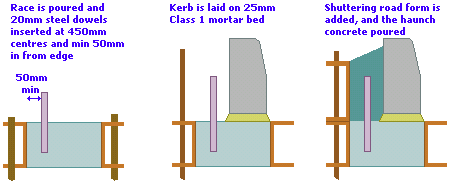
The first stage is the placement of a concrete 'race', which is a strip of concrete of the right width and height that the kerbs will be laid upon. It is usual to have the 20mm diameter mild steel dowels inserted at 450mm centres once the race is poured.
Once the race has set, the kerbs are laid on a Class 1 mortar bed, no thicker than 25mm, usually 12-20mm. The haunching roadform is then added and the haunch concrete poured. Once set, usually after 4-7 days, the road form is 'struck', ie removed, and the paving and backfilling completed.
Other Kerb & Edgings Pages
- Edgings Main Page
- Types of edgings
- Laying on Concrete
- - Case Study Example
- - Constructing over sub-base
- - Profiling and Alignment
- - Bed Depth over a sub-base
- Curved edge courses
- Steel Edgings
- Timber Edgings
- Mowing Strips
- Road Kerbs
- - Kassel Bus Stop Kerbs
- Sawtooth Edging
- Determining Kerb Radius
- Alternate edging systems for block paving
- Written Specification