A more general overview of cobbles and duckstones is given on a separate page
Construction
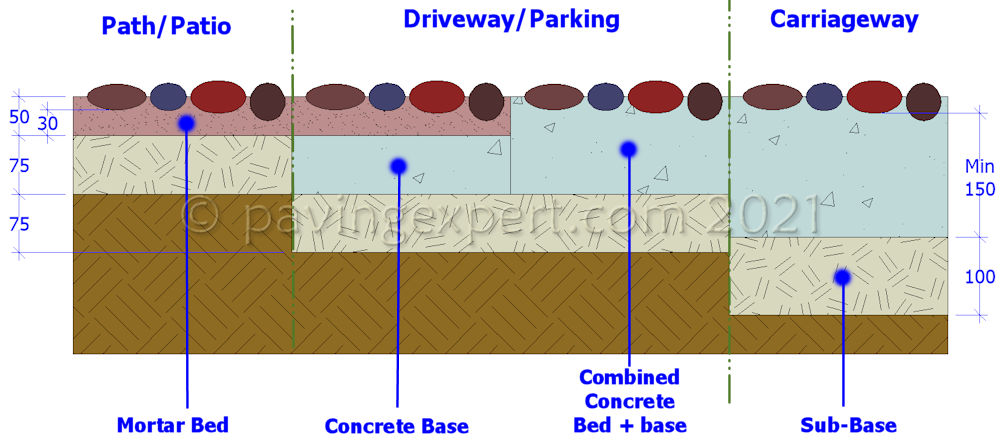
There are several layers to cobbled pavements depending on its intended use....
Light-use constructions
(Paths, patios, landscape features)
Paving Layer (Cobbles)
Bedding Layer
-
Sub-grade
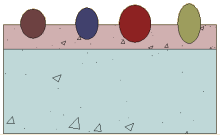
Heavy-use pavements
(Trafficked by vehicles)
Paving Layer (Cobbles)
Bedding Layer
Sub-base or Base Layer
Sub-grade
For simple, untrafficked landscape features, setting the cobbles into a bedding layer may be adequate, whereas on cobble pavements subject to vehicular use, there will probably be a sub-base and a substantial bed.
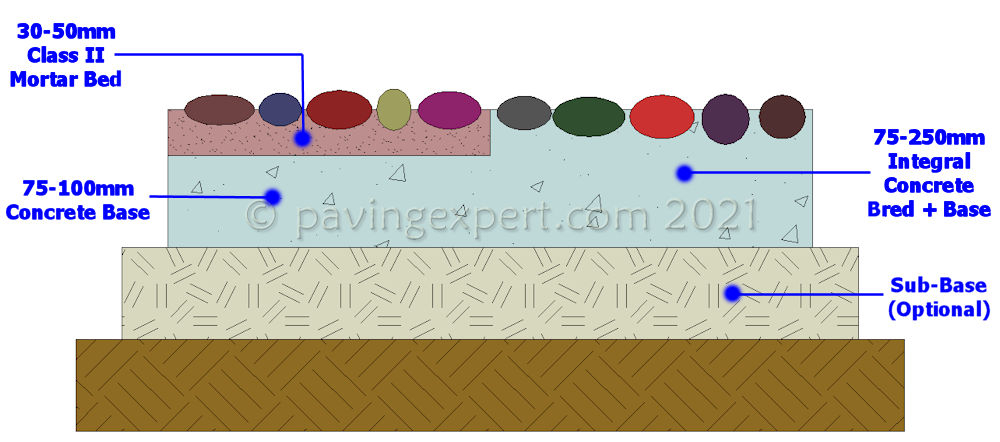
As shown above, the bedding layer can be replaced with a combined concrete base--and-bedding layer and the stones laid directly onto the concrete before it sets, rather than set them into a thicker monolithic bed of concrete.
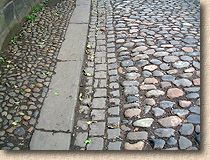
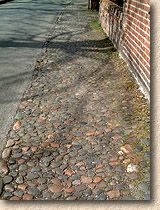
Laying patterns
Cobbles can be laid in one of 3 main patterns and these are illustrated below.
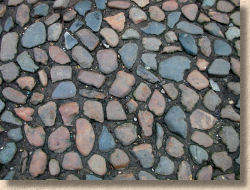
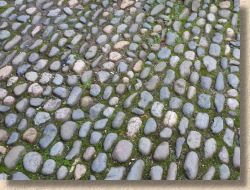
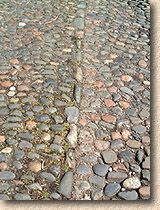
Random work is the lowest grade; the cobbles were more or less packed together and laid as they came to hand. There is little, if any, evidence of sorting.
Flat parallel work is a sort of intermediate grade of work. There is some sorting taking place and the cobbles are laid in rough lines, but these lines, or roughly parallel courses, can deviate from true quite significantly as the cobbles themselves vary in size and type.
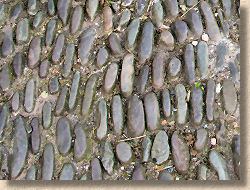
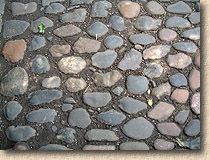
Coursed work is the highest grade; the cobbles need to be sorted into similar sizes and then laid in true straight lines that are either longitudinal or transverse. A straight-edge or taut string line would be used to guide the alignment and the final level of individual courses.
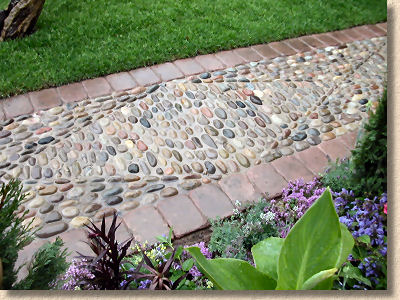
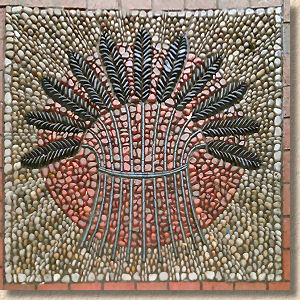
Naturally, there are even grander patterns. Circles are one obvious and relatively easy pattern to set out and construct within a cobbled pavement, but European Fans, Diamonds, Diaper work and Chains are very occasionally seen. And then, of courses, there are mosaics.
Traditional Construction
Because pavement construction using cobbles has such a long history, there are several different construction methods, and most are based on what materials were available locally at the time the pavement was originally built. The vast majority of cobbled pavements were built before the development of modern concretes, and so there tends to be no concrete or cement used in the structure, although a lime-based coarse mortar may have been used in some cases.
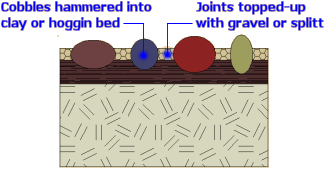
In a typical traditional construction, the sub-grade would be prepared by removing vegetation and any loose soil, and any soft spots would be excavated. A layer we would now call a sub-base would be laid next. This would usually consist of a gravelly or sandy clay, a hoggin-like material, mixed sands and gravels (ballast), rock waste or whatever was available locally that was suitable. This would be levelled out and thoroughly compacted by repeated ramming with a heavy wooden tamper.
The cobbles would be laid on a bedding course of finer material, such as a sandy-clay or a hoggin , and the cobbles literally hammered into the surface. The gaps between the cobbles would be filled with sand and pea-gravel, a hoggin, or maybe pitch or a coarse lime-mortar. By repeated compaction, the pavement would eventually 'settle down' and reach a point where no further settlement or movement was possible under standard loads.
Regular maintenance was minimal. Loose stones would be re-laid and re-compacted, but that was about it. By laying to a camber to ensure adequate drainage, many of these pavements have survived for hundreds of years.
Modern Construction
There are two main types of cobble construction that are used nowadays - cobbles as a pavement that will be trafficked and cobbles as a deterrent surface. The main difference between these constructions is the spacing and depth of embedding of the cobbles.
Obviously, there has to be different specification for those pavements that will be subject to vehicular traffic and those that will never see anything heavier than a wheelbarrow. This difference in load-bearing capability is achieved by use of a thicker laying course; essentially, the bedding and base course become one.
Decide where the paving is be positioned, and mark out with sand guide-lines, if required. It is assumed that the paving is to be flush i.e. level, with the existing ground. It is a good idea to dig wider than the planned path width, allowing an extra 100 - 150mm at the edges makes handling much easier.
Sub-grade
The surface needs to be dug off to a depth as indicated in the table opposite.
Note that for vehicle projects, the bed and base may be combined as a single layer, as described previously.
The depth of dig can be calculated as...
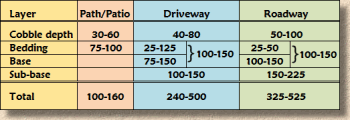
dig depth = stones + bed + base* + sub-base*
* = optional, depending on type of construction
All weeds and other unwanted organic matter, along with any topsoil should be removed. Any soft spots should be excavated and filled with compacted sub-base material.
For those areas troubled with weeds, the excavated sub-grade can be treated with a general weedkiller such as Glyphosate, but it is unlikely any weed will be able to penetrate the upper layers.
Should an edging be required, this is the point to construct it. Brick edgings, stone kerbs or channels, or cobbles laid lengthways are all suitable.
Sub-base
This will not normally be required for a path, driveway or landscaping feature unless there is a need to raise levels. Any low spots beneath a light-use construction can be filled with crushed hardcore, crushed stone or compacted bedding material - see below. For Access Roads and other cobbled pavements expected to carry vehicles up to 7.5 Tonnes, the sub-base layer is an essential load bearing layer between the sub-grade and the base layer, and should be at least 100mm thickRefer to medium duty sub-base designs on sub-bases page.
Base layer
Again, a base layer is not normally required beneath light use pavements (ie, no vehicular traffic). For other pavements, the base layer could be laid as a separate layer, then allowed to cure or solidify, before being covered with the bedding material (mortar) and eventually paved. However, for experienced cobble paviors, the bed and base are often laid as a single layer of concrete into which the cobbles are directly bedded.
Separate Base:
The base layer may be any bound material, with a Bitmac or a Concrete (CBM) being the most popular. The chosen base material is placed, levelled and compacted as described elsewhere before the bedding and paving layers are positioned.
A concrete base course should be a minimum 75mm thick for structural integrity. The cured surface of a concrete base should be left rough tamped or stippled to aid bonding of the eventual bedding layer.
A bitmac base course may be only 40mm thick, depending on planned usage, as this is sufficient thickness to ensure structural integrity. An open textured 20mm or 28mm base course macadam is suitable. If a dense or close-textured macadam is used, it may be necessary to bond the eventual bedding layer material to the surface, using a bonding agent such as SBR slurry .
For larger projects, the base layer may be machine-laid by a slip-form paver rather than hand-laid.
Integral base and bedding layer:
With this method, the base and bedding layer are laid as one, single layer, and therefore, this can only be a concrete (CBM).
A 20 Newton mix is the minimum strength that should be used, and this should be placed and levelled as described on the Laying Concrete page.
Bearing in mind that concrete has a limited working time, it's best not to place too large an expanse of concrete at one time.
A skilled tradesman backed up by at least one good labourer might lay 10-20 m² of cobbles per hour, but that does not include any jointing and titivating work that may be required. A 25-50mm slump C20-C35 concrete has a working life of around 2 hours on a typical British or Irish spring or summer day, and so a maximum area of 30-40m2 per gang should be placed in one pour.
Bedding layer
The cobbles should be bedded directly onto a fresh bed of mortar or concrete, minimum 50mm thick. This bedding could be...
- a Class II mortar
- a granolithic mortar
- a C20 or equivalent concrete
- a proprietary bedding mortar with an aggregate roughly 2-6mm in size
For patios and paths, a Class III mortar or a Bedding Concrete would be acceptable.
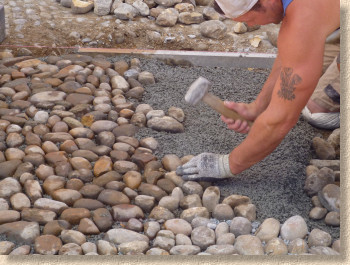
When preparing the bedding layer, a relatively stiff consistency (20-40mm slump or S2 ) is preferred: not too wet (soup!), but fluid enough to allow the stones to be hammered into the matrix.
It's best to spread out about 1m² of the bedding material, approximately 75mm thick (or half the cobbles' average depth), and roughly level the surface at this point using a float , a short, straight length of timber or a brick trowel.
Coverage rates for a cement-based bedding mix, either mortar, grano or concrete, is approximately 6-8 m² per tonne or 13m² per m³ at 75mm thick.
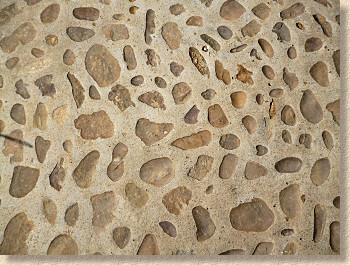
Laying the stones
The cobblestones should be pushed into the bedding concrete, to at least half their depth.
For trafficked areas (paths, patios, drives, roads etc)
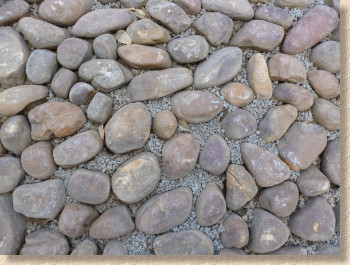
- Keep the spacing of the stones as tight as possible - it's the stone that makes the finished paving look good, not the bedding matrix, so keep exposed bedding to a minimum.
- Always lay the cobbles with the flattest face uppermost, presenting as level a surface as is possible to the world.
- Use smaller cobblestones to 'infill' spaces left between larger stones

For deterrent paving
- A significant spacing of the cobbles will make them a nightmare to walk, cycle, or push prams across. Allow 1-2 cobble widths between adjacent stones.
- Laying 'pointy end up' makes them even more impassable.
- Ensure they are properly embedded - the wide spacing means they receive no additional support from neighbouring stones and must rely entirely on the bedding to keep them in place. Embedding to a point beyond the 'shoulder' renders them less likely to be accidentally loosened.
Once a small area is covered, a timber board or beam can be placed over the top of the embedded stones, and tapped with a lump hammer or rubber mallet to ensure the highest points of the stones are roughly level. A length of 100x100mm timber, a scaffold plank off-cut or 600x600mm square of 18mm plywood is ideal. Use a taut string line stretched from one edge of the paving to the opposite edge as a level guide.
Coverage rates for cobble are very variable, given the random nature of the stones, but for guidance only...
1 Tonne 75mm average size rounded stones covers approx 8-10m² 25Kg bag covers approx 0.2-0.25m² - Approximately 4-5 bags per square metre
Jointing/Sealing
In theory, it is not always necessary to point between the stones. When the bedding matrix has been squeezed up between adjacent stones, it could be smoothed-off by repeated brushing with a soft brush, and/or sprinkling with clean water from a fine rose a couple of hours or so after laying. However, this may leave an open or unattractive finish.
However, on most modern work, the cobbles will be slurry jointed (wet-grouted) which entails smothering the surface with a suitable cement mortar made to a high slump (S3 and above - like a pea soup), brushing this over the surface to fill any gaps between the individual cobbles, then washing off, often aided by a belt cleaner.
In the wrong hands, slurry jointing can ruin a cobble pavement. All to often, the jointing dominates the stone and mars the appearance for the first 2-5 years of the pavements existence, but it will (hopefully!) eventually weather and become less visually prominent.
Done well, slurry jointing will find that sweet balancing point between holding the cobbles securely, without dominating the finished look.
On some work, a Retarding Agent may be sprayed over the surface so that the area can be cleaned 12-24 hours later to reveal the cobbles, much as an exposed aggregate concrete is created.
On deterrent paving and some other cobble pavements, the work is normally pointed as soon as is possible after laying. When pointing work that has been down for more than 24hrs, the 'joints' can be primed with a 10:1 dilution of SBR to ensure the mortar bonds to the hardened bedding matrix.
For mortar pointing, a reasonably strong mortar, such as a Class II, is preferred, and we find that it will look a lot tidier if the mortar is coloured black - either by addition of chemical dyes available from builders merchants, or by using a pre-packed proprietary black mortar.
See Mortars & Concretes Page for notes on pointing mortars
For meticulous hand-pointing, the mortar is carefully packed into the joints by using a small pointing trowel to push it in from the edge of a larger, bricklaying type trowel. Try to ensure that at least 25mm of the stones are left upstanding. When all the joints are filled, it can be smoothed with a pointing bar or short length of flattened copper piping. Be sure to clean off any spillages - they WILL stain! - or alternatively a watering can with a fine rose can be used to simultaneously level the mortar and clean off the stones. The mortar should start setting within 2 hours, faster in summer, slower in winter.
However it is pointed or sealed, a newly laid cobble pavement should be protected from foot or vehicle traffic for at least 48 hours.
It's also possible to seal the joints with molten pitch, as described on the Sett Jointing page.
Construction Diagram