Introduction:
The previous pages have dealt with rigid and flexible construction methods for sett paving. This page deals with the principle ways of jointing a sett pavement, namely...
- Cement mortar jointing for rigid sett pavements
- Resin mortar jointing for rigid or flexible sett pavements
- Pitch jointing for rigid or flexible sett pavements
- Loose jointing for flexible sett pavements
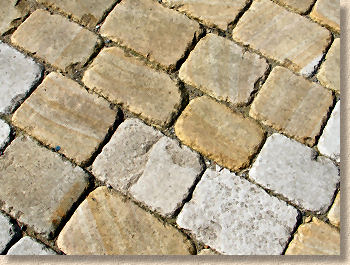
The jointing of a sett pavement can have a dramatic effect on the finished appearance of the work, completely changing its character, in some cases. The chosen jointing should never detract from the sett work by being more visually demanding - after all, the mortar, pitch or grit-fill costs a fraction of what the setts are worth, and you want to see where the money has gone, not the ancillary materials!
While a light coloured mortar can accentuate a dark coloured sett, it can look messy with a light coloured pavement. The dark nature of pitch/bitumen looks great with most materials, but can get soft and sticky on the very hottest of days; not something you'd want on a heavily pedestrianised precinct regularly trafficked by Ladies' fashion heels. A loose filled joint is not an effective deterrent to weeds, and is not recommended for sett work where joints of 10mm or greater are anticipated.
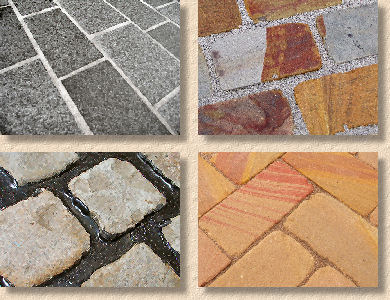
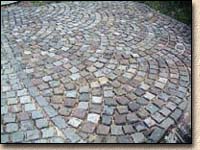
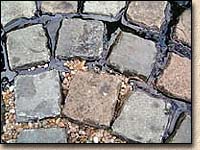
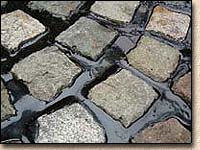
Bottom Left=Pitch : Bottom Right=Loose Sand
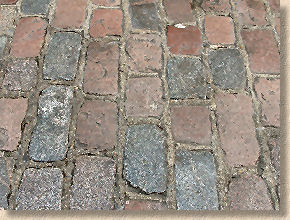
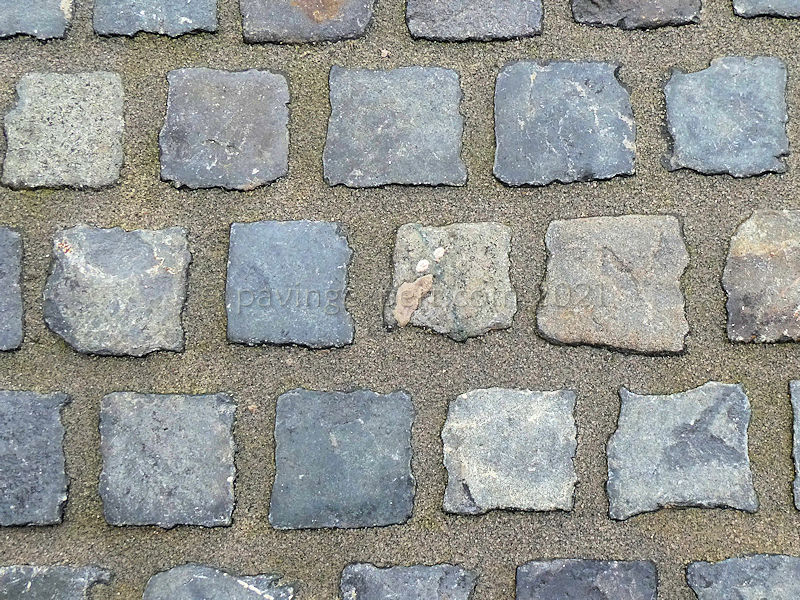
In days gone by, quality sett paving work would be finally sealed with molten pitch, while work of a lesser quality would be filled with some loose material, such as ash, or possibly a lime-based mortar. The modern trend is for a high-strength cement or resin mortar pointing for rigid pavements and sand or grit sealing for flexible.
For residential and other 'light-duty' sett work using reclaimed materials, we prefer the traditional approach, of molten pitch (roofing bitumen). We find that the pitch complements the setts perfectly, and will reseal any cracks that appear, as the hot summer sun beats down upon and partially melts the pitch. Sett paved roads and driveways we have laid in this manner have remained free fom any weeds for many, many years, and look far more 'authentic' than mortar-pointed sett pavements.
Many contractors and DIYers are finding that the simpler resin-based mortars offer a easy method of jointing with reliable results, as it is virtually impossible to stain the paving and the jointing is completed in minutes not hours.
The cement mortar pointing method is more fraught. Accidental spillages of mortar will stain the setts; any jointing cracks caused by minor movement of the setts cannot reseal unaided, as the pitch does, and the mortar itself can be perished over time by the actions of mosses, lichens, and general wear and tear.
Therefore careful thought must be given to the choice of jointing to ensure it meets the requirements of the project.
Cement Mortar Jointing
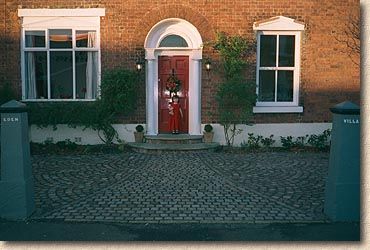
As with other forms of paving, messy or sloppy mortar pointing can absolutely ruin the finished appearance of a pavement, and a poor tradesman can make an expensive sett pavement look abso-bloody-lutely awful - compare and contrast the two images opposite.
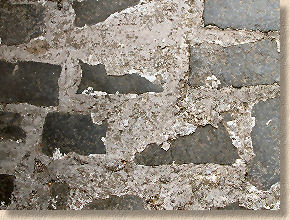
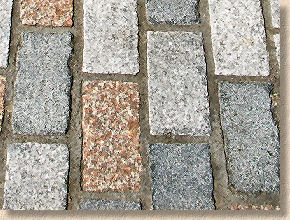
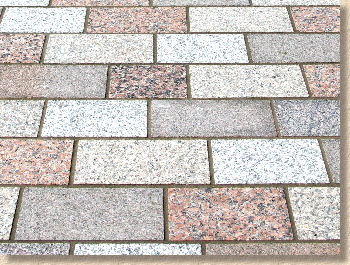
For sett pavements, a high strength mortar is preferred, and we find that it will look a lot tidier if the mortar is coloured black - either by addition of chemical dyes available from builders' merchants, or by using a pre-packed proprietary black mortar. A standard Class II 3:1 sand/cement mortar, or a 1:½:4 lime mortar should be used, but it should be 'beefed up' by the addition of a strengthening additive such as Styrene Butadiene Resin (SBR), which not only improves the bonding properties of the mortar, but also improves water-resistance and hardness.
See Mortars & Concretes page for details of general mortars.
For hand-pointing, the mortar is carefully packed into the joints and smoothed below the level of the top of the setts with a pointing bar. We find it works best to smooth out the mortar to imitate the appearance of pitch.
There are other methods of jointing using cement mortars and these are explored in more detail on the Cement Mortar Jointing page.
Be sure to clean off any spillages - they WILL stain! This mortar should start setting within 2 hours, faster in summer, slower in winter. It should be protected from foot or vehicle traffic for at least 48 hours.
It is also possible to wet grout sett pavements with a mortar slurry, but this can be a time-consuming and potentially catastrophic process for the home DIYer, especially if the mortar is allowed to bond to the heads of the setts and then refuses to budge. In our experience, it is generally safer for inexperienced persons to hand point rigid sett paving, reserving the following wet grout method for professional paviors and for those pavements where traditional pointing methods would be unfeasible.
A sloppy grout is prepared to the same strength as mentioned above, and is spread over the setts with a soft brush or a squeegee, as shown in the Slurry Grouting page. The surface of the pavement, and the grout thereon, is constantly dampened for a number of hours, by means of equipment that delivers a fine mist over the entire surface. This process usually takes at least 4 hours, but possibly as many as 12 or 16, depending on ambient temperature and other conditions. Once the grout has commenced to set, it is scraped off the surface of the paving, often with a stiff brush or rubber squeegee, aided by a hose. The process is repeated and repeated and repeated again until all traces of cementitious material has been removed from the heads of the setts. This is is very, VERY tiresome process, and usually delegated to a junior member of staff.
As this process is most commonly used with close-jointed sett work, it is usually unnecessary to strike (ie, polish) the surface of the joints as is done with traditional pointing, but this should be done with any wider-than-normal joints of, say 10mm or more. Use a pointing bar or section of copper tubing to 'rub up' these joints.
Slurry grouting is covered in much greater detail on its own page on this website.
Resin Jointing
Given the vagaries that can affect cement mortars, notably the variable strength which often depends on the generosity of the mixing operative with the cement content, the inconsistent colour of the cured mortar, and the propensity for unsightly staining, resin mortars seemed to be the answer to many of these issues. They provide a consistent strength, a consistent colour, and they are consistently stain-free when used correctly. Unfortunately, they are also consistently pricey, based, as they are, on high-performance epoxy resins.
Rather than rely on a traditional Portland cement or similar to bind the fine aggregate, resin mortars use a transparent 'glue' which is usually some form of epoxy resin. The resin is mixed with a specially blended fine aggregate to create the mortar. By carefully batching the fine aggregate and the resin, the manufacturers are able to provide that sought-after consistency by controlling the variables that can impact on the performance and appearance of a mortar.
A range of different products are available, from simple ready-to-use 'polymerics' to incredibly tough 2-part resins that have to be mixed on-site for a specific time prior to use. The polymerics are usually supplied in sealed containers, with the resin pre-mixed and ready for use straight from the container. The mortar cures by absorbing moisture from the atmosphere and/or the immediate environment. These polymerics are ideally suited for DIYers and for light-use pavements such as patios. Further up the performance ladder, the commercial grade mix-as-needed mortars often incorporate water in the mixing process.
The drier polymeric resin mortars are brushed into the open joints within the paving, while the wetter slurry type products are persuaded into place using a squeegee and then the surplus is brushed from the surface. Once in the joint, they start to cure in a matter of hours, and pavements jointed with the commercial grade resin mortars can often be opened to traffic in as little as 48 hours.
There is much greater coverage given to various resin mortars on the following pages....
Sealing with Pitch, Tar or Bitumen
Pitch sealing can be used with both rigid and flexible sett pavements, as although the pitch does 'set', it never becomes irreversibly 'hard', and even when 'set', it does allow a small amount of movement. However, it is not the perfect solution to the jointing problem that it may first appear to be. Its soft nature make it unsuitable for many civic applications such as shopping precincts and plazas, as heels can easily become 'stuck' in wider joints, and the material may actually melt and 'flow' on exceptionally hot days. Nor is it suitable for steeply inclined surfaces paved with setts, a common hardscape feature in many towns and cities, mainly because of the difficulty in getting it into non-horizontal joints, and keeping it there on the hotter days of summer.
However, for driveways, paths, heritage projects and the like, it is an exceptionally good sealant to use. It's cheap, effective, aesthetically pleasing and maintenance free. For smaller residential projects, it really is worth considering as a viable alternative to mortar.
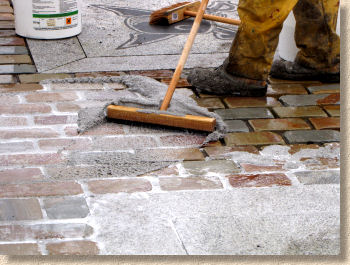
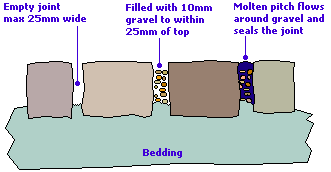
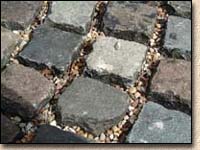
The basic process of pitch sealing is very simple. Once the setts have been laid and checked for level/alignment, the joints are partially filled by sweeping-in a suitable gravel, usually 6mm or 10mm, to within around 25mm of the head of the setts. Remove any surplus gravel that is 'proud', ie above the heads of the setts, before topping-up the joints with the molten pitch, which is poured from a can and allowed to flow in and around the gravel, sealing the joint as it cools.
The following series of pictures illustrate the process as the joints to a fan pattern sett pavement are sealed with pitch. The setts were laid by a couple from Rainhill near St. Helens, following the instructions given on this web site and we undertook the pitch sealing on their behalf.
The first picture shows a section of the laid setts in their unsealed condition, and the second shot shows how the joints of the newly laid paving are filled to within 20mm of the top with a 6mm or 10mm gravel.
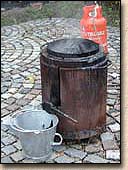
The pitch comes in 25Kg packs, and may need to be broken up into 2-5 Kg chunks before being placed in the tar boiler, which can be hired at most Hire Centres. It takes approximately 1 hour to melt down a single 25Kg pack and each pack will seal approximately 6-9m² of paving, depending on joint width and depth of filling.
The pitch used for sett jointing is a specially modified bitumen, intended to be stiffer and more resistant to penetration by spiked heels than a standard bitumen, such as those used for roofing. It may need to be specially ordered as not all Builder's Merchants carry stock.
Extra care is required in wet or rainy conditions as water and molten pitch have an explosive relationship, which can cause droplets of scalding pitch to fly upwards.
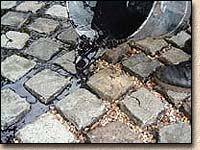
The molten pitch is carefully poured into the joints from a steel tar bucket or tar can. Protective gloves must be worn for this operation, and it is strongly recommended that safety goggles are worn and long sleeves used to cover up the arms.
The VERY HOT molten pitch penetrates the gravel and eventually finds its own level - there is no need to smooth or strike it, as there is with a mortar. However, as the molten pitch flows, it tends to cling to the sides of the setts, which can result in a concave (U-shaped) surface to the joint and it may take repeated topping-up pourings to achieve the ideal finished level of around 5mm or so below the top of the setts and with a flat or convex profile. These top-up pourings are fine, as they partially re-melt the pitch beneath and the whole lot then solidifies as one.

Any over-fill or spillage, referred to as 'tails', can be easily trimmed with a sharp knife, and the off-cuts returned to the tar-boiler for re-melting. Some spillage is inevitable; even the most careful and most experienced pitch pourer will spill and splash, but it's relatively easy to clean off.
The pitch will cool rapidly and should solidify within 15 minutes. The surface of the hardened pitch tends to be somewhat glossy at first, but this will deaden to a matt finish in a matter of days. The paving is now complete and can be trafficked immediately.
And that's it - the finished effect is highly effective both structurally and visually. Obviously, larger projects will use multiple boilers, a larger tar boiler capable of melting 100Kg or more at a time, or have the pitch delivered in a molten state by a heated tanker, ready to pour.
Aesthetically, no other jointing looks as good as pitch. The darkness of the jet black pitch emphasises the colour of the setts, whether they be silvery granite, blue-green basalt, or buff-brown gritstone. They eye pays no attention to the blackness of the pitch and instead, it homes in on the beauty of the stone - after all, it's the stone that costs; pitch is pennies!
More comprehensive coverage of using pitch for jointing pavements can be found on this separate page .
Loose filling
This method of jointing setts is becoming more widely used as sawn setts become more reasonably priced and readily available for commercial projects as well as private driveways, forecourts and patios. It uses the same principle used for block paving, in that a dry fine aggregate of a specific range of grain sizes is brushed into the relatively tight joints of the sett pavement and either vibrated into place by means of a plate compactor, or washed in by a hose, sprinkler or misting system.
For sawn setts, a kiln-dried jointing sand , as sold for jointing block paving, is normally used, but for sett pavements using fair picked or other non-regular setts, a crushed rock aggregate approximately 4mm down to dust is normally used. Actual coverage for the jointing material varies depending on joint width and sett depth, with tight-jointed sawn setts requiring much less jointing material per unit area than non-regular or deep units.
It is common for the jointing material to settle over the first few months and so it is essential that the pavement is inspected every 3 months or so and has the joints topped up as and when required. In areas experiencing heavy surface water flows or on civic pavements subjected to vacuum/brush street cleaning equipment, it may be beneficial to use a joint stabilising product or even a paving sealant to bond together the sand/aggregate and give it more of a chance to resist the scouring action found in these unfavourable conditions.

Read more about loose jointing on this page .