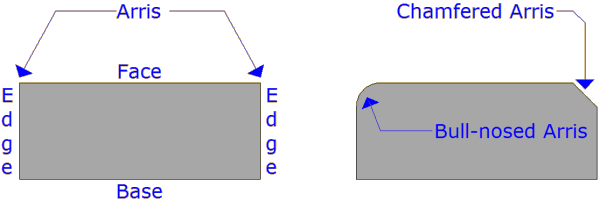
Introduction:
A separate page considers the tools used to cut flags while these pages focus on the layout, positioning and placement of cut pieces, using worked examples to show how the application of a few simple rules and the selection of one particular cutting solution in preference to another can produce neater looking pieces that are less likely to break or to come loose.
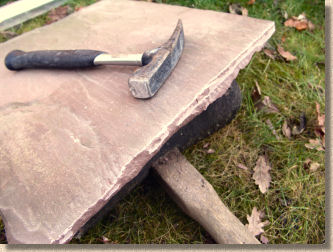
In all of the examples, it will be assumed that a cut off-saw (Con Saw, Stihl Saw) or an angle grinder will be used, and that these will be fitted with decent quality diamond blades . 30 years ago, all of these cuts would be made using hand tools, but there are fewer and fewer of us left that can cuts flags with the hammer and pitcher. A separate page considers cutting and trimming techniques using hand tools . This page includes a short section illustrating the technique used to 'fettle' sawn arrisses to make them look as though they were cut using hand tools.
A word or two about measuring
It doesn't matter how good and accurate is the cutting if the piece that has been cut doesn't actually fit the gap it was intended to close. Accuracy of measurement is essential, otherwise the piece(s) will have to be re-cut, wasting materials, wearing down the blade unnecessarily, and wasting time. The Trade has a simple maxim for all cutting tasks, whether it's cutting flags, blocks, kerbs, a length of timber or anything else....

...measure the dimension to be cut; mark the dimension onto the flag; measure the dimension to be cut once again and check that this is what has been marked. When a flag has been marked up for cutting but it somehow doesn't look right, re-measure both the gap and the marks on the flags to ensure they correspond. Don't even think about firing-up the cut-off saw until you're 120% certain the measurements and the marking-up are correct.
Marking can be done with all sorts of items. My personal favourite is a purpose-made Pavers' Marker , a 2mm wide hand-size sheet of resin and chalk that gives a clear, fine line on any paving surface.
Read more about them on the Pavers' Marker website .
A cheap and useful alternative is a small piece of roofing slate - the thin, laminar nature of slate makes for a sharpish edge; it's strong and won't break too easily; it never needs sharpening; and best of all, it costs nowt! Many contractors carry a few larger pieces of broken slate in their vans. The bigger pieces are ideal for packing-out mortar when setting the levels of recess tray covers and utility boxes, and the smaller fragments make great marking tools, giving a clear and definite line on all types of concrete, stone or even clay paving units.
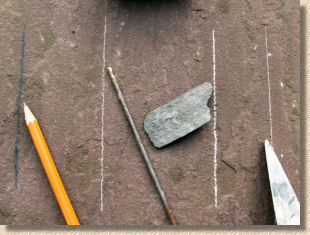
Pencil, steel nail, piece of sandstone, edge of trowel
Others prefer a pencil (needs sharpening every five minutes), a steel or masonry nail (line can be difficult to see on some materials), the blade of a trowel (same problem as nails), chalk (tends to give an overly wide indistinct, accurate mark), porcelain/china shards (fine, if you have it), or a fingernail (not a good idea when you've 150 cuts to do!). As with much else in the paving trade, there is no right and wrong: find what works for you and stick with it. As long as the mark or line is clear and obvious, and the eventual cuts are neat and accurate, it really doesn't matter whether you used a piece of slate, an old nail, or your partner's diamond ring.
Joint Width
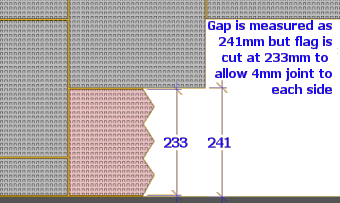
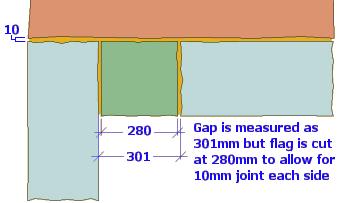
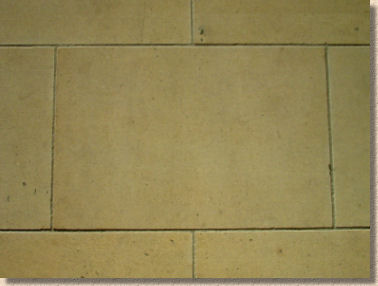
When measuring a gap, don't forget to allow for a joint at either side. The type of flag being used will determine the width of the joint. For example, a small element paver (a 300x300mm flag) typically has a 3-5mm joint, so, if the gap to be filled was measured and found to be 241mm, 6-10mm should be subtracted from that to allow for the jointing. For Indian sandstone flags which often have an 9-12mm joint, then 20-22mm should be subtracted to accommodate the jointing.
Preparing the flag
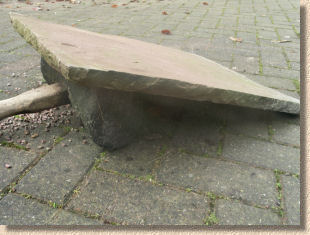
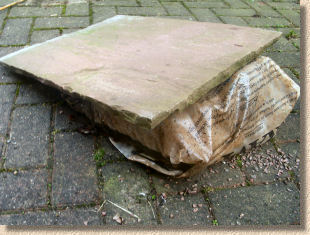
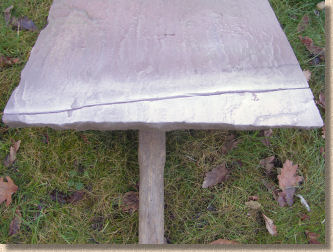
Prior to cutting a flag, it needs to be laid out in a position where it can be cut safely. The flag itself needs to be firm and secure, with no wobbling or rocking. It could be laid onto a bed of sand, rested upon bricks or a pavior's maul, or propped over the edge of a kerb. As long as the flag is stable and unlikely to move while being cut, it will be satisfactory.
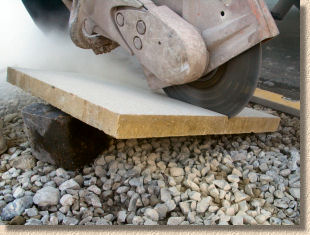
One very important consideration prior to setting to work with the saw is the fact that a good deal of dust and possible scalpings/shards can be ejected backwards during the cutting process, so ensure there are no bystanders behind, no glass doors or windows, and try to stay at least two metres away from any wall, as the detritus ejected will cling to it and stain any brickwork for a considerable period.
From May 2008, the Health & Safety Executive in the UK has declared that all cutting of paving should be dust-suppressed. While this can be achieved using a vacuum system, it is much more likely that the more practical 'water suppression' systems will be used. All modern cut-off saws are fitted with a hose-attachment fitting enabling simple connection of a hose that can be fed from a tap or from a portable water bottle.
There is now NO excuse for dry cutting: it is dangerous and should be viewed as indicative of cowboys, eejits and incompetents. Any so-called contractor using dry-cutting should be chased off the site.
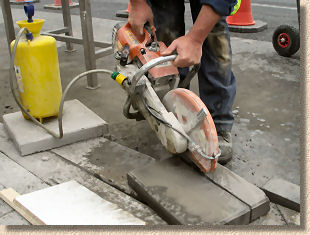
In best practice, the saw will be water-fed: a constant supply of water is dripped onto the blade as it cuts, dampening down the dust and preventing it being blown everywhere. While undoubtedly safer, it should be noted that the dust-laden run-off from wet cutting is almost like a thin cement slurry, setting and adhering to any surface where it's allowed to collect. Make sure any run off is thoroughly washed away before it can settle and stain.

Download HSE leaflet on cutting using water suppression
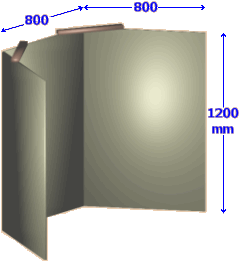
Even when wet cutting is used, it is a good idea to have a 'back board' placed directly behind the cutting operation.
This may be a simple three-sided open box, 1200mm high with 800mm sides cut from a single 2440x1220mm sheet of 15-18mm ply. This acts to brake and collect most of the dust-laden slurry and all of the scalpings/shards. However, any form of baffle that will prevent shards flying out behind the cutting operative is better than none.
For those using a power saw to carry out the cutting of paving materials, there is a separate page which looks at what needs to be considered when choosing a diamond blade
Finally, it should go without saying that safety equipment for the cutting operative is essential. Dust mask and goggles should be used on every, single cutting task. It takes only one stray shard to blind, and the dust generated when cutting stone or concrete is abrasive and aggressive in the lungs. Don't risk it. Ear Defenders are recommended, as the saws tend to be noisy, but are not essential when there are just a few cuts of short duration.
Cutting straight lines
This is the basic skill and the most commonly encountered cutting task. How difficult can it be to cut a straight line? Just flash across with the saw and the job's done, right? Well, you could work that way if quality of workmanship, accuracy of fitting and detail of presentation were not of any consequence, but there are few tips and tricks we use to ensure we get cuts of the highest quality almost every time.
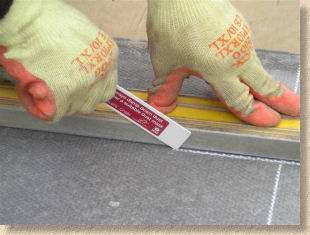
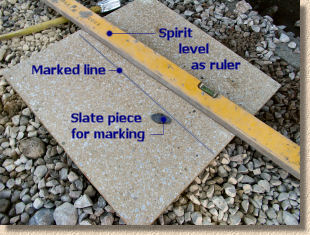
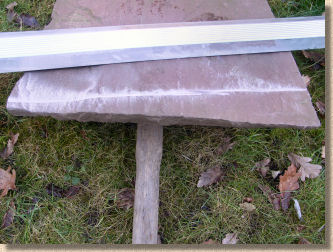
To achieve an accurate straight line it is best to use a "ruler" of some description to guide the blade while it first scores the flag. Obviously, you could simply rely on a steady eye and an even steadier hand to guide the blade as accurately as possible along the marked line, but it's almost impossible to create a perfectly straight line in this manner. Using a ruler enables the blade to be held against the edge of the ruler while the first traverse is made.
The best thing to use as a ruler is a length of steel or aluminium, either box section, or, preferably L-section (also known as "angle iron"). These are relatively tough materials and provide good resistance to the blade should it attempt to stray. L-section allows the side of the foot to hold the ruler in places while it is simultaneously protected from accidental contact with the blade. A length of timber could be used, but it should be absolutely straight and true, and it's better if it is a dense or hardwood that will resist the blade, rather than a piece of softwood that will offer little effective check.


The "first traverse" is made to mark the surface with the blade, cutting a notch just a few millimetres deep. This is the line that will be seen at the surface, so neatness and accuracy is all important. Once the first traverse is complete, the ruler can be withdrawn, the saw brought back to the edge nearest the operative, and a deeper cut can be made.
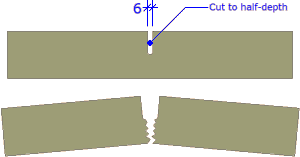
In most cases, there is no need to saw the full depth of the flag: sawing to half-depth will be adequate to ensure it breaks where required with a few light taps from a hammer. Half-depth cuts also reduce the amount of dust generated as well as saving on blade wear.
The saw should pass along or through the paving in one direction only - repeatedly running the saw up and down the length of the cut in a 'back and forth' motion will serve only to accelerate wear on the blade but will not improve the speed of the cutting process.
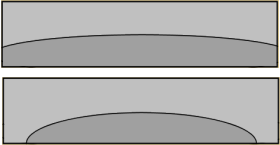
The deep cut should be made with the saw held at an angle that will produce an undercut, that is, the blade should be angled in towards the required piece at 15°-20°. This undercutting is a standard technique when cutting all sorts of paving as it makes fitting of the cut piece much simpler with less risk of it being excessively tight. In practice, the easiest way to achieve such an undercut is to have the flag itself resting at an angle, and keep the saw 'plumb', rather than having the flag laid flat and the saw held at an unnatural and uncomfortable angle.
Allow the saw to determine its own pace. Forcing it, or pressing down will not make it cut any faster, in fact it will make it slower! Similarly, moving the saw back and forth in a sawing motion will not increase the rate of cut. Keep the saw steady and even, allowing its own weight to cut down into the flag and moving the saw steadily forward.
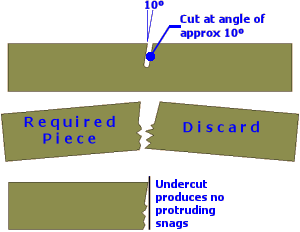
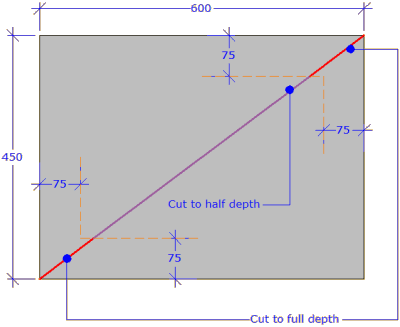
Cut to a depth of between one-third and two-thirds the thickness of the flag: no need to be exact, but somewhere around half depth is ideal. When making cuts that are within around 20° of parallel to the flag's edges, the cut can be kept at a fairly constant depth, but cuts that are more acutely angled tend to be more successful when the cut penetrates to full depth at each end. The most powerful example of this is when cutting acute triangular pieces, such as diagonal mitre cuts - the 'points' on such cuts are relatively fragile, so it's a good idea to cut right through (full depth) for the first 150-200mm or so of these cuts, or until there is at least 75mm of flagstone between the cut and the edge - see diagram.
For cuts roughly parallel to edges, cut slightly deeper at the 'ends'....
.... but for angled cuts, send the blade right through at each end.
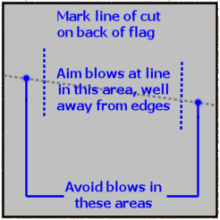
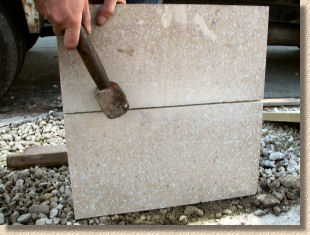
Once the cut has been made, a few sharp raps of a lump hammer is usually sufficient to complete the break. The type of cut will determine the most effective method for 'snapping' the flag. For cuts that are within 100mm of an edge, the flag can be placed onto a maul or similar support and a few sharp blows applied to the discard side of the cut to force it to break off from the rest of the flag in a succession of pieces.
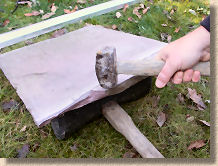
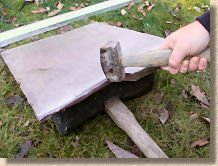
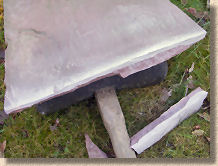
When the cut is further from an edge, it is best snapped by applying a few sharp blows from a hammer on the back of the flag, in line with the cut. This should be adequate to break the flag exactly along the line of cut. Lay the flag on its face, resting on sand or on some form of support. Mark the line of cut on the back of the flag and aim the blows in the centre of the flag and to within 100mm or so of the edges. Do not apply blows close to the edge - they can cause weaker flags, such as the imported sandstones and limestones, to snap "off course". It's also possible to have the flag stood on edge, with the smaller "half" of the cut (whether it's the wanted piece or the discard) uppermost, and the whole flag between the legs, as shown. When the blows break the flag, the legs initially hold the upper piece before it is lifted off.
Trimming
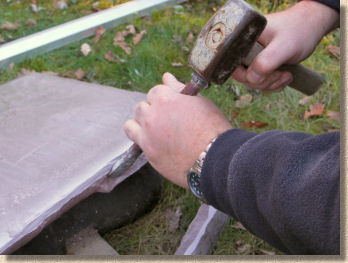
While most cuts made using the above techniques will break evenly, there are always a few that have 'snicks' or 'jags' that protrude from the cut edge and would interfere with easy fitting. These can usually be trimmed off with a brick hammer or a chisel. In a few cases, it may be necessary to use the saw or an angle grinder to trim the snicks. However, before attempting to fit the flag, check this cut edge is relatively "clean" with no snicks that might complicate the eventual fitting.
Multiple cutting
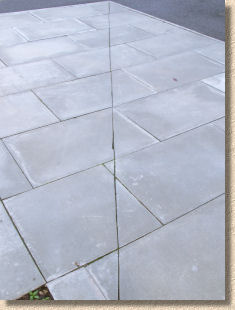
Occasionally, we encounter jobs where a succession of flags need to be cut to create a straight line. During the laying process, the line of cut is usually indicated by a taut string line, and the flags will be laid so that they project beyond this line. It may seem a good idea to cut each projecting flag immediately after laying - after all, the string line is there as an alignment guide, so it's simply a matter of transferring its position to the flag on the ground.
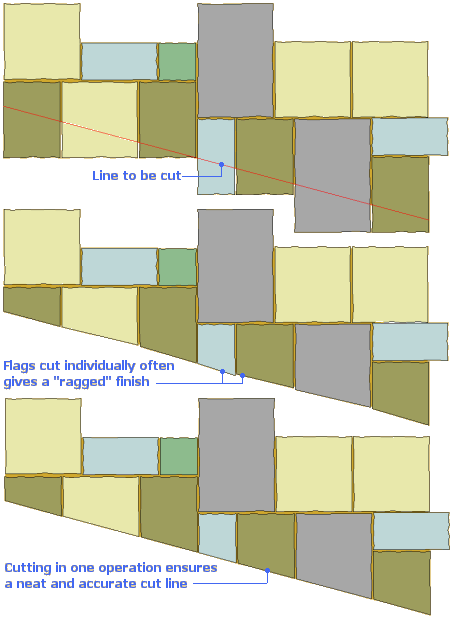
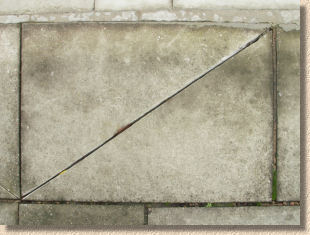
Sadly, this method invariably results in a hotchpotch of misaligned cuts. In the illustration below, the first flag may be cut at, say, 24°, the second at 26°, the third at 24.5°, and so on, The end result, as you can see, is less than ideal.
Longer cuts are best done as one operation, rather than a series of individual cuts, but a cutting guide such as a long plank or steel bar should be used to ensure the cut line is actually straight!
In practice, we would lay all of the projecting flags first, then position a long-enough straightedge to give the line of cut, and use the straightedge to guide one, long continuous cut from start to finish. As described above, the 'first traverse' would be a simply scoring and marking cut, just deep enough to leave a definite line on the surface of the flags. Once that was done, the straightedge can be withdrawn and a deeper cut completed. If this was to be a visible cut edge, such as would be found on a step, then a full depth cut would be used to ensure a smooth vertical face, but if the cut line was to be abutted against some other paving, a lawn or some other object that would effectively hide the cut edge, a standard half-depth cut would be suitable.
Fettling sawn cuts on stone flags
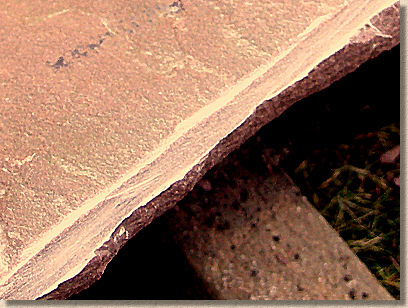
Imported stone flags have grown in popularity over recent years and part of their charm are the 'fettled' edges, which may also be referred to as hand-cut, hand-trimmed, chiselled, dressed or a host of other terms. Fettling is a term we use in the streetmasonry trade in northern England for the process of squaring-up and dressing a piece of flagstone to create a presentable and tidy-looking arris at a cut edge, so we'll stick with that in this discussion.
Fettled edges have a distinctive, soft, organic look. They're not absolutely straight and true and this seems to sit well with the lightly riven surface that is the most popular choice. The dead-straight hard-edged line of a saw cut looks uncomfortable with this type of flag. Honed, sawn-six-sides, polished and certain other finishes look perfectly fine with ruler-straight sawn edges, but there's a glaring inconsistency (to my eyes, at least) between an obviously natural riven surface and a laser-line straight saw cut edge. It just don't look reet, as they say in Lancashire!

Genuine fettled edges are created by cutting the flagstone with hand tools - this is how they are dressed in the quarries from whence they came. Labour is cheap in these quarries, and so there's no great cost in employing a few local characters to trim the riven stone to the desired size. Hand tools bring a natural, albeit slight, inaccuracy that creates a cut arris that isn't as straight as a die, but varies by a millimetre or two, here and there, echoing the natural unevenness of the riven surface.
Although labour in overseas nations may be cheap enough to employ trimming masons, in Britain and Ireland, wage levels are much higher and the skills once used to cut flagstones with fettled edges are teetering on the verge of extinction. Most paving contractors now use Power Saws to do their cutting, and who can blame them? It's faster, more accurate, can be done by unskilled operatives, whereas a true fettled edge takes a craftsman with skills learned over a number of years.

No matter how fast and economic the saws may be, the cut arris they create is typically square-edged, sharp and mechanically straight. The flags can be cut and dropped into place "as is", but for a more authentic-looking finish, some clients will prefer all edges of the flags to be fettled, or at least appear that way. Luckily, it's a very simple task to mimic a fettled arris on a sawn edge. Notice I didn't say we'd mimic a fettled edge - there's no advantage in fettling the edge when the joint will be pointed or filled with a jointing medium. The only part that will be seen, once the flag is laid, is the arris, and so that's the only part we need to treat.
Lay the flag on a maul, a bag or sand or other suitable support, with the arris to be fettled facing you and tilted upwards. All that is needed is for the sharp arris to be lightly bashed with a hammer, enough to chip the arris, and so soften the edge and disturb the straight line finish of the saw cut. A lump hammer can be used, although care is required so that the fettling doesn't turn into spalling, but for those uncertain of their skills or trying this for the first time, a smaller hammer, such as a Warrington Hammer or even a standard Claw Hammer, can be used with a greater degree of delicacy.
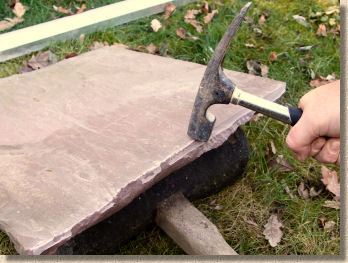
Take additional care at the corners: these are the most vulnerable parts, the parts most likely to go awry and break if clobbered too heavily. Use lots of light taps rather than a few heavier blows. Fettle both 'ends' and then work towards the centre of the cut edge, where heavier blows are far less likely to spall or even break the flag. If in doubt, try out this technique on a few discarded off-cuts before attempting to fettle a necessary flag.