Article written by James Ramsden of Stonecrete
Introduction
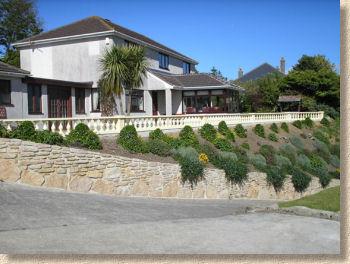
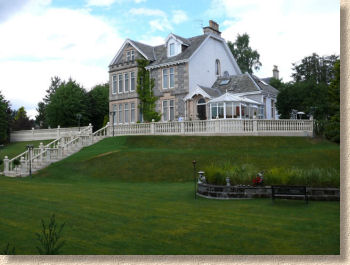
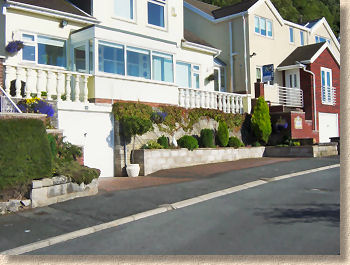
Many stone balustrading runs are designed and erected for decorative purposes, creating an attractive stone feature. They may also be used as a guardrail on raised patio areas and balconies. If this is the case, some very specific guidelines must be adhered to in order to comply with current building regulations.
Complying with Building Regs
The following guidelines are an overview of regulations for domestic application as advised by building control and can be subject to change. As all projects vary, you MUST seek advice from your local authority prior to commencing work.
A stone balustrade is subject to building regulations if used as a guardrail which guards a drop of 600mm or greater. If used purely for decorative purposes at ground level, building regulations do not apply.
When used as a guardrail, building regulations state the following:
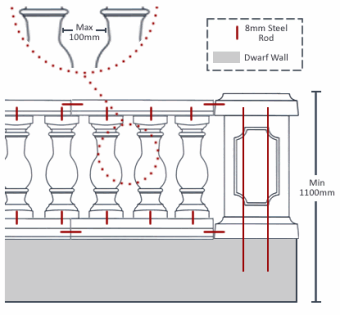
- The overall finished height of the balustrade must be a minimum of 1100mm,
- At no point should there be a gap of more than 100mm,
- The balustrade should withstand the following UDL (Uniformly Distributed Load)
- Sideways UDL on top rail - 7.74KN
- Sideways UDL on balusters - 1KN
- Downward UDL on top rail - 0.5KN
The stability and strength of the balustrade MUST be calculated by a qualified structural engineer and submitted to building control in order to comply with building regulations.
Constructing a Stone Balustrade
The following guidelines are based on the construction of a stone balustrade which complies with building regulations.
However, to fully comply with building regulations when required, all aspects of its design must be submitted to your local authority for confirmation including structural calculations from a structural engineer.
Creating a Solid Base
For stability, your balustrade must be constructed on a solid base, be it a concrete floor or a dwarf wall built from brick or concrete blocks.
For maximum strength, it is advisable to create a base thick enough to be able to drill to a depth of over 150mm to accept steel reinforcing rods. You must seek advice from your structural engineer on strength and suitability of your base.
Depending on the size of your balustrade, it may be necessary to raise it to a total height of 1100mm to comply with building regulations. Some manufacturers can provide colour and size matched blocks to suit your balustrading product. Alternatively, it is common practice to build an appropriately sized dwarf wall from brick or even concrete blocks with a rendered and painted finish.
Pedestals
Pedestals (Post, Pillars, Piers) are used at the beginning, end and corners of a balustrading run. For extra strength, they should also be used every 3m or less.
Joints
All elements should be fixed together using a 5mm mortar joint. This can be a 3:1 sand and cement mix or a premixed alternative. Some manufacturers provide a colour matched mortar at a price. Where building regulations must be adhered to and extra strength is required, reinforcements may need to be added to all joints. In this case, use 8mm steel rods and consult your structural engineer.
Laying
1
Start by constructing your corner pedestal or post.
You may be required to insert steel reinforcing rods. If this is the case, consider how many steel rods are needed (ask your structural engineer) and the best way to insert them. Corner pedestals or posts are normally hollow allowing for rods to travel through the entire pedestal. The rods should be anchored into the base by drilling more that 150mm and fixing using a strong mortar mix or premixed alternative. They should then travel through the pedestal which should then be filled with concrete. If the pedestal has a capping or top plinth, holes will need to be drilled in the underside in order to accept the rods. The capping can then be mortared to the pedestal and the rods.
2
Lay your base rails.
These should ideally be laid on a bed of mortar no less than 20mm thick. If necessary, cut rails using a disc cutter. If steel rods are required, measure and drill two holes accurately in each end of the rail to ensure rails line up. Drill holes in the pedestal where the pedestal and rail join. Push elements together leaving a 5mm joint. Once a few rails are laid, check level and direction and adjust slightly if needed.
3
Arrange balusters (bottles) on the base rail at correct intervals.
If steel rods are needed, measure and drill holes in the base rail and in the centre of the underside of the baluster. At this point, it may be useful to drill holes in the top of the baluster as well. Then fix the balusters to the base rail with a 5mm mortar joint including steel rods if needed.
4
Lay top rails (copings) on top of the balusters.
Measure and drill holes in each end of each top rail (as base rails), in the underside and also in the pedestal where needed. Fix with a 5mm mortar joint.
5
Once the mortar is semi-dry, scrape away an excess and point if necessary.