
Refurbishing a block paved driveway
This page is one in a series which documents the refurbishment of an existing block paved driveway. Although the page can be read as a standalone article, it will probably make more sense if read in conjunction with the associated pages listed below.
Part 7: Applying the Sealant
The Problem
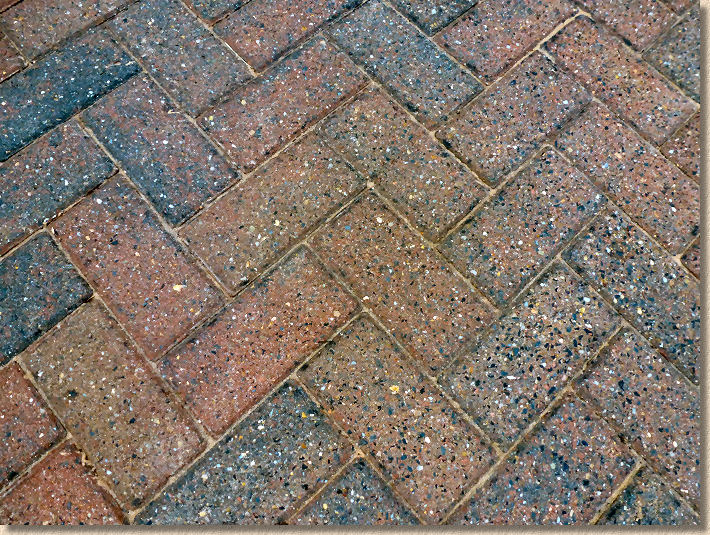
And so to the final part of the whole process, the part where all the previous hard work is 'locked-in', for want of a better phrase, and the newly restored good looks preserved for the next few years. The sealant does exactly as the name suggests: it 'seals' the pavement, protecting it from accidental staining, enhancing the colour of the blocks and gluing the jointing sand into place so that it can no longer be lost to wind or water.
Choosing the right sealant
There are dozens, nay hundreds, of sealants on the market and choosing the one best suited to any particular project can be something of a challenge. The pros and cons of the various types are discussed elsewhere on the website , but it's probably a good idea to run through the reasoning that led to the choice of one particular product for this project. The key choice is whether to use an acrylic sealant or a urethane. Acrylics are the usual choice for residential concrete block paved driveways and patios because they are simple to apply, they give good coverage, they enhance colour and they are relatively cheap. Urethanes are more widely used on commercial projects, as they can be a little more tricky to apply, although there's really not much in it. They give reasonable coverage, they can enhance colour, they are extremely hard-wearing but they are a bit more costly. A separate part of this driveway had previously been sealed using an acrylic product which gave a reasonable finish for the first 12 months or so, but rapidly deteriorated in the second year of service to the point where it was impossible to tell a sealant had been applied. Accordingly, the property owner decided to try a urethane sealant for this project to see if it fared any better.
When it came to choosing a specific product, the main requirement was for a sealant that gave a damp but not wet look. The desire was for the sort of effect observed half-an-hour after the rain has stopped and the colour of the blocks is emphasised without any hint of shininess. It also had to be an effective jointing binder as the property owner regularly washes cars on the driveway, which had previously resulted in scour of the jointing sand.

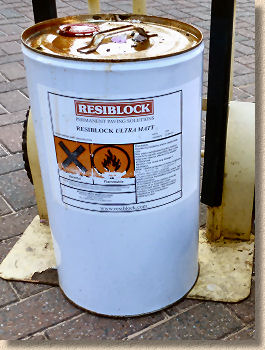
After wide consultation with sealant specialists and experienced paving contractors, the choice was narrowed down to two products. Individual loose blocks were treated with the two possible options and left for a few weeks to see how they looked. Eventually, it was decided that Resiblock Ultra Matt would be the chosen product as it was deemed that the fully-cured appearance best matched the requirements of the property owner.
The sealant comes supplied in 25 litre steel drums with a plastic cap and the drums are moved about the job on a sack trolley. It is a single-pack (ie: no need to mix with a hardener or activator before use) prepolymer urethane that has what is referred to as a 'low viscosity' which essentially means it's not thick and gloopy. Prepolymer means that the liquid polymerises (sticks together) as it cures in the atmosphere.
Health & Safety
In common with most other sealants, Resiblock Ultra Matt should be regarded as a hazardous substance and handled accordingly. PVC gloves with barrier cream protection of any bare skin is recommended, as is the use of safety goggles or a face shield/visor. The product in its liquid form is flammable, and must only ever be used in the open and a strict policy of no smoking/no ignition sources should be enforced. In public areas, it is better to erect barriers to exclude anyone other than the operatives.
Tools
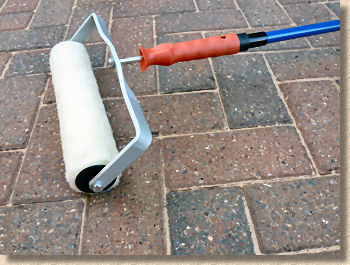
Resiblock Ultra Matt is best applied using a squeegee. Resiblock can supply one specially selected for the task, but any good quality foam- or rubber-edged squeegee should be adequate. It is also possible, with care, to use a good quality short-pile roller attached to a long handle, as we did on this project.
It's also a good idea to have a couple of paintbrushes, say 1½" and a 3" for 'cutting-in at edges against walls etc. where a roller or squeegee would be impractical. Finally, a measured bucket of some form will be needed. The Resiblock Ultra Matt is poured from the drum into the measuring bucket prior to application. Resiblock supply a wide, flat bottomed pail which is ideal for this purpose.
It's also worth noting that a decent brush and a leaf-blower are incredibly useful for the preparation work that is essential before applying the sealant, and that Resiclean is the solvent which can be used to clean tools and any minor uncured spillages.
Preparation
Most of the preceding sections have looked at the preparation needed to render the paving ready to be sealed, but just before we actually apply the sealant, it's essential that any last minute loose material, surplus jointing sand, rogue litter or any other detritus is removed from the surface first. There's no sense in sealing on any crap which has landed on the paving since it was last brushed down!
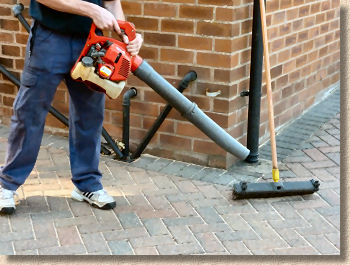
So, a thorough brushing will usually suffice but the specialist contractor undertaking the sealing also uses a leaf-blower to see off any sand or dust that might have collected in the corners and in the block chamfers. This is a simple matter of working continuously along the paving chasing any suchg detritus in one direction, off the pavement, to a point where it can be disposed.
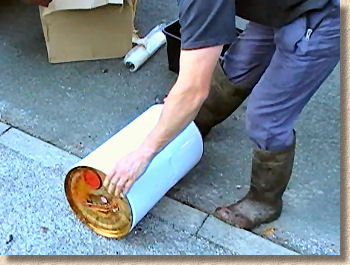
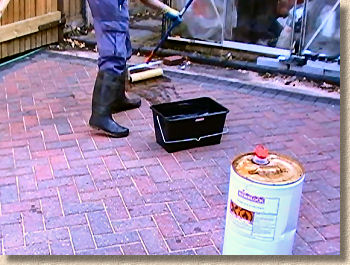
Agitate the drums
Once the surface has been blow-cleaned, the sealing can begin, and the first thing to do is to ensure the unopened drums of sealant are thoroughly mixed prior to opening them. This is best done by placing a drum on its side and rolling it around for a couple of minutes.
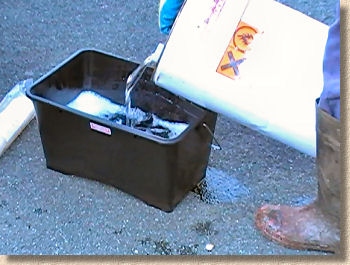
Once the sealant has been properly agitated, the drum can be opened and some of the liquid poured into the roller tray ready for use.
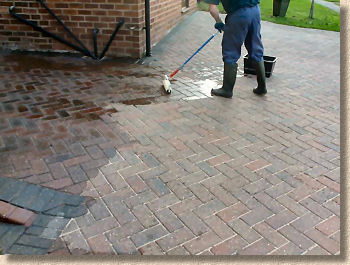
Applying the Sealant
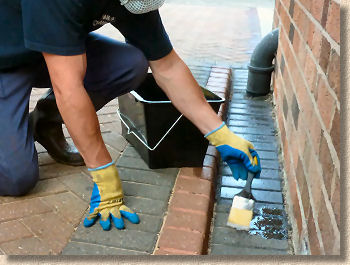
To start off, the sealing specialist recommends that the edges are 'cut-in' which involves coating them with sealant applied by a paintbrush. This helps ensure the sealant doesn't get smudged onto adjacent walls or other surfaces while also checking that even the relatively inaccessible areas around gullies and tight corners are fully covered.
Resiblock recommend that accurate coverage ensures best results and so they suggest that by roughly sub-dividing the surface to be sealed into sections of 10m² and then using 5 litres, as measured by the bucket or roller tray, this will act as a reasonably accurate indicator that a sufficient and consistent quantity of sealant has been applied to each section. The Resiblock roller tray is conveniently marked on the inside face to show how many litres remain within the tray.
Using the long-handled short-pile roller, this is dipped into the tray and then transferred to the area to be sealed and rolled to give effective coverage of the paving. It's important to note that this is not an exercise to apply the sealant as sparingly as possible and so maximise coverage, but rather it is important to ensure full, even and consistent coverage with no pooling of the liquid within the block chamfers or elsewhere. Using the litre guide inside the tray helps ensure that the sealing operative is maintaining an average coverage rate of around 2m² per litre.
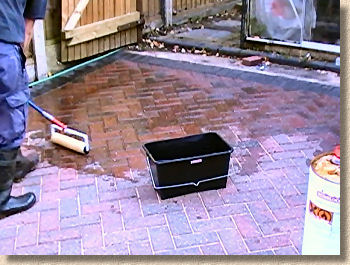
The sealing starts at the 'back' of the driveway, so that the operative can work towards the front and not paint himself into a corner, literally. One trick used be experienced operatives when they are forced to walk across an area that has just been sealed and is still wet is to wear a pair of old golf shoes so that the spikes carry the sole above the tacky surface and minimise any disturbance of the sealant as it cures. Old cricket shoes or running spikes would be suitable for those not sad enough to own a pair of bloody golf shoes!
Sealing progresses at quite a lick (excuse the pun!) and it takes less than a half hour to seal roughly 60m². The blocks and the jointing drink up the sealant, but coverage is fairly consistent at a shade over 2m² per litre. Due to the edges already having been 'cut in', the operative is able to concentrate of covering the bulk of the area in one continuous operation and not having to stop, park up the roller, and get down on hands and knees to fettle a bit around, say, a gully or a soil pipe.
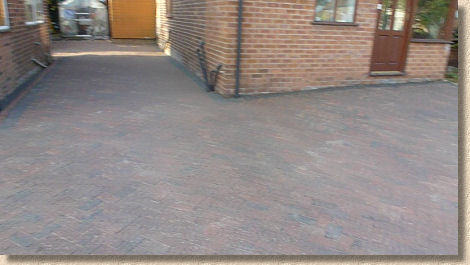
Within 90 minutes of starting the whole of the driveway is covered, and that includes the blowing-off of surface dust and sand, and the cutting-in. That's roughly 100m² in an hour and a half, a little over a square metre per minute. Pretty good!
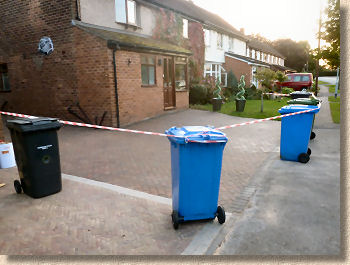
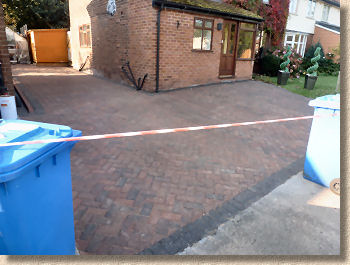
The sealant applied first has already begun to cure in the warmth of the late afternoon, but that most recently applied, at the threshold of the driveway and the public footpath, is still very much wet and tacky, and so the whole of the driveway is cordoned off in a (probably futile) attempt to keep the local kids off it overnight.
Finishing Off
And that is it! Keep the local eejits from straying onto it for the first 2 hours or so, and after that, it's almost impossible for them to mess it up. At this time of year (end of summer) vehicles are best kept off for the first 24 hours or so but this may be longer in cooler periods. Personally, I like to play it safe and ensure the sealant has been given every chance to cure and so we kept the vehicles parked on the road for the first three days.
In theory, a second coat can be applied but in the vast majority of cases, there is no need for this additional work and expense unless a truly impermeable surface is required or if exceptionally heavy wear or staining is anticipated. In the rare case where a second coat is deemed necessary, it's best applied within 24 hours and the usual 'make sure the surface is clean and free from dust' recommendation still apply. Note also that second coats may reduce the Slip Resistance Value (SRV) of the pavement.
Cleaning tools
It has to be said that Resiblock Ultra Matt tends to start curing quite quickly and even after a few minutes any unwanted residue will start to harden and this can build-up on tools such as brushes, squeegees and rollers.
In our experience, the life of a short pile roller or squeegee is limited and on a project such as this, it's often best to replace a worn or knackered tool rather than try to clean it, but there may well be tools that are worth cleaning, and, of course, there are the occasional splashes and overspills that need to be cleaned.
In all instances, it is imperative that the correct cleaning solvent is used. This is ResiClean . It is obtainable from the same people that sell the Resiblock sealants. It is very important to note that it is NOT turps nor white spirit nor xylene. It is a specialist product designed for use with high grade polyurethane resins.
Tools and uncured spills can be cleaned with the ResiClean and then rinsed with soapy water followed by clean water. Gloves and full skin and eye protection MUST be used when using ResiClean. If it can dissolve a polyurethane resin, you really don't want to find out what it can do to human flesh! Once the sealant has cured, removal becomes much more difficult. It's not impossible, but it's not easy and it's not particularly cheap, which is why disposable tools such as rollers and squeegees are often binned after use - it just isn't economic to attempt to clean them.
Left over sealant
It's also worth noting that, once a drum of the sealant is opened, its working life is somewhat limited. The humidity in the atmosphere will initiate the curing process and so product from a drum that was opened last month may not adhere as well as expected or it may have a much reduced service life. Any left-over sealant should be used within a few days or it should be disposed of responsibly. This may involve adding a litre or two of water to the residual sealant in the drum, stirring it through with an old stick and allowing it to harden before disposal.
Don't be tempted to pour left-over sealant from the tray back into the original drum. This can cause serious problems ranging for accelerated curing of the sealant to gas generation which could burst the drum! Mix it with water and allow it harden before disposal.
And finally:
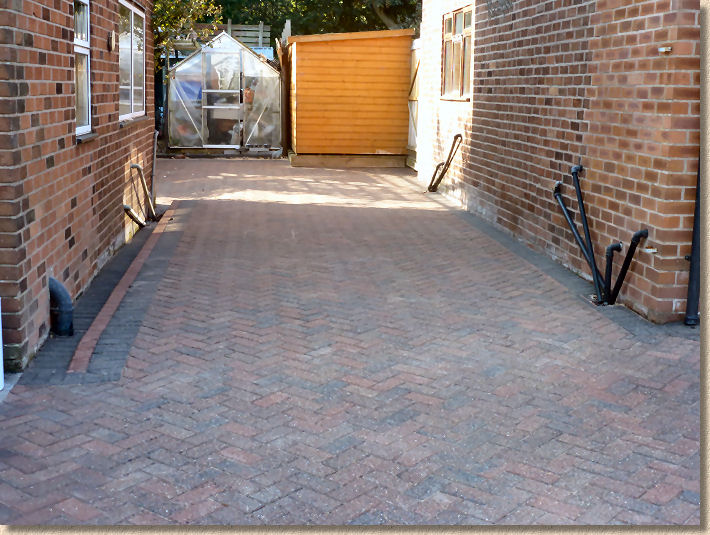
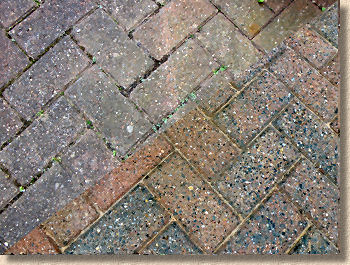
The finished project is genuinely stunning. There is no way you could tell that this residential driveway is over 17 years old. It's no use pretending it looks brand new, because it is obviously bedded in and weathered to a degree, but it certainly doesn't look more than two, maybe three years old. And that has to be regarded as a result!
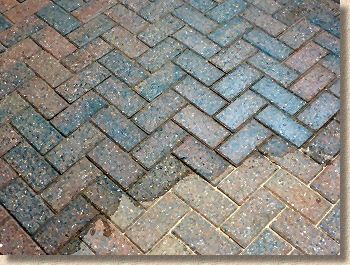
Just look back at the photos of what we started with. Look at the image here showing the contrast between old and new. Why pay a fortune to have a new driveway or patio installed when, with a bit of effort, a bit of know-how and the right products, the existing paving can be completely rejuvenated and given a whole new lease of life.
Video: