Introduction:
This 'slipping out of line' is known as "Lateral Movement" yet a few basic precautions at the design and installation stage can help ensure a long service life for flagged pavements.
As a very rough and ready rule of thumb, the bigger the flag and the tighter the joint, the less prone is the flag is to lateral movement. So, a 900x600mm flag that is close-jointed or has a 12mm mortar joint, is less likely to slip out of alignment than, say, a 450x450mm flag with a 20mm joint.
Obviously, where an edge is retained, by a wall, a kerb, and edging or other fixture, lateral movement is not a problem (usually!), and the presence of a restraining course is well worth considering when designing pavements. Also, the presence of soil, lawn, gravel or similar against a free edge will help restrain lateral movement, to some degree, but, for those situations where an edge course is not feasible, then there are a couple of techniques that can be used to help minimise the risk of lateral movement.

Mortared Edge
This technique relies on replacing the bedding at the edge of the pavement with a wet mortar or high slump concrete. The idea is that the flag bonds to the mortar/concrete and is therefore held firmly in place, unable to slip sideways.
A wet-mix Class II mortar , a wetted-up 10:1 bedding mix, or a few spadefuls of a general-purpose concrete (C10-C20 sort of strength) can be used. The extra wetness facilitates the adhesion of the flag base to the mortar/concrete, and using a plasticiser in the mix will further aid adhesion.
Use of a bond bridge will help even more!
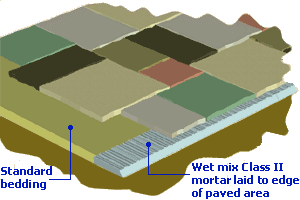
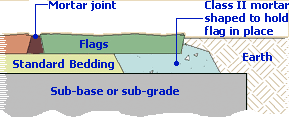
It's not fool-proof, though. The flags may not bond to the cement-bound material, and, even if they do, there's a possibility that the bond will break at some point. The relatively smooth, regular nature of BS flags makes them less likely to bond than is the case with wet-cast flags, which generally have a knobbly, uneven base. This can be overcome by bringing the cementitious material partially up the edge of the flag, as shown in the cross-section drawing above.
There's also a problem of potential differential settlement. If a non-bound bedding material (e.g. sand or grit) is to be used as the bedding, then that may, over time settle slightly or by disturbed by groundwater movement, whereas the cement-bound edge bedding is firm and incapable of settling/moving. This could then lead to the internal edge of the flags sinking slightly relative to the free edge.
However, this is basically a sound and reliable method for most light-use pavements, such as garden paths or patios.
Edge Spots
One way to overcome the potential problem of differential settlement is to use this method that borrows something from the despised Spot Bedding so beloved of TV Gardeners and assorted eejits. It works best with larger flags, 450x600 or bigger, where the size of the flag itself gives a reasonable degree of stability while the anchoring provided by this method is basically extra insurance.
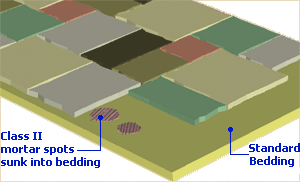
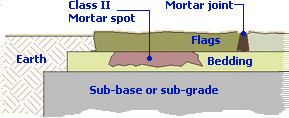
Again, a wet mix Class II mortar should be used, and the idea is to provide two generous dollops of mortar that sit within the standard bedding material. These dollops of mortar (or spots, dabs or whatever you want to call them) bond to the base of the flag and effectively anchor it in place by providing a keyed base; that is, the profile of the base of the flag-mortar combination is shaped so that it is firmly lodged into the bedding.
It should be noted that the mortar spots ARE NOT supporting the flag, as is often the case (and the problem) with <spit> Spot Bedding, but are merely providing anchorage. It is the bedding that is supporting the flag.
The best way to use this method is to prepare a bed as normal, either individual bedding or screed bedding , and then scoop out a couple of hollows in the prepared bed, approximately 150mm in diameter, 25mm deep and 150mm apart. Place a generous trowelful of the mortar into these hollows, and ripple the surface with the edge of the trowel so that the top of the mortar is level with the bedding or proud by not more than 10-15mm. Then, lay the flag as normal and consolidate it into position, so that the base of the flag is pressed into contact with the mortar.
Once the mortar has cured, the flag should be fairly secure and unlikely to move.
Using Crossfall
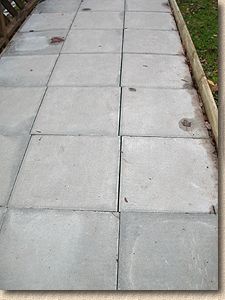
This solution is often seen with public footpaths, where crossfall tends to be more generous than is typically found on domestic paving. The roadside edge of the pavement (the "front" edge) is retained by a kerb, and then the paving is laid to a crossfall of 1:40, which means on a typical 1800mm wide path, there is 45-50mm of fall.
The flags are less prone to lateral movement because gravity wants them to 'slide' in the direction of the crossfall, ie, towards the kerb, and not towards the free edge at the 'back' of the pavement.
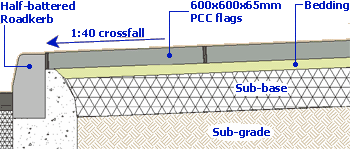
Even on the relatively narrow 900mm wide access path to a car park shown opposite, the generous crossfall is helping keep the flags in place, tight against the kerb retainer, and not laterally spreading into the planted area at the back.