Introduction:
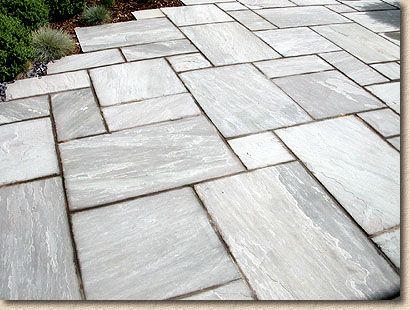
As has been stated elsewhere on this website, we find that a dark coloured mortar works exceptionally well with riven flags, both the concrete copies and the genuine stone articles , including the highly popular imported sandstone . However, pointing using a dark coloured mortar is fraught with difficulty, not least of which is the risk of staining from the dark mortar itself.
The following is a step-by-step guide to pointing a light grey Indian sandstone riven flag using a dark brown, almost-black, mortar. It should, however, be pointed out that the pointing work was undertaken in the late spring/early summer when conditions were ideal, the flags themselves were thoroughly dry and there was no risk of overnight rain or dew. This method should NEVER be undertaken on flags that are damp, or when there is a risk of them becoming damp in the first 24 hours, otherwise the flags WILL be stained by the mortar used in this process. Where flags are damp, then the more traditional method of pointing is preferred, or, better, still, wait until the weather improves and the flags are dry.
Mixing the Mortar
The key to success using this method of pointing comes from using a semi-dry mortar. This section looks at how such a mortar is prepared.
To form a good, solid, joint between flags, a decent mortar is required, and, to achieve maximum strength, a mortar requires the cement content to be hydrated, that is, the cement has to undergo a chemical reaction with water that initiates hardening of the mortar. However, use of a wet mortar is more likely to result in staining of the surface, and so the dry grouting method has become popular in certain circumstances, notably where water for hydration can be drawn from the relatively fresh mortar that has been trapped in the joint following buttering of the flag edges during the laying process.
Obviously, dry grouting is not always suitable: the flags may have been laid the previous day, or even the previous week, and so there is no free water in the joint to initiate hydration, or, as in this case study, a coloured mortar is required. To achieve a full depth of colour in a mortar, water is essential to thoroughly disperse the dye powder and to activate it. Adding dye powder to a dry grout mixture does not bring out the full colour and, because the dye is not fixed there and then into the mortar/grout, it can be released days later when the paving first gets wetted, resulting in staining of what was supposed to be a completed pavement.
But, as mentioned earlier, a wet mortar is more likely to result in accidental staining of the flag surface. So: we have a dilemma - we need a wet mortar to get a strong joint and to get a decent degree of colour, but we don't want a wet mortar because it might stain. That's where this semi-dry mortar comes in. It should include just enough water to initiate hydration and to activate the dye powder, but not enough to form a sloppy, staining mortar. The key to success is getting the water content "Just Right"
The ingredients for the mortar need to be measured out, or "batched" with a degree of accuracy. A Class II mortar is used for most pointing work, and so we need to measure out 3 volumes of sand to 1 volume of cement. It doesn't matter whether these 'volumes' are bucketfuls, cupfuls or kilogrammes, as long as they are consistent. The other ingredient at this stage is the dye powder (or liquid) itself and only trial and error can reveal what quantity of dye is required to achieve a certain shade. As a general guide, allow for 1-2% colour, so, if a mix of 20kg dry weight total was being prepared, then it would consist of 15kg of building sand plus 5kg of cement and 200-400g of dye. It's easy to add dye if the depth of colour is not reached, but colour can't be taken away if its found to be too strong, so start low, say 200g, and add more if required. Keep a record of what volumes of sand, cement and dye were used to make the batch.
In this example, a batch of 10kg is being prepared, as only a small area is being pointed at this time. Under normal site conditions, it's best to mix roughly "1 barrowful" at a time, using a full, 40kg bag of sand with 12.5kg of cement (half a bag) and 500g of dye, so that a reasonable area can be pointed using a mortar of consistent colour and strength.
The dry ingredients are added to the mixing vessel (a bucket in this case, but it could be a barrow or a mechanical mixer) and thoroughly mixed - the water is NOT added yet.
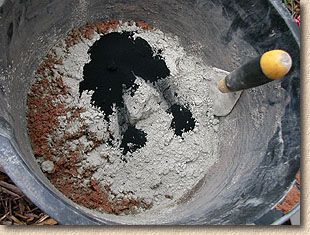
The dry ingredients need to be turned over and over and over until they are utterly, thoroughly and completely mixed, with no clumps or patches of sand or cement. The mix should achieve a uniform hue, an intermediate shade somewhere between the colour of the building sand and the bluey-grey of the cement. The dye will not achieve its full depth of colour at this stage, but the residual moisture content in the sand may begin to bring out the colour, and spots or streaks of colour may be seen in the mixture.
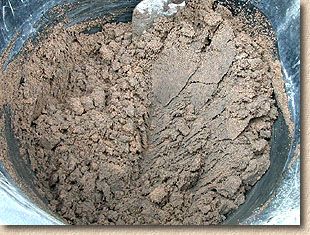
Once the dry ingredients are properly mixed, the water can be added. The aim is to produce a mortar with "just enough" water, so it should be added in small amounts, just a bit at a time, and worked into the dry ingredients. This is hard work - it's much easier to mix a wet mortar, as it is more fluid and moves much more readily, but with a semi-dry mortar, the mix remains stiff and almost unworkable. Hand mixing is best done in small quantities, using a pointing trowel to agitate the mix, but a mechanical mixer is much less strenuous.
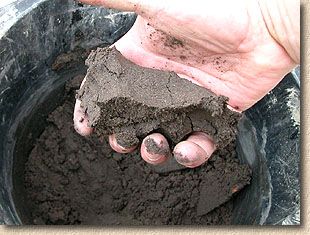
The aim is produce a mortar that is just about capable of sticking to itself (aggregating) and has brought out the colour of the dye. As shown in the photo opposite, the mortar has darkened considerably, and is sticking together as a coherent ball when compressed, but no excess water dribbles from the clump when it is squeezed and, more importantly, it is not staining my hand! Also note that I really ought to be wearing protective gloves.
The colour is consistent; there's no streaking which would indicate incomplete mixing. The mix is obviously damp, but not wet, and can be trowelled to a smooth finish, just about. It's now ready to be put to use!
The Pointing
This is the moment of truth....it's best to test the semi-dry mortar on an inconspicuous corner to ensure it doesn't stick, stain or leave any colour behind. If it's too wet/damp, and it does stain, then wash off the affected area and mix in additional dry materials to the mortar to dry it out a little more.
The paving to be pointed should be swept clean prior to starting, as pointing involves a lot of kneeling, and suddenly putting all your body weight onto one knee that happens to be resting on a nasty little pebble can be a painful experience. The use of good quality knee-pads cannot be recommended too highly.
The joints themselves should be reasonably clean and free from mud, excessive dust or detritus, cig ends, litter or anything else that's undesirable.
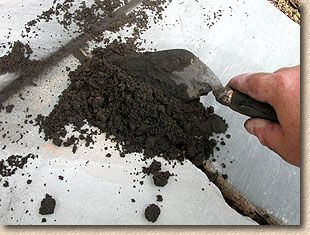
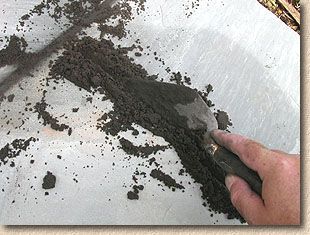
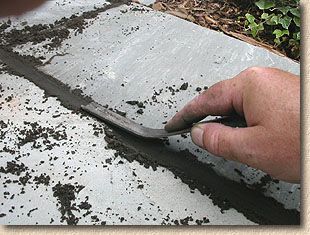
A trowelful of the semi-dry mix is unceremoniously dumped on top of the empty joint. Note that it is obviously damp and aggregating, as evidenced by the small 'ball-like clumps of mortar near the bottom of the picture, but is not marking the paving.
The edge of the small pointing trowel is used to push the mortar into the empty joint, pressing it down, moving more mortar into place, pressing that down, and so on until the joint is definitely full.
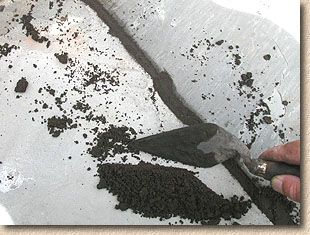
As one, short length of joint is filled, the semi-dry mortar is drawn along the joint using the trowel, and the process repeated and the next short length, packing the mortar into the joint, pressing it down, topping it up and moving on again down the joint.
It's best to work from the un-pointed area, so that there's no danger of treading mortar into the surface of the flags. It's also easier to work progressively and methodically in one general direction, always drawing the mortar towards your body and avoiding walking over the freshly pointed area as much as is possible.
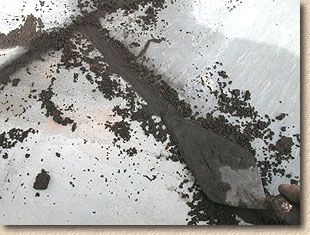
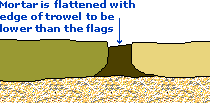
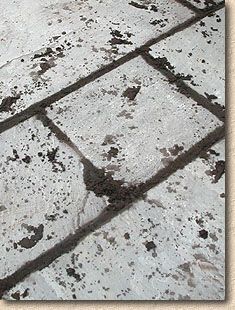
Once a joint has been filled, the tip of the trowel blade is used to smooth the surface of the mortar-filled joint, ensuring that it is properly filled along its entire length and that the mortar is slightly depressed compared to the surface of the pavement.
The surplus mortar remaining on the surface of the paving is then scraped away with the trowel to be used elsewhere, leaving the surface relatively clean and free from any mortar.
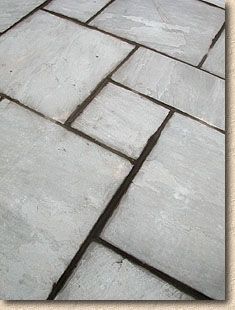
The joints can be tooled (struck) at this stage. Normally, an area of several square metres would be pointed-up and then the joints tooled with a pointing bar to further push down the mortar, ensuring full joints, but also polishing the mortar at the same time, giving a smooth, tidy appearance that is demonstrably harder than an untooled joint. The profile of the pointing bar may be flat, if preferred, but experience shows that a half-round profile works best with the variable joint widths that come about with riven flags.
Once tooled, the paving is best left for a period of time while the mortar begins to cure. This may take only an hour or so in warm weather (20°C or above), or 3-4 hours in cooler conditions.
Observing the loose mortar tailings remaining on the surface is a good indicator, as they will dry out much faster than the mortar in the joint - in fact, they dry out so fast that the cement hardly has time to hydrate and the result is a weak, powdery mortar. In this photo, the dried-out tailings are a definite light grey, compared to the darker browny-black of the joint mortar.
Cleaning Up
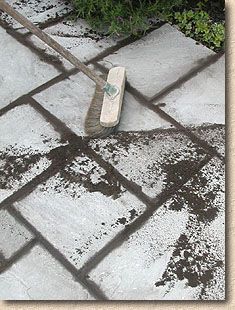
Finally, the tailings can be swept away using a soft brush. The brush should NEVER run along the joints, but should run across the joints, so that any mortar that is still a bit fresh is not accidentally swept out. Where there are lots of orthogonal joints (joints running up-and-down and side-to-side), as there will be with most flag paving, gently sweeping at an angle of 45° to the joints makes sure there is no risk to either the transverse or the longitudinal joints.
It should be noted that the swept-up tailings are waste and should not be re-used under any circumstances. Not even wetting will make them usable, as the cement content will already have partially hydrated and, if they were to be re-used, the resultant mortar would be weak and useless. Bin them, or mix them in with the bedding material, if flagging work is still ongoing.
And that's it! 24 hours later, the mortar should have hardened sufficiently to take careful foot traffic, but, if the paving is to be used by vehicles, it should be kept free from such traffic for at least 5 days, to allow the mortar a reasonable chance to harden to near full-strength.
Using a dark mortar emphasises the flags, setting them off and framing each one, drawing the eye to the paving (which cost pounds) rather than the mortar (which cost pennies).
Other pointing and jointing pages...
- Introduction
- Terms & definitions
- Pointing Styles
- Spacers for Paving
- Cement Mortars
- - Hand Pointing
- - Pointing Riven Flagstones Using Coloured Mortar: A Case Study
- - Wet Grouting
- - Dry Grouting
- - Slurry Grouting
- - Steintec Tufftop Slurry Grouting
- - Gun Grouting
- - Poured Grouting
- Resin Mortars
- - Polymerics
- - GftK Polymerics: A Product Study - VDW 840+
- - Romex Polymeric Mortars: A Product Study
- - Jointex Polymeric Mortar: A Product Study
- - Slurries
- - GftK Slurry Mortars: A Product Study - VDW 800 Permeable
- - GftK Slurry Mortars: A Product Study - VDW 850
- Re-jointing paving
- Pitch Jointing
- Loose Fill Jointing
- - Stabilisation
- Alternative Jointing Materials