Introduction:
Tidy detailing is usually the hallmark of a good block layer; it reveals a tradesperson's sense of integrity and professional pride in the finished appearance of the work.
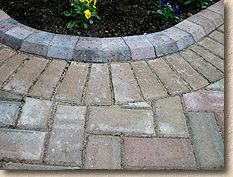
Some projects have little or no detailing, but most have at least some features that should be detailed, even if it's only mitred corners to a soldier edging course.
Curve detail
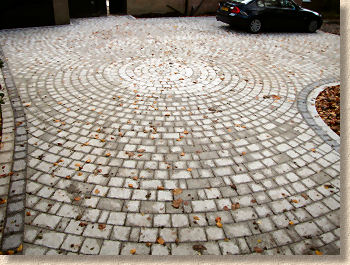
Curves are a common feature of most block paving. The small unit size lends itself perfectly to constructing curves, arcs and circles, which give a pavement a more organic look than does regular geometric shapes such as triangles and rectangles.
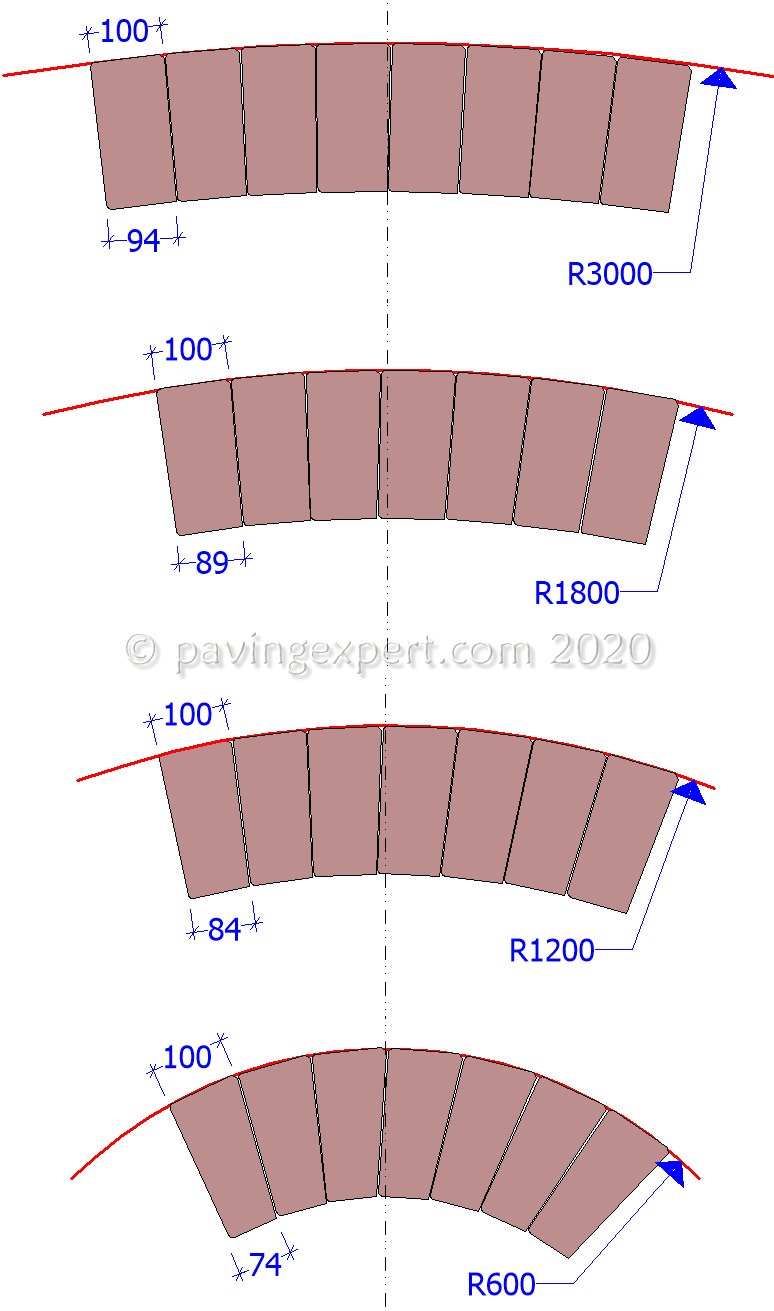
In practice, it's relatively simple to construct arcs of more than about 5 metres radius using full blocks.
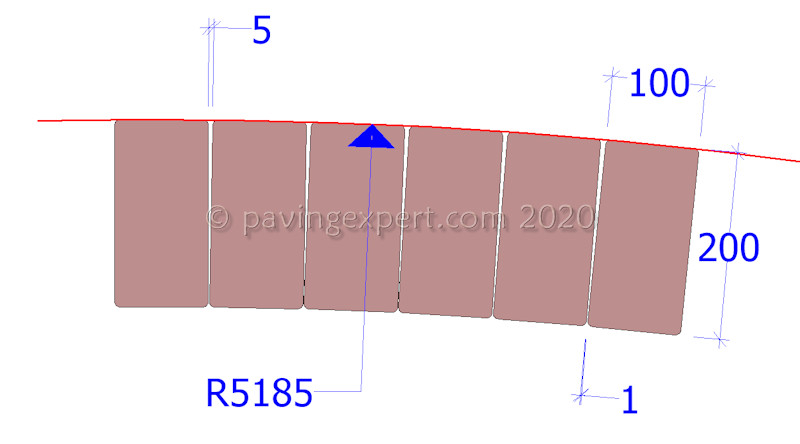
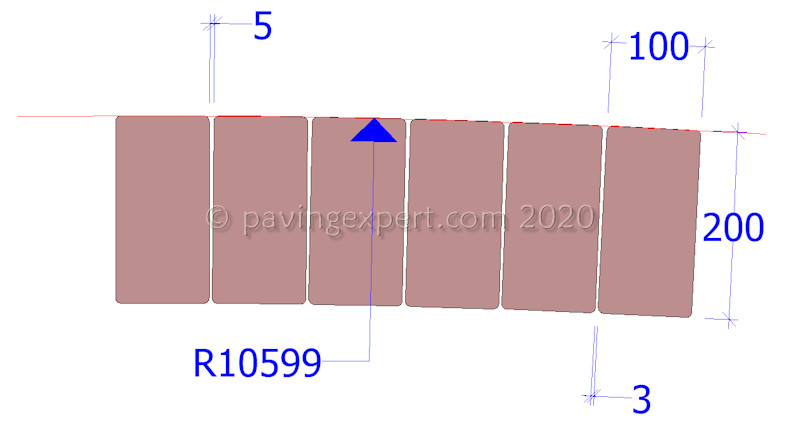
The relevant British Standard BS7533:3 allows for a maximum joint width of 5mm.
If this is accepted, then using a typical 100x200mm plan size block, the minimum radius achievable using full blocks, with no joint wider than 5mm and allowing a 1mm joint on the external face is around 5.1 metres, as shown in the diagram opposite.
However, this assumes that it's possible to achieve a tight 1mm joint on the inside face of the arc (at the 'bottom' of the blocks in the images) which may not be as simple as we might hope.
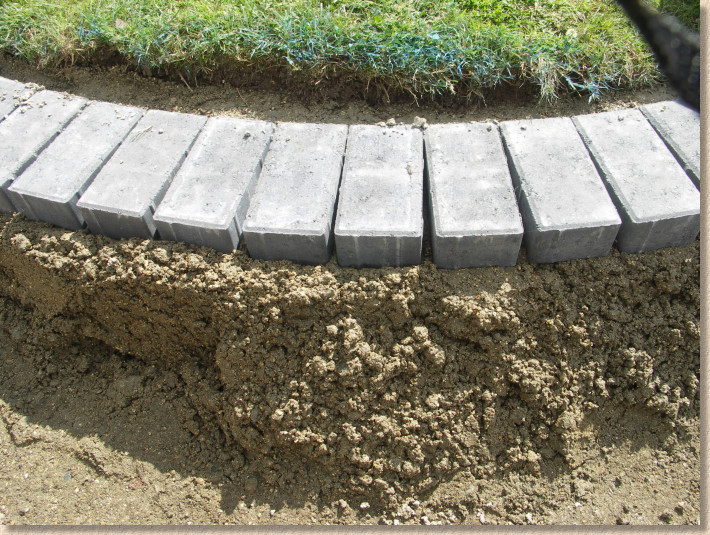
On most block paving projects, and especially those using blocks with integral spacer nibs, the typical minimum joint width is more likely to be 3mm (the BS reckons 2-5mm). When that is factored-in, and maintaining the ideal maximum joint width of 5mm, the minimum achievable arc is roughly doubled, to 10.6m, a relatively generous 'slow' arc by paving standard - radial road kerbs are replaced by straight units once the radius of an arc reaches 12m or greater!
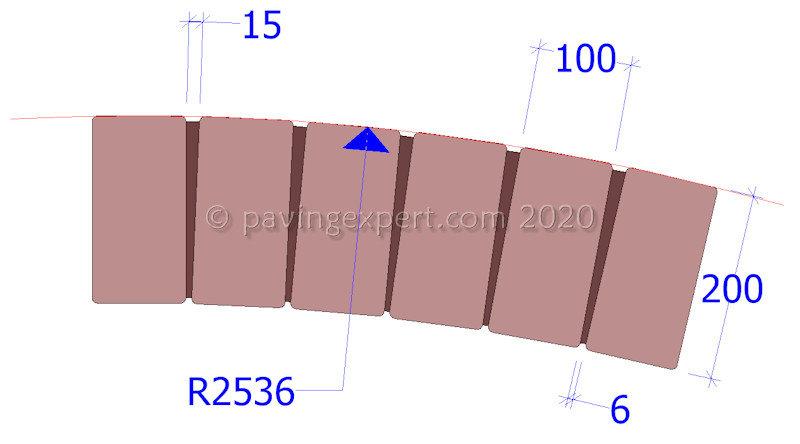
So, if a 200x100mm curved edge course which is BS compliant and has sand-filled joints is required, then any radius less than 5m, or thereabouts, will require the blocks to be tapered on either one or both edges, as is shown below.
Using Mortared Joints:
Some contractors use a mortar to fill overly wide joints on a curved or arcing edge course. While this is not directly forbidden by the British Standard, the use of mortared joints within an edge course should be considered carefully:
- - Does having mortared joints on curves look acceptable when joints on straight sections are not mortared or should all joints be mortared?
- - The mortar is liable to cracking if passed over by a vibrating plate compactor
- - A careful hand is required to avoid staining the block surface with mortar (7533:3 explicitly warns against using jointing materials which might stain the pavement surface)
If it is decided that a mortared joint is acceptable, then, to comply with the British Standard, it must be a full depth mortar joint, not just a token stuffing of the joint after installation. In practice, this means the edge course blocks will need to be buttered with mortar immediately prior to laying so that the ensuing is properly filled, as is done when bricklaying.
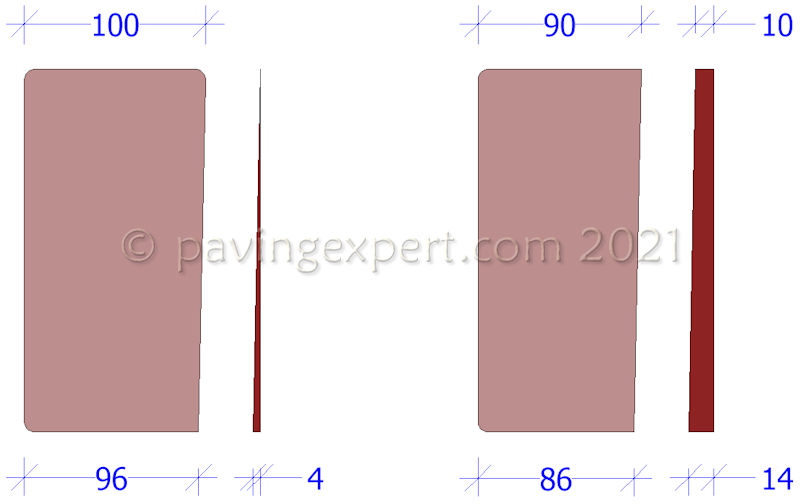
Given that the minimum width of a mortar joint is typically taken to be 6mm (anything less than that is considered too weak to last), and that any joint wider than about 15mm looks excessive, the layout shown opposite can be achieved.
By using mortared joints, a minimum radius of around 2.5m is possible without needing to cut any blocks.
If a mortared joint is to be used, then the mortar should include a strengthening/bonding agent, such as SBR , and should be coloured with a quality concrete dye to complement the paving. A red mortar looks good with any of the red colourways, such as 'Brindle', and a black mortar looks best with charcoal or dark brown blocks. If using a black mortar, base the mortar on a silver sand , as this requires less dye per kg to achieve a good black colour than does red or yellow building sand , which tend to turn dark brown rather than black.
Taper Cutting:
Regardless of whether sand-jointed or mortared jointing is used, any curves or arcs with radii of less than the values indicated will require the blocks to be taper cut.
Taper cutting is the name given to the trimming of a block or other paving unit to create an edge that will allow successive units to gradually follow a curve without creating a gaping joint between the units.
Taper cut joints not only look better than those pointed with mortar, they are less likely to cause problems.
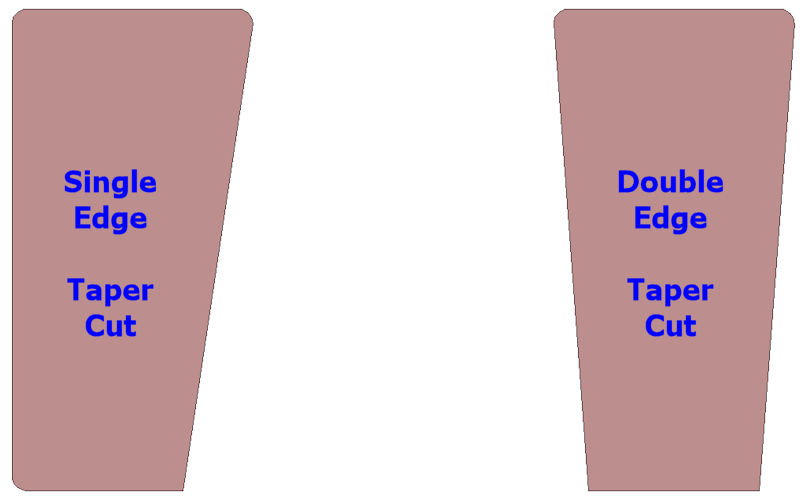
There are two forms of taper cutting: single edge and double edge, which should be fairly self-explanatory.
Single Edge Taper Cuts:
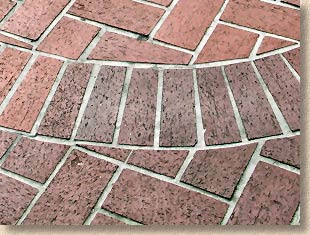
For radii between 0.6 and 5.0 metres, only one edge of the brick needs to be cut. This is a single edge taper cut and the appearance of this procedure at various radii is shown below....
Make sure that the same edge of each brick is cut, so that two cut edges are not butted together to form the joint, and the curve remains 'sweet'.
Lengthways (long axis) cuts on block pavers can be quite difficult unless the blades on the splitter are sharp. Clay pavers are exceedingly hard, and it's often quicker, easier and results in less wastage, to use a cut-off saw fitted with a diamond blade to taper cut the blocks.
Once the radius of the arc gets above 2m or so, the size of the piece to be trimmed and discarded from the whole block becomes vanishingly small and, in many cases, it's almost impossible to cut such small pieces from a block. It can be done using a cut-off or bench saw, if done carefully and patiently, but it's practically impossible using a splitter.
Instead, it's simpler to cut off a larger piece *at the same angle* .
So, for the 4.5m taper cut piece shown above, the piece to be removed measures 4mm at it's widest point reducing to nothing. However,by reducing the size of the piece to be retained by just 10mm, the piece to be cut off becomes a much more realistic 14-10mm, as shown opposite.
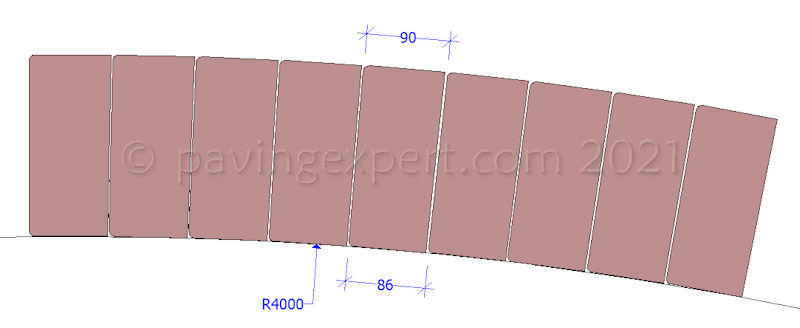
There is, obviously, more wastage when using these 'shifted cuts' but when the ease and simplicity of the cut is taken into account, it's well worth those few extra blocks.
Double Taper Cuts
Curves and arcs with radii less than about 0.6 metres need the block to be cut on both edges to create a good looking curve. This is known as a Double Taper Cut.
If only one edge is cut, the length of the cut edge is slightly longer than the uncut edge of the adjacent block, and this leads to a jagged-looking appearance to the curve. This is shown in the diagram below.
By cutting both edges, and this is best done using a saw rather than a splitter, regardless of block type, the arc is kept 'sweet' and the blocks don't look 'skewed'.
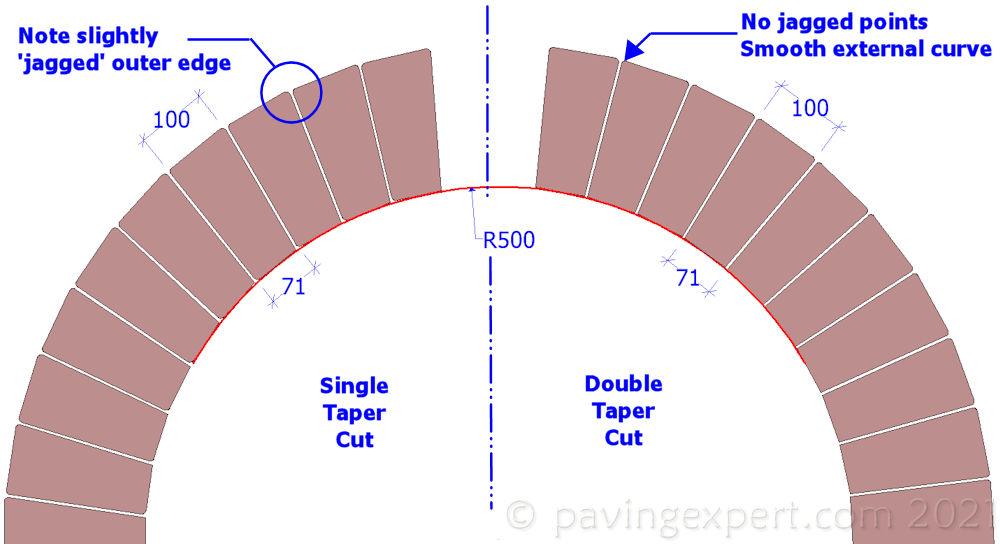
While it has to be appreciated that double taper cuts involve twice as much work and take considerably longer to cut than do single taper cuts, the finihed effect is immeasurably better and the sign of a true craftsperson.
The untrained, the bodgers and those working on a tight budget will nearly always opt for a single taper cut (and that assumes they don't think they would get away with using gaping joints!) but the true artist will always prefer and will always invest the time and effort in creating a double taper cut when it is necessary.
Although trimming the edge of each block in a radial soldier course makes a neat, sweet curve, as on the left, alternating taper cuts with uncut blocks can also achieve a reasonable curve, (on right) but somehow, it just doesn't look quite as professional.

Mitred edge course detail
Edge Courses, their functions, their construction and a gallery of some of the more popular choices, are considered in much greater depth on a separate page .
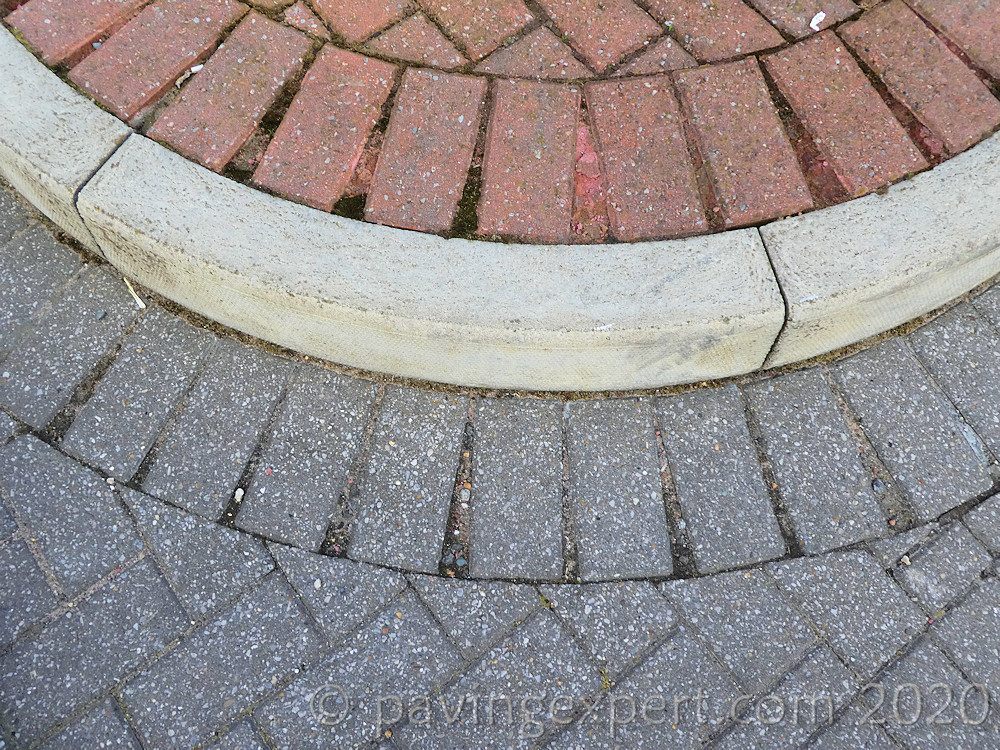
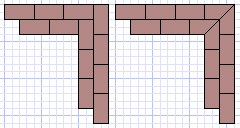
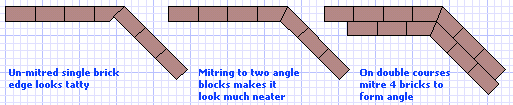
Mitred corners occur where two lines of soldier edging meet at an angle. Quite often, they form a true 90° corner, as at the corner of a house or garage. Mitring is less visually effective with single width block edgings, except at non-orthogonal angles, but can be used if so wished. The series of sketches that follow illustrate some of the more common mitres found in block pavements.
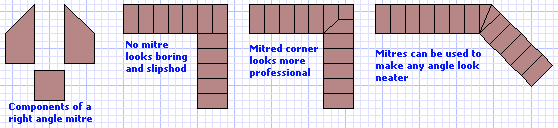
The bog-standard un-mitred vertex between two lines of soldier blocks at 90°. It's simple, it's straightforward, it involves no cutting and virtually no skill, but it's the most common vertex seen on driveways and other block pavements. While there's nothing wrong with it, technically speaking, it lacks class and indicates haste and simplicity were the driving force behind this installation, rather than a willingness of the block layer to show off their skills.
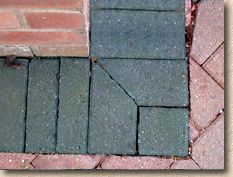
In the photograph above, note the use of a narrow 'slip' to the left hand edge of the vertex. This is wrong - instead of using a 20mm wide slip, the cut block and the block to the left of it should have been replaced by two blocks cut down to 60mm width, as shown in this photograph of a properly mitred corner
The corner mitre shown in the photo above only works with angles ranging from about 60° to 120°. For other angles, standard mitres are preferred.
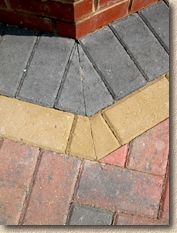
The transverse mitre shown on the right is neat and tidy, but breaks the alignment of a standard Soldier course by introducing a third angle and the consequent third block orientation, and relies on using a small, triangular cut block at the vertex of the mitre.
Double stretcher edgings don't really need a mitre at 90° corners, but they are needed for non-orthogonal angles (angles not equal to 90°). If mitred angles have been used elsewhere within the edging course, mitring the 90° corners will keep the appearance uniform.
See the Mitre Joints page for a much fuller discussion of the principles involved in creating mitred joints for all types of paving.
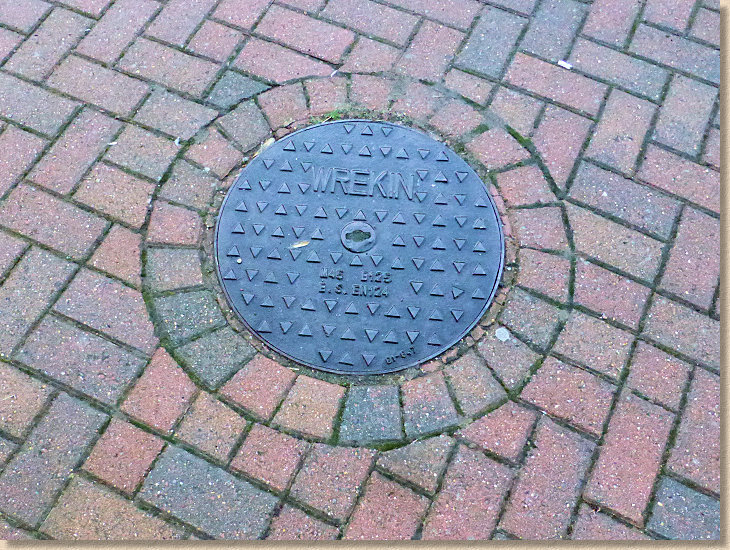
Manhole detail
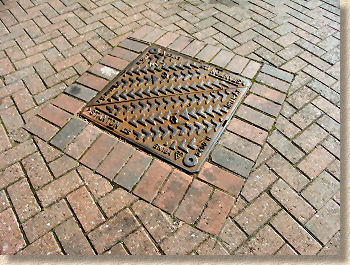
Manholes are often unavoidable within a paved area, although the use of recessed tray covers can make them 'disappear' into the body of the paving. However, there are circumstances and situations that make the use of such a cover impossible or impractical, and there is no alternative other than to pave around the manhole cover, or other fixed feature.
In most cases, the position of the manhole cover is fixed, and the paving must be made to fit around it. This can result in small 'darts' and other blocks abutting directly against the frame of the cover, and so to avoid this, the use of an edging course around the cover allows the paving to be cut-in to avoid these undesirable partial blocks.
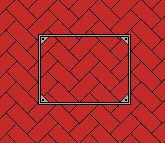
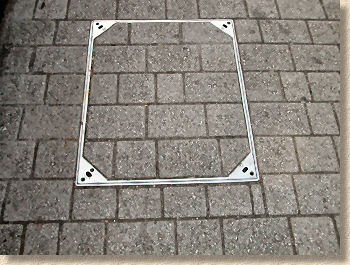
Rectangular covers
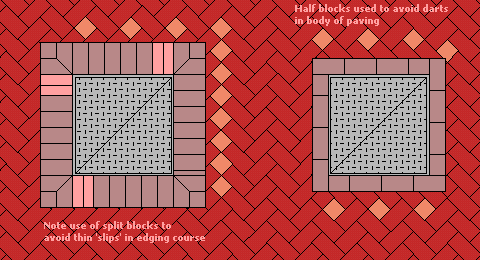
A double or single width edging can be used as shown in the diagram above. Note the use of a pair of trimmed blocks to complete the edging course to each side - this has been omitted in the bottom right corner to show how a thin 'slip' block looks awkward. They are also prone to snapping as the longitudinal length is that much greater then the width.
The corners can be mitred as discussed above, and the use of half blocks within the body of the paving eliminates the 'darts', as shown on the cutting-in page.
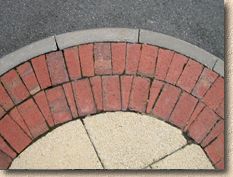
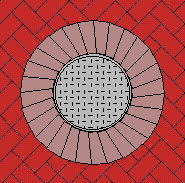
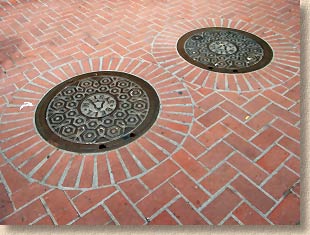
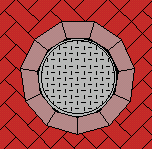
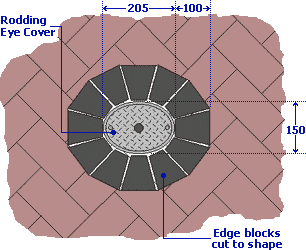
Circular covers
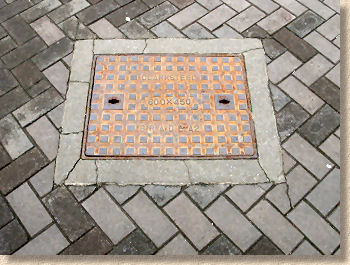
Circular manhole covers, usually 450mm diameter domestic inspection chambers, will need the blocks to be cut to a taper to form an edging course around the circumference.
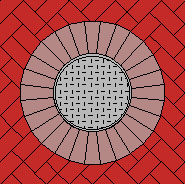
Tapering both longitudinal edges by cutting on a bench-saw, results in a more balanced looking and professional surround, as shown on the left. A single edge taper cut looks 'skewed' when viewed in plan, as shown on the right, although this is less noticeable when viewed from normal eye level.
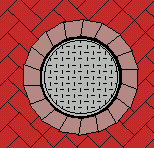
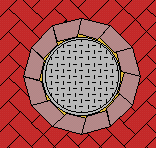
Single width edgings around a circular cover also look better when taper cut to both edges, but can be made to look very good with only one edge tapered, provided that the cut block length isn't too long. In the examples below, the centre drawing has an edging course formed from blocks measuring 125mm along the longest, external edge. The drawing on the right has used blocks with a maximum edge length of 175mm, and the result is jagged and untidy.
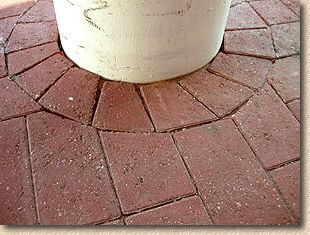
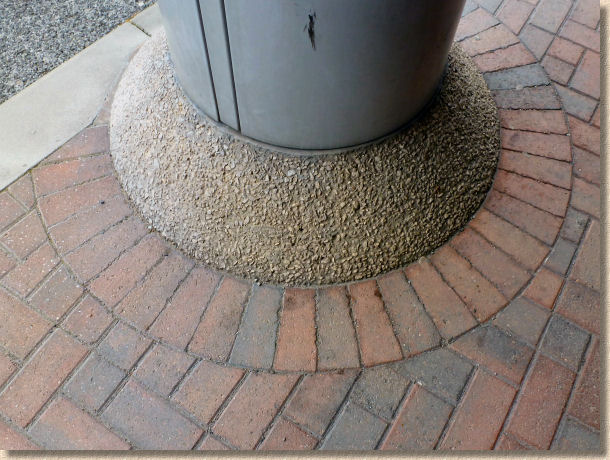
In the photograph opposite, the taper cut principle outlined above has been applied to the edge blocks laid surrounding a 300mm diameter support stanchion.
This has not been done purely to create an aesthetically-pleasing finish to the stanchion, but it actually makes cutting-in the blocks used for the body of the paving so much easier, as the size and angle of cut can be determined more accurately than would be the case if cuts were required directly against the stanchion itself.
See the Edge Courses page for further discussion on the use of edge courses to simplify cutting-in tasks.
Recess Tray Covers
The fitting of Recess Tray Covers is dealt with on a separate page
Unlike other manholes covers, recess tray covers are not surrounded by an edge course, but the pattern of the paving is maintained, to make the cover less noticeable.
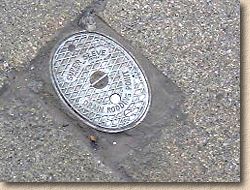
Around Rodding Eyes
Rodding Eyes (RE) are a bit of a nuisance when it comes to block pavements. They can't be disregarded, as they are essential access points to the drainage system beneath, and they are a royal pain in the arse to pave around, but they are so small that they hardly warrant the use of a recess tray . Specialist suppliers can offer smaller trays, such as a 300x300mm unit, that would be a suitable replacement for the standard aluminium Rodding Eye cover (shown opposite), but most Builders' Merchants do not have them in stock, and it can be a 5 day wait to have one delivered to site.
The awkward shape of both the RE cover and the connecting pipework makes for difficult construction of a block pavement around the structure. Unlike most other 'ironwork' (the trade name for gratings, manhole covers and the like), a RE cover doesn't have vertical sides, but has one edge that undercuts itself while the opposite side splays outwards.
If the RE cover is to be retained within the block pavement, then the following method has been found to be a successful way of dealing with them and presenting, on completion, a respectable looking finish.
The RE cover and connecting pipework should be surrounded by mass concrete, as shown in the cross-section drawing, so that the structure is supported and a bed provided for an edge block surround to the cover. A C20 or equivalent concrete (roughly 1:2:4 or see Concrete Mixes page) is adequate for most driveway applications.
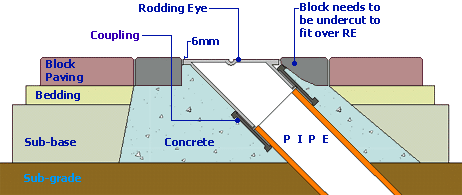
The edge blocks will need to be cut to shape, and this is best done with a Power Saw. By using a relatively narrow edge course, such as the 100mm band shown in this example, the number of tightly angled cuts required is kept to a minimum, and the presence of the RE cover is not overly promoted.
Note that, on the splayed side of the RE cover, the edge blocks will need to be undercut to sit atop the cover. The 3 or 4 blocks in this spot may be better bedded onto a shallow bed of finer concrete or a Class II mortar overlying the mass concrete, so as to ensure full support.
Once the edge blocks are in place, the surplus concrete/mortar can be removed, the joints sanded, and the paving work can continue as per normal. Once the remainder of the paving is in place, there should be no problem traversing the RE cover and the edge block detail with the plate compactor.
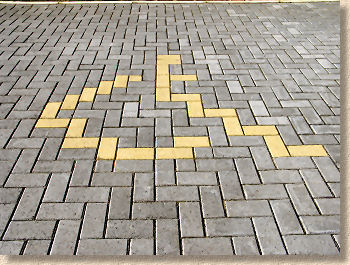
Feature details
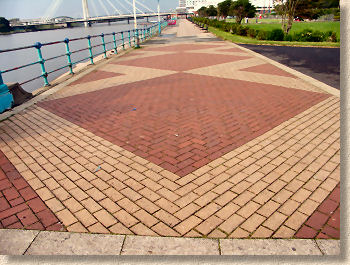
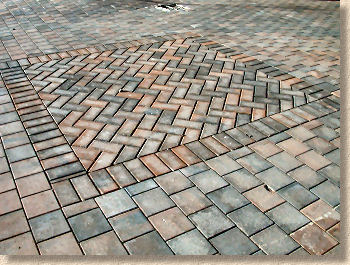
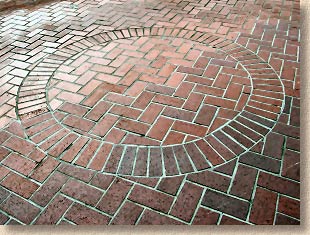
Block paving is without a doubt one of the most attractive looking paving surfaces that can be used, but in large swathes, it can lose itself, become over-bearing and bland, almost. We find that large areas of block paving can be visually enhanced by inserting patterns and features within the paving.
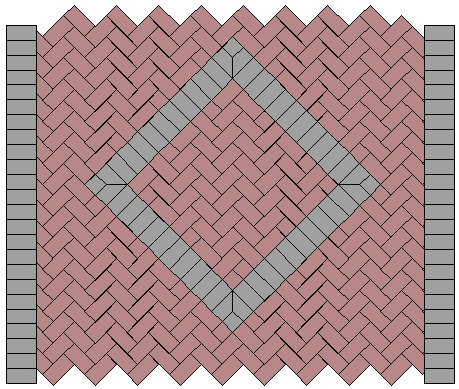
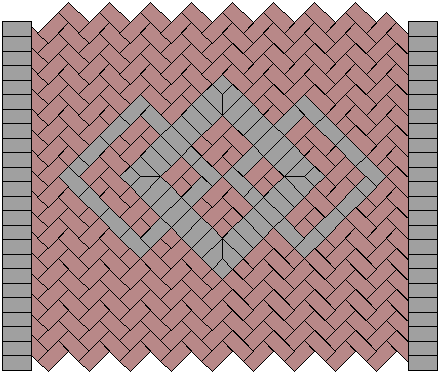
The clearest example of this is the use of diamonds within herringbone paving. These diamonds are very simple to insert and can give a drive entrance an impressive look, or can be used to break up large areas into 'visually manageable' areas, to draw the eye along certain lines of sight and away from others, and give the impression that this is a section of paving that someone has put some thought into.
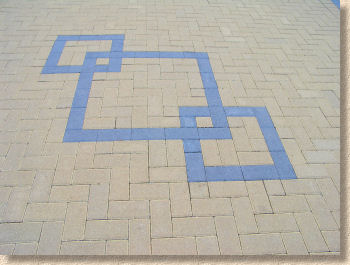
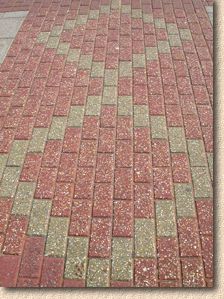
It is possible to insert diamonds into any paving pattern, although patterns not set out at 45°, such as a stretcher bond or basketweave, will require a lot of angled cutting to accommodate the diamond. In a 45° pattern, only half blocks are required, which makes them the simplest of all features to insert.
With diamonds, we find that it is easiest to lay the body of paving in the chosen block, and then place the diamond, in a contrasting colour block, over the top of the paving. View from various angles or an upper-floor window to get the size and position of the feature exactly right before fixing it into the paving by removing the underlying blocks and replacing them with the blocks that will form the diamond. Trying to build a diamond, or any other isolated pattern feature into a pavement as it is laid can often result in it being off-centre or out of scale.
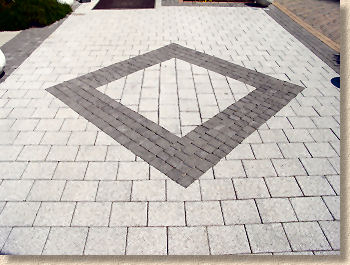
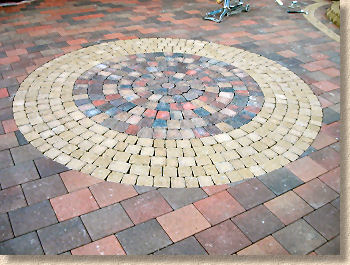
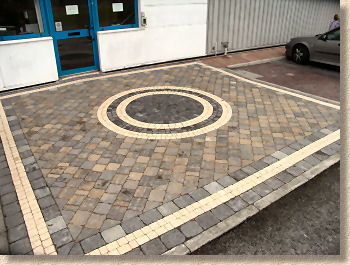
And diamonds are not the only features that can be built into a block pavement; circles are popular too, so much so that most of the big manufacturers now supply ready-made circle packs in various forms of paving. Unlike the diamonds above, it's easier to set out and lay the circle on the prepared bed and then complete the body of the paving around the circumference.
Another popular item is to build-in the initials of a company or the house number, although quite why anyone should want a 1.5 metre high number 32 outside their home is beyond me, but, as they say, whoever pays the piper calls the tune.
These need to be scaled in accordance with the size of the project, and are best prepared after the body of the paving has been laid, positioned on top of the pavement and scribed around with chalk. Take up the blocks bearing chalk marks, insert the letters, numerals or other figures, and cut in the body of the paving to suit.
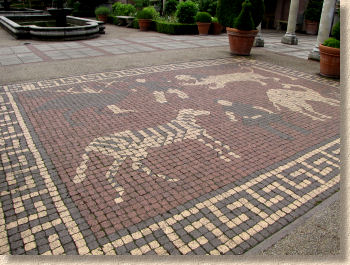
There's no limit to what figures, symbols, or just about any other design can be built into a pavement. The more complex designs ought to be planned out on paper or a CAD program before starting out, and it must be borne in mind that what looks like a fantastic decorative design in plan view, can look a mess when viewed from ground level.
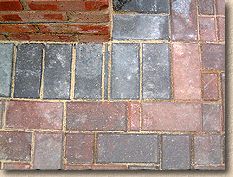
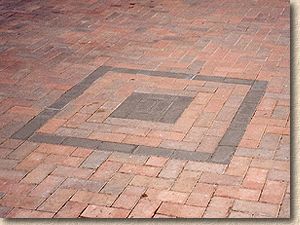
A contrast can be made by using not only different coloured blocks, but by creating the design from a different type of paver, as shown in these next photos