
Introduction:
Unfortunately, too many homeowners suspect work they’ve just had done for their new patio of driveway isn’t all it should be. Often, they’re not absolutely certain it’s sub-standard, but it just doesn’t look as they’d imagined. Naturally, the installer has all sorts of excuses and explanations: the customer has unrealistic expectations; the installer has been doing it like this for umpteen years; no-one else has ever complained; if it gets any worse, they’ll come back (honestly!)… but the homeowner can’t shake off the feeling it isn’t quite right.
Asking another installer to take a look might help, but will their opinion really be impartial? Asking a properly skilled and acknowledged expert can be a bit pricey, but what else can be done?
Pavestone, one of Britain’s leading suppliers of quality paving, are always keen to promote best practice and to direct customers to the better tradespeople. Consequently, they asked for a simple illustrated guide to the most common “issues” found on sub-standard residential projects, and to put the guide on this website so that ordinary “civilians” can check for themselves before challenging their contractor, or calling on a professional consultant….and there’s no insistence on being a Pavestone customer: the advice which follows is there for everyone.
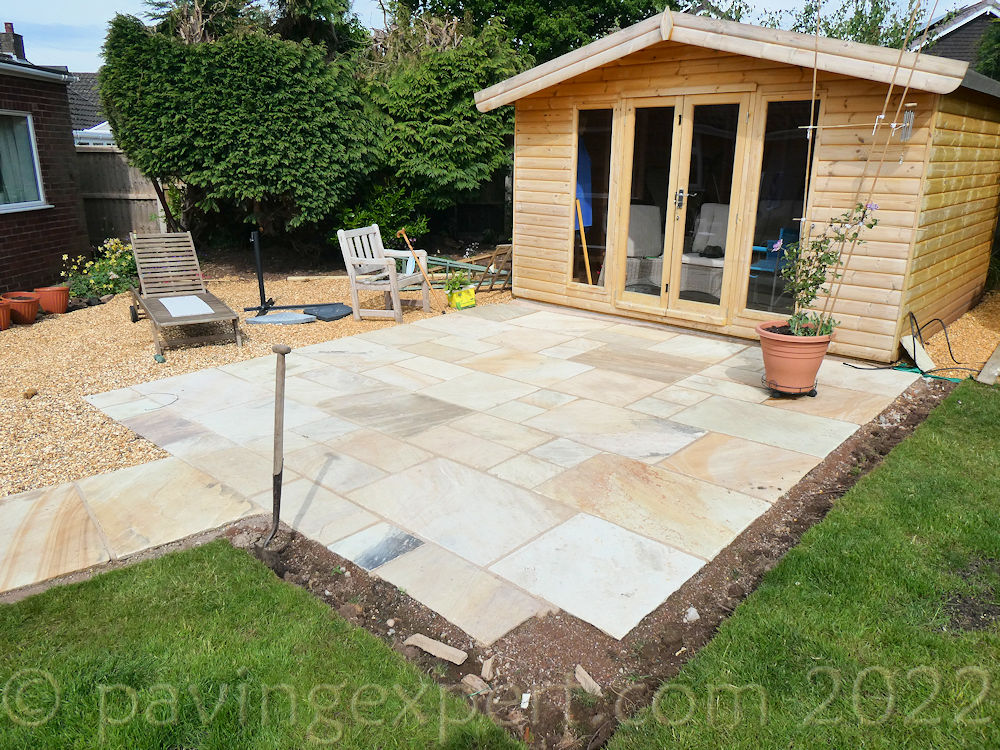
A very simple, roughly 4m x 4m, back garden patio constructed using Pavestone’s riven sandstone paving has been used as the main example. It’s a real-life project; it’s nothing overly fancy or complicated; it’s spoiled by some fairly basic errors; and it was easily put right with a bit of help from Pavestone.
The Basics:
We‘ll start with a basic overview of what should be seen at the surface of a completed patio. It is often the surface appearance that first alerts homeowners to potential issues with a project. Faults visible at the surface are often caused by more deeply-seated problems but investigating sub-surface failings means lifting and removing at least part of the paving. Let’s keep it simple and check the surface first, and then decide whether deeper investigation is warranted.
Loose Paving:
The single, most common complaint from homeowners when contacting this website is loose flagstones. This is an easily identifiable and indisputable fault. No newly completed area of paving should have any loose paving. If a flag, slab or tile is moving or rocking, it is a fault. Full stop. No possible argument. It. Is. Wrong.
With the obvious exception of unbound paving (such as block paving) nearly every other contemporary modular paving material is intended to be held in place by the mortar bedding and/or jointing. If the paving unit is not bonded to the bedding, it is a fault.
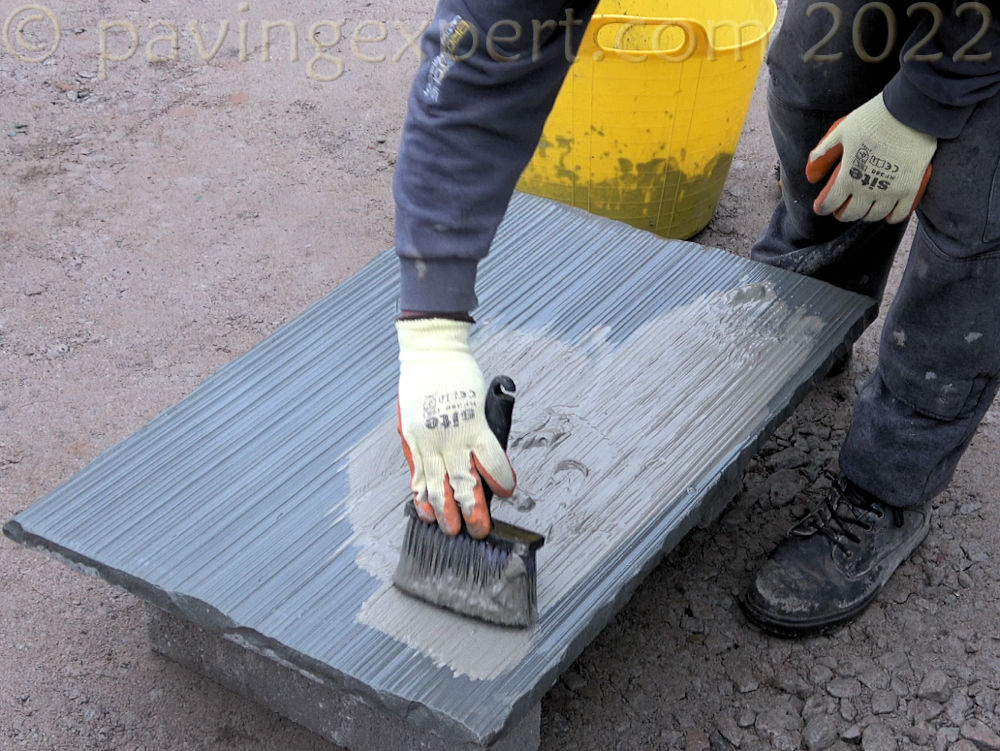
Over recent years, we have increasingly used Primers (slurry primer, bond bridge, priming coat – many terms for the same product) to ensure full adhesion between paving and bedding. All good installers are now using proprietary primers (such as Pavestone Priming Slurry) to ensure adhesion. It’s not necessarily a fault if no primer is used, but a valid explanation should be provided by the installer.
Home made primers, such as SBR with cement, are usually better than nothing, but nowhere near as effective as proprietary primers. PVA or other bonding agents are NOT acceptable.
Hollow Paving:
The second most common complaint, and not far behind the loose paving, is hollow-sounding paving: flags, slabs or tiles that echo when tapped. Many homeowners will naturally assume this means the bedding has voids, that the paving was laid on spots, dabs or rings, and while hollow sounding paving *may* indicate such shoddy practices, it is NOT a reliable guide.
Larger paving units, such as flags, slabs and tiles, will act like a drumskin when laid over a mortar bed, and this can result in relatively minor voids, even something the size of a coin, causing that ‘drumskin’ to resonate and suggest a much larger void.
While small voids in the bedding (and small means less than 50mm in any direction) are less than desirable, they are not always a significant issue. Don’t take the presence of hollow sounds as definite proof of shoddy or sub-standard workmanship.

Surface Details:
On to suspected visual defects.
Paving should be laid to agreed patterns, or to straight lines and sweet curves. With hand-trimmed flagstones, there may need to be some leeway in just how straight and accurate a line can be, but there is a limit. As a reasonable guide, lines should be accurate to ±6mm. If a paving unit is more than 6mm out of alignment, there’s something wrong with that paving unit, with the person laying it, or possibly both.
Similarly, arcs and curves should be “sweet”, which means they should look like regular, consistent, smooth curves, and not like threepenny bits (or 20p/50p coins for younger readers!)
Laying patterns and layouts should be accurate. Courses should be straight and parallel; individual paving units should be square to each other, not skewed or rotated; edges should be absolutely straight and aligned with no oversails or short-finish pieces. Random layouts should have well-balanced joints (see below) and should not have any instances of crossed joints or overly long joints (> c.3m)
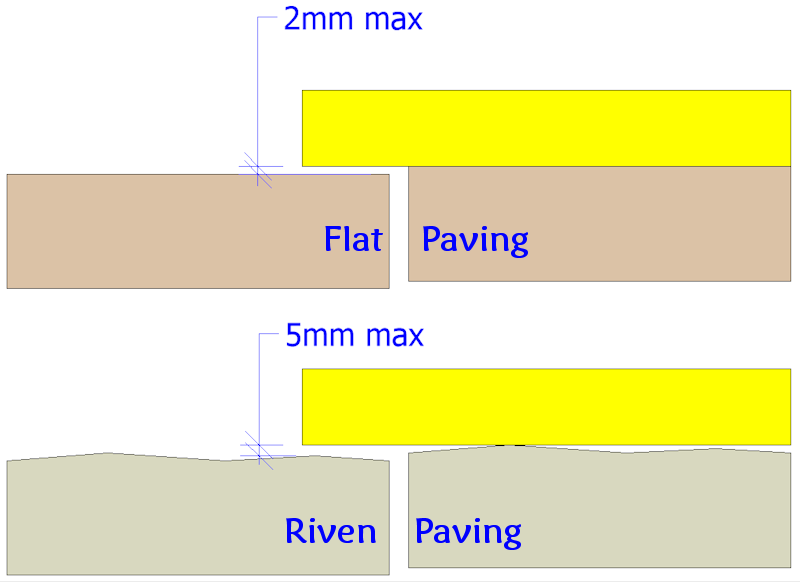
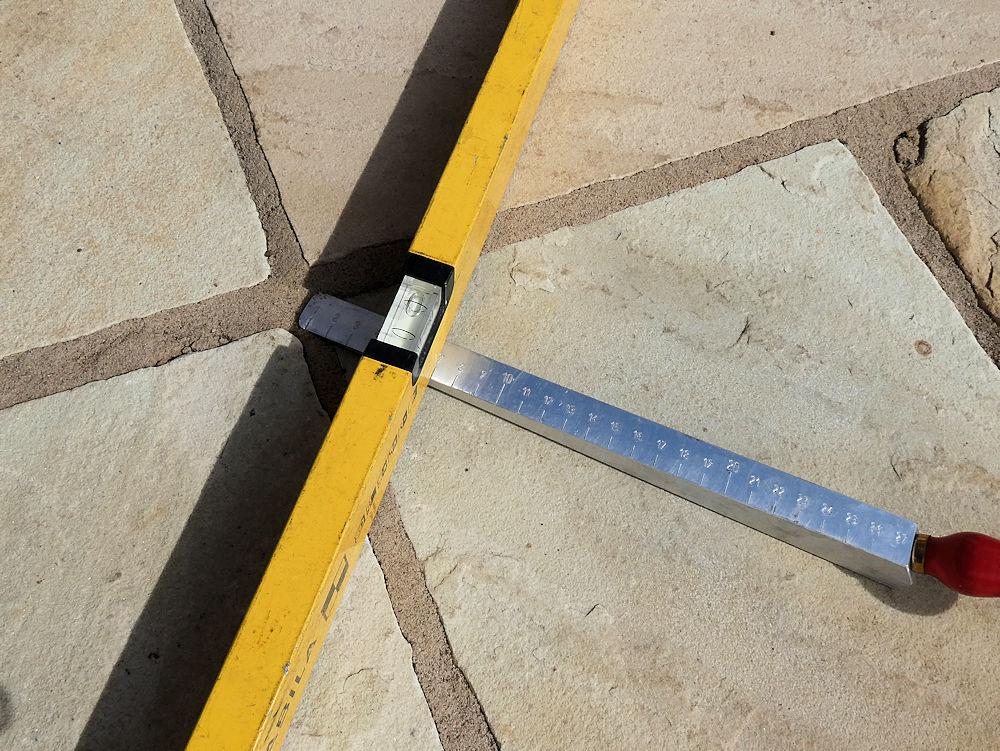
Elsewhere on the surface, there should be no significant lips, which means no surface level differences greater than 2mm between adjacent paving units. Allowance has to be made for riven paving, due to its surface character, but nothing more than around 5mm.
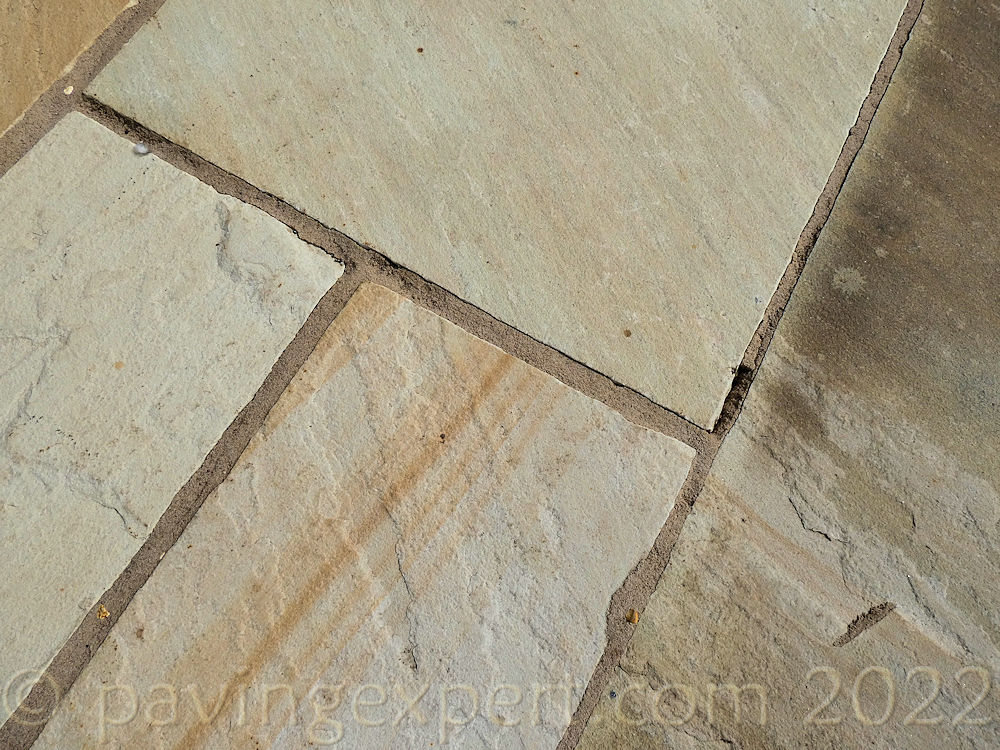
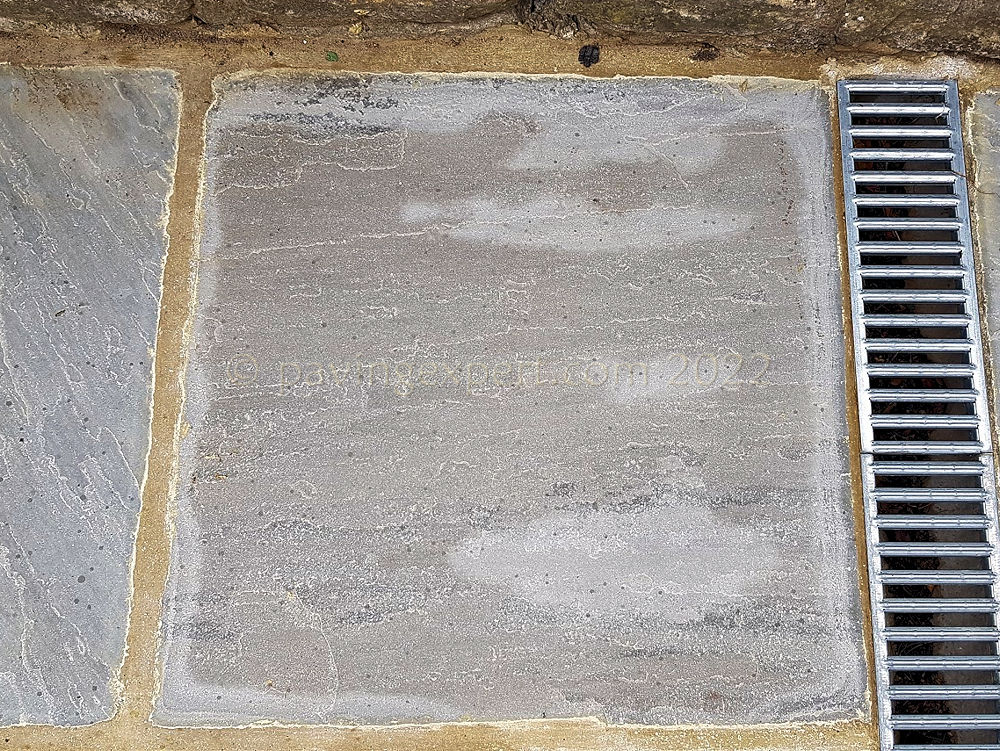
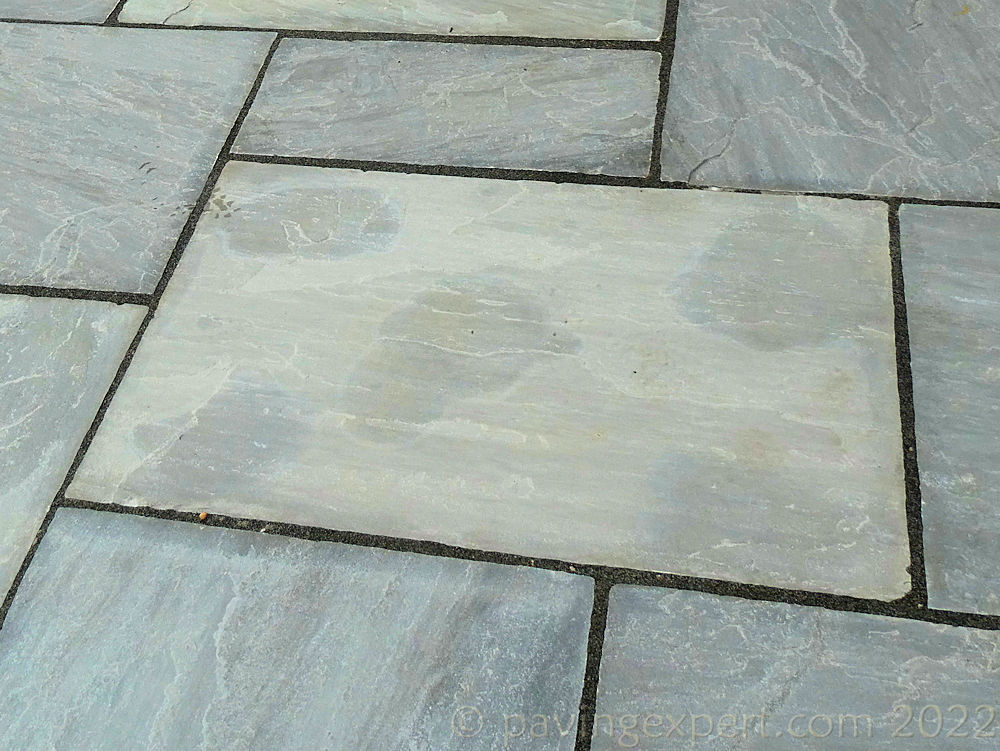
There should be no excessive picture framing (a dark marking to the perimeter of the paving unit) and definitely no reflective staining (a mirror or “reflection” of the partial mortar bed beneath).
Surface Levels:
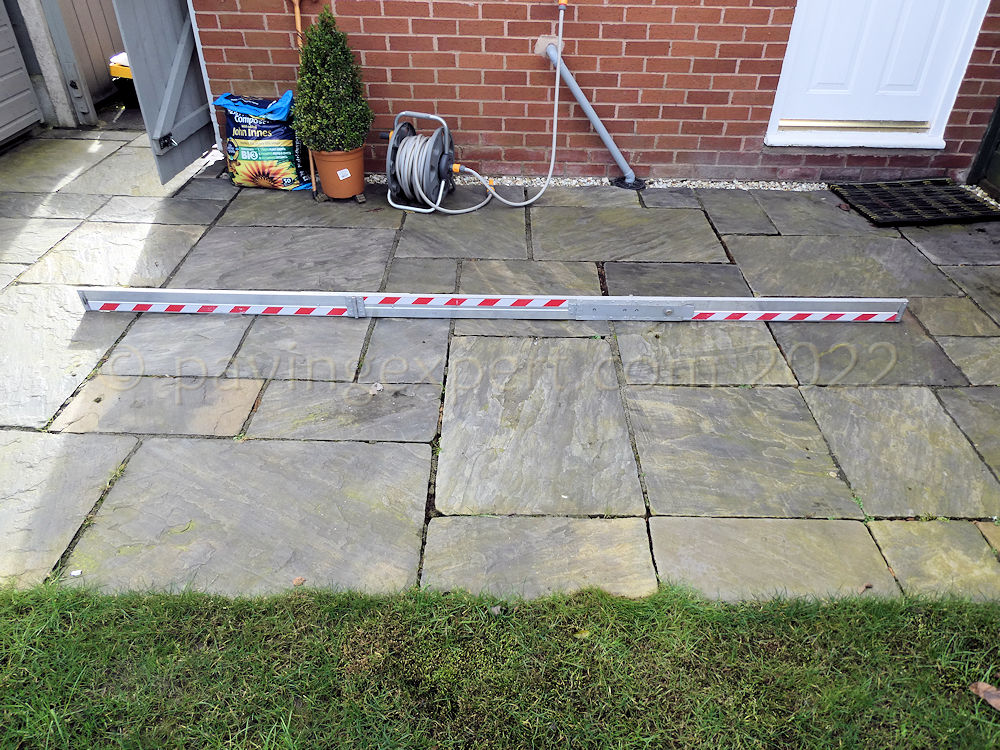
The surface levels should be reasonably even with no obvious high spots or hollows. There should be no standing water on the surface following rain. There should be sufficient fall or slope to ensure water runs off to a suitable drainage fitting or area of garden.
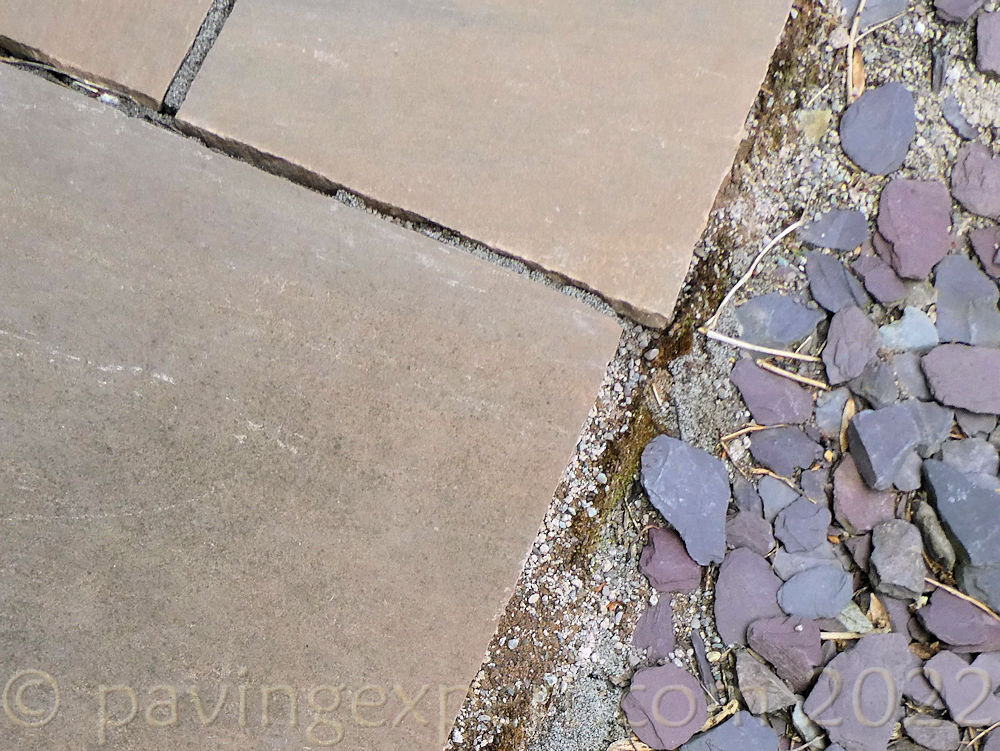
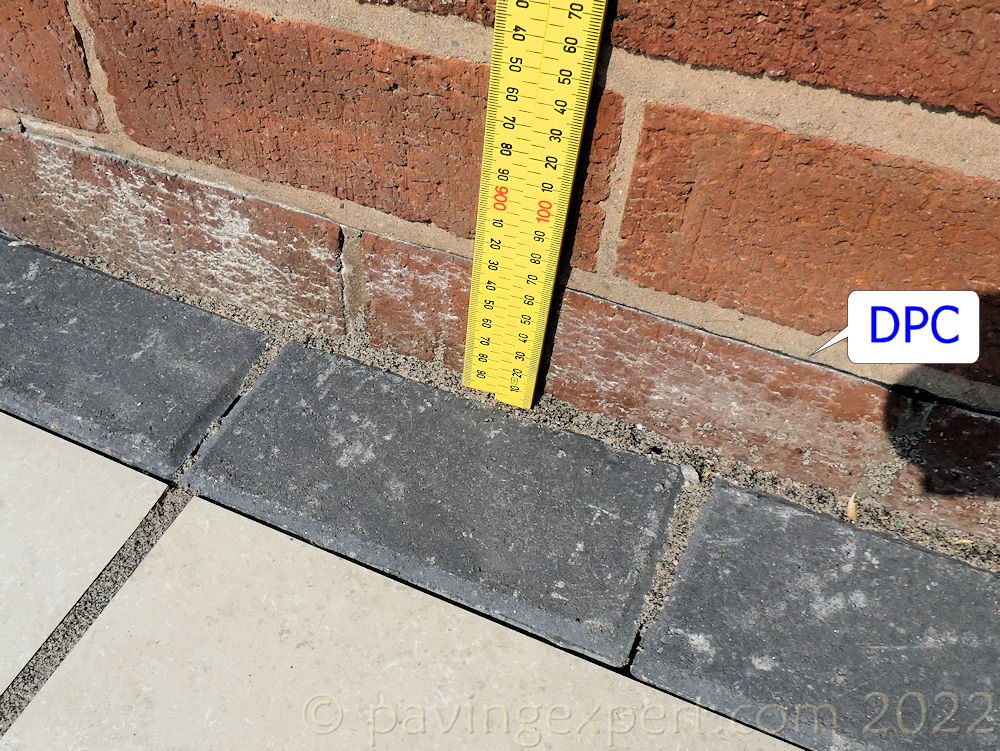
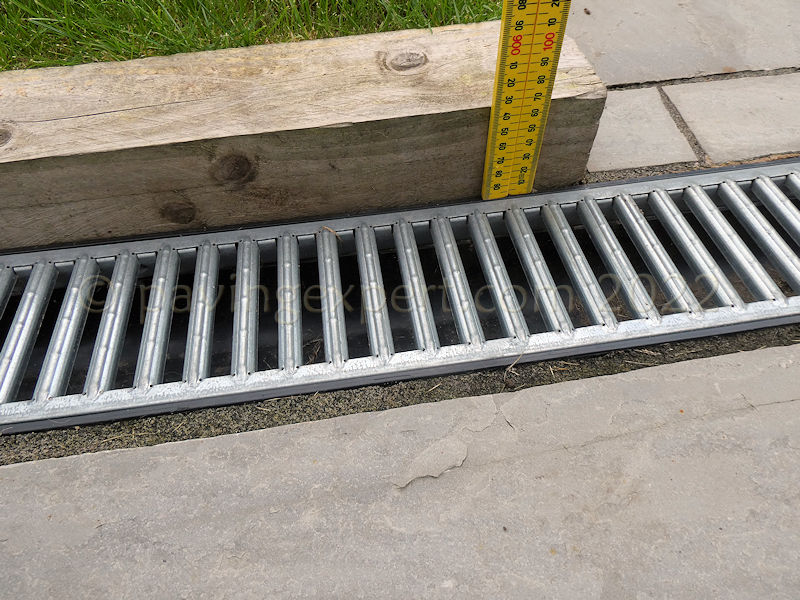
Unless at an access doorway, the paving should be at least 150mm below the DPC. The use of a linear channel drain between paving and the house to enable raising the paving to a level closer to the DPC runs the risk of being declared in conflict with Building Regulations by a Building Control Officer or a keen surveyor valuing the property. Similarly, a gravel filled gap (splash strip) between paving and house masonry does not necessarily allow paving to be laid closer than 150mm to the DPC.
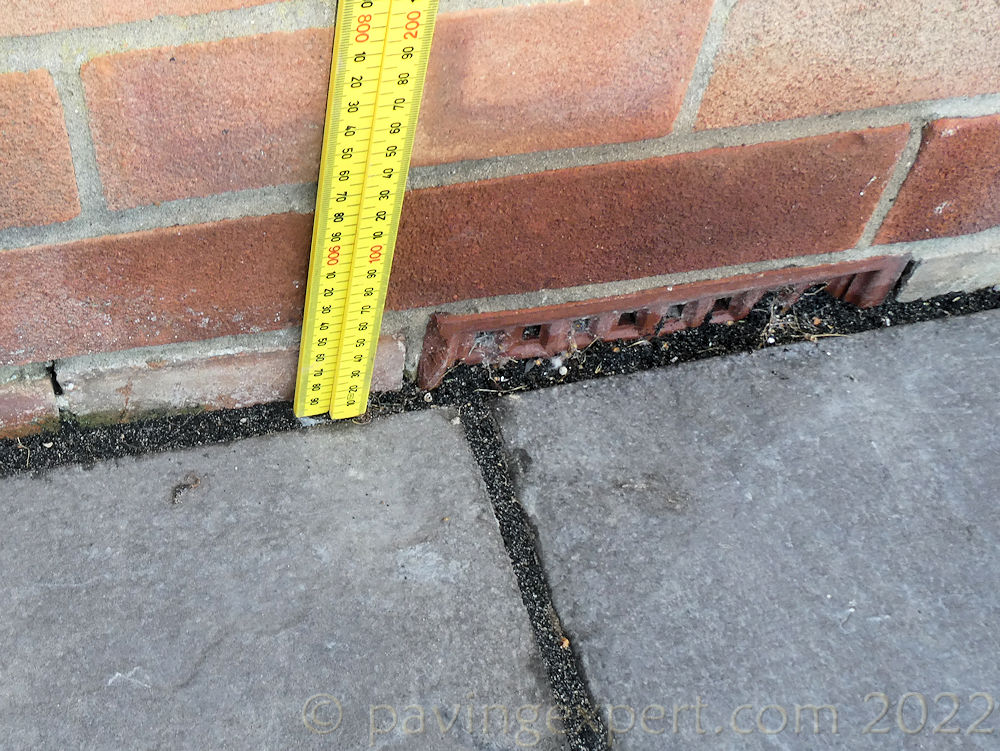
Air bricks should NEVER be obscured by paving.
Bedding:
For almost all patio flags, slabs and tiles, a full mortar bed is required. Block paving is usually laid on a bed of coarse sand.
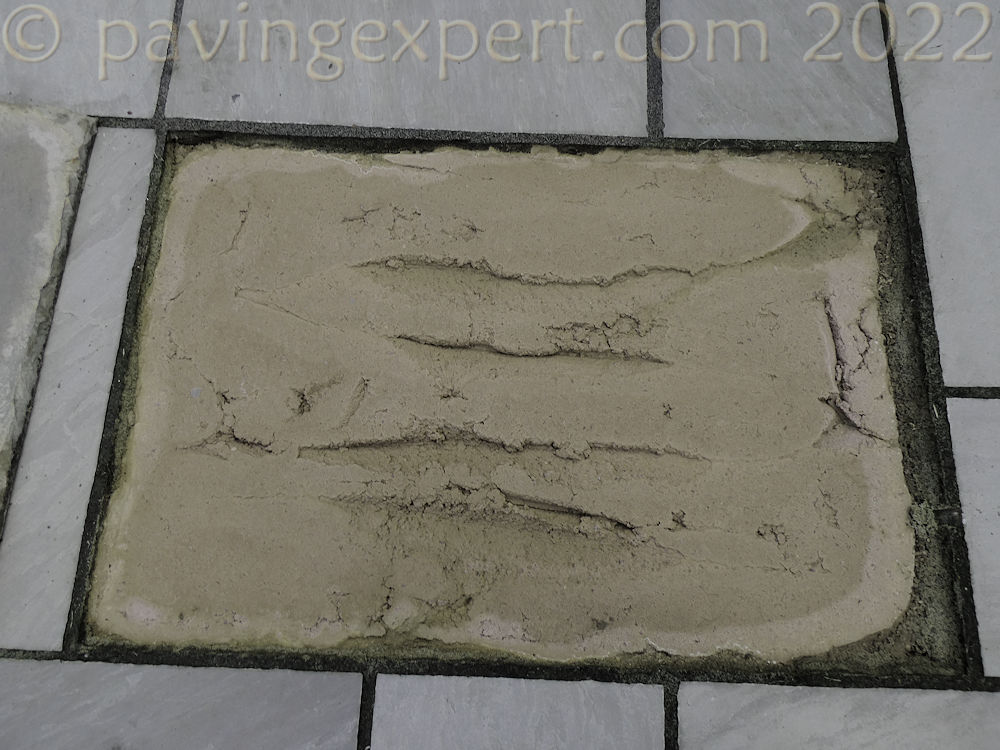
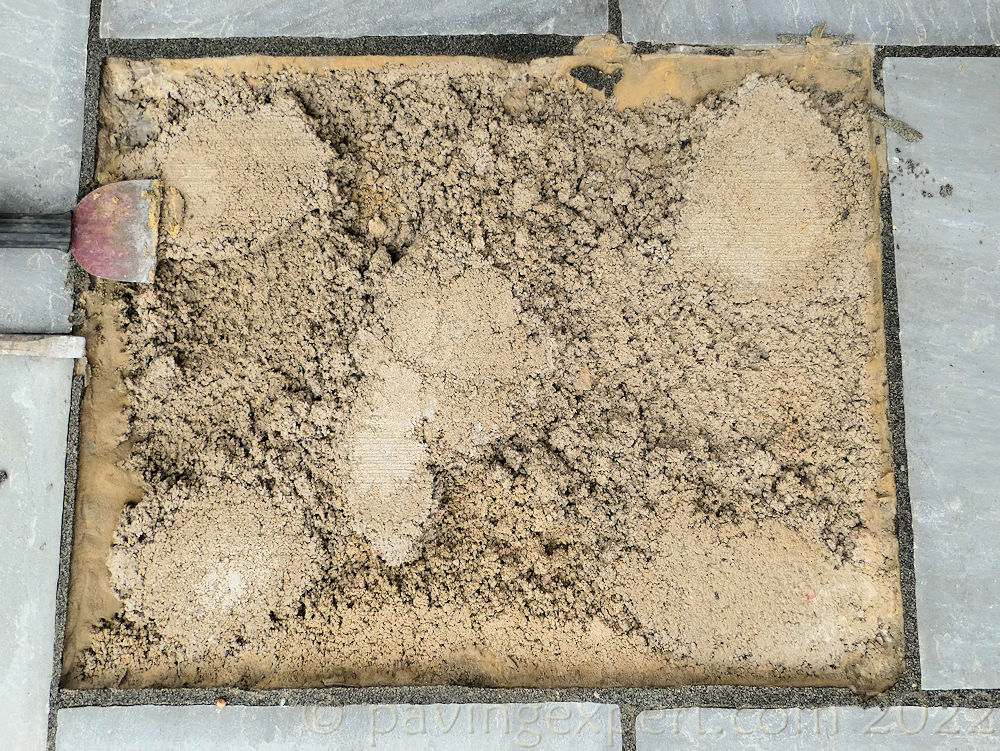
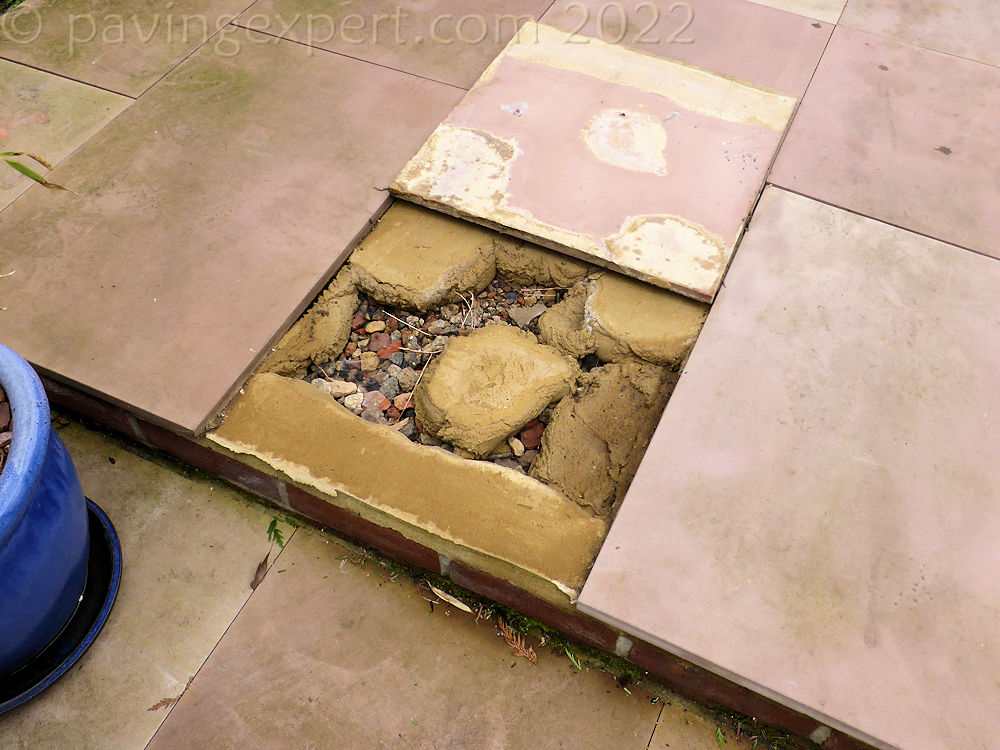
The bed *must* be full, which means no voids. We expect at least 80% of the bedding to be in direct contact with the underside of the flags/slabs/tiles.
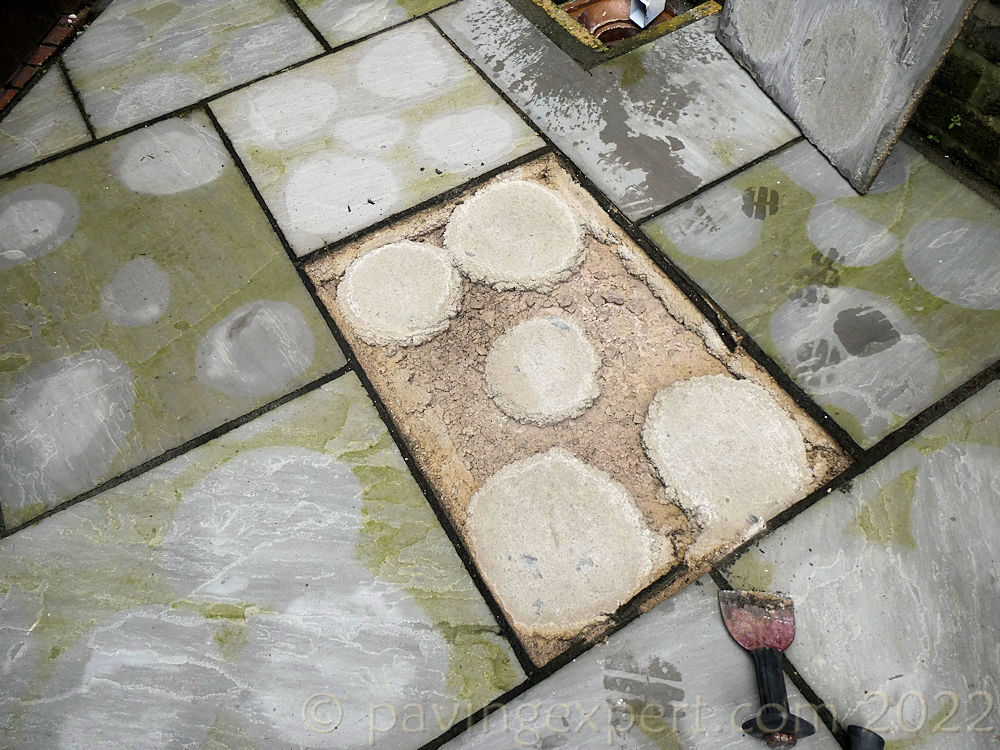
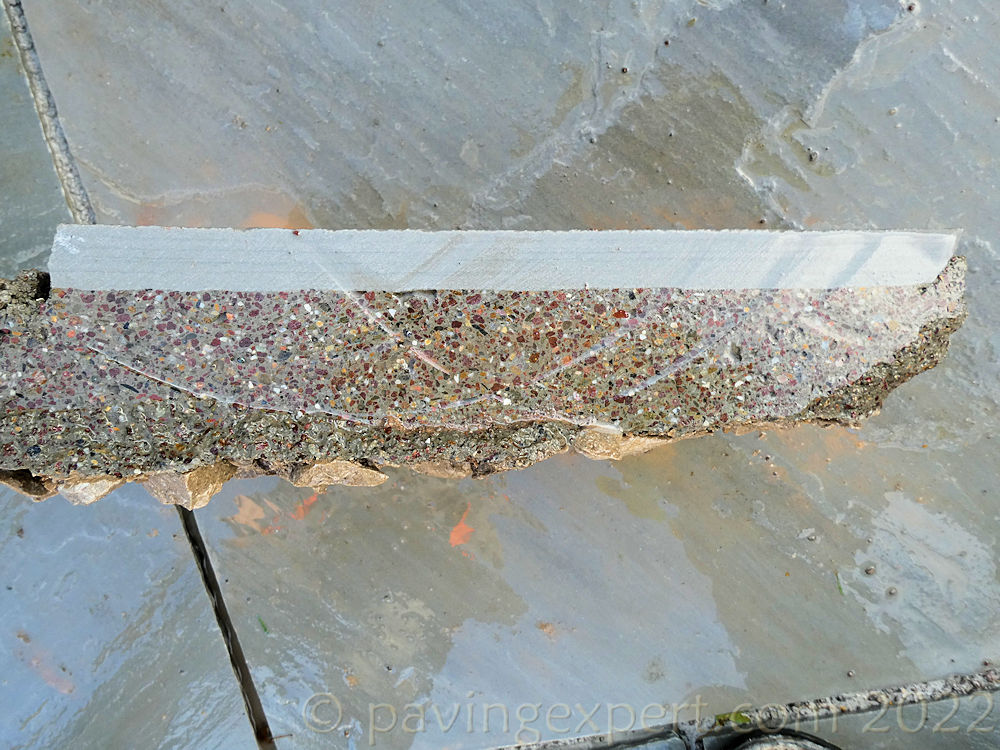
Spot bedding, dot and dab, ring bedding, ribbon bedding or any other variation of mortar with voids/spaces is NOT acceptable, nor is a thin scattering of neat cement over a sand bed, as was used on the ‘case study’ project….
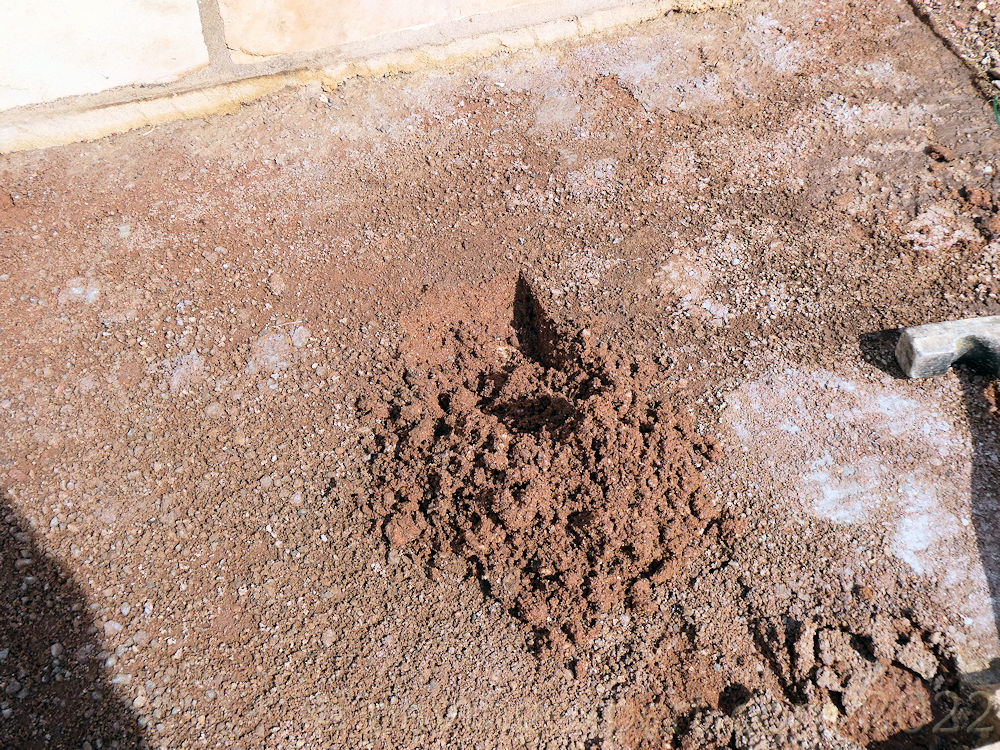
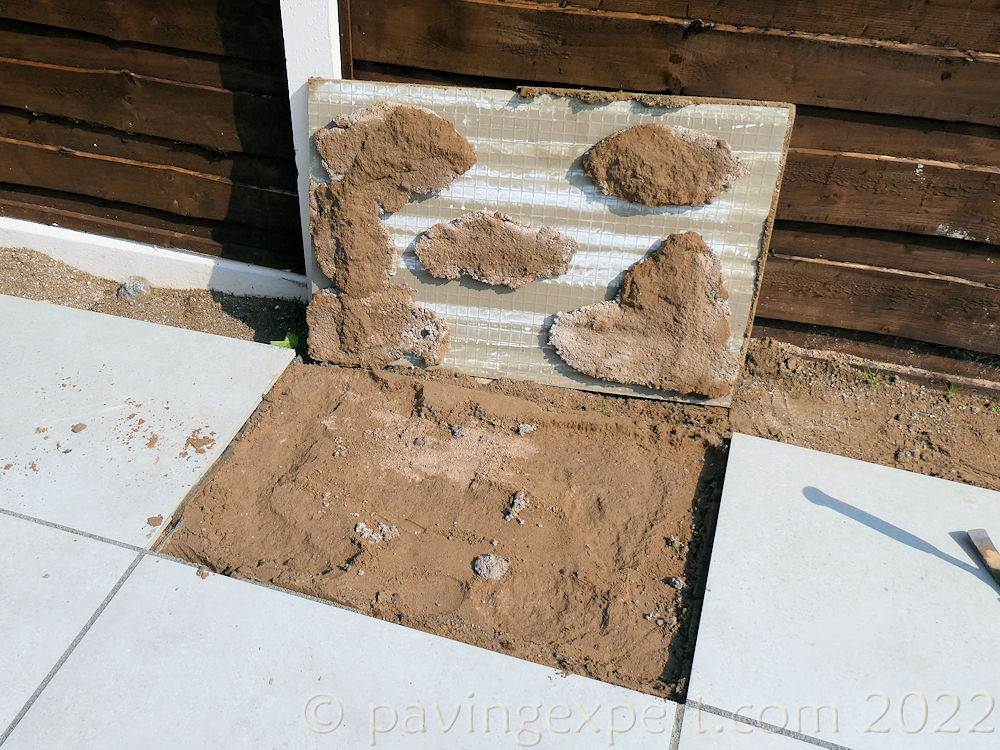
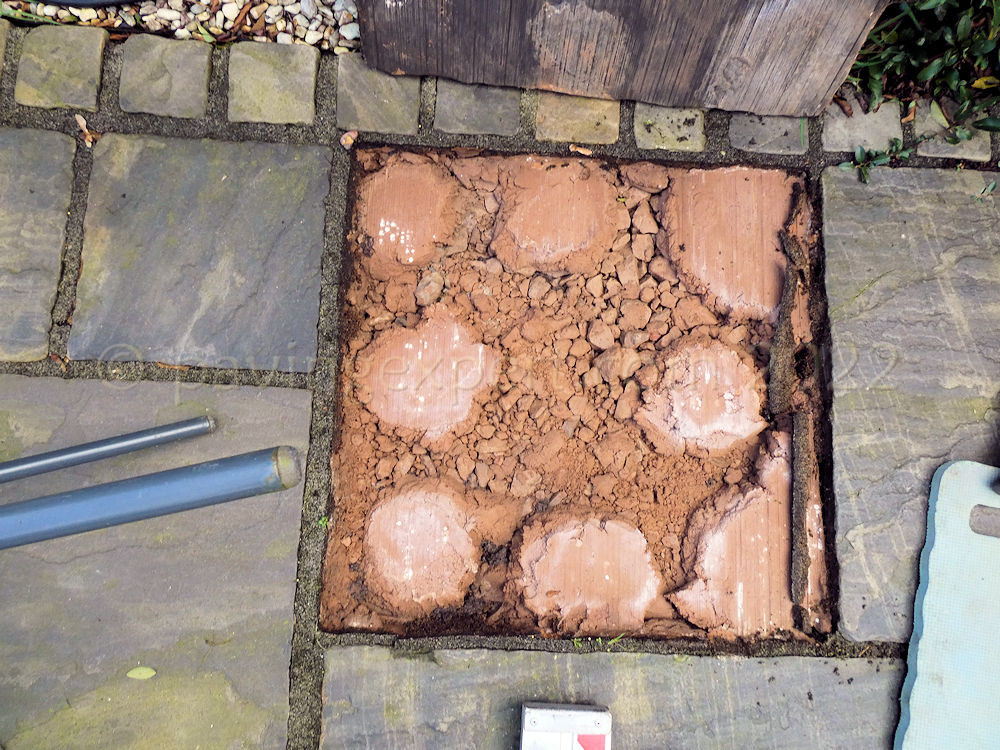
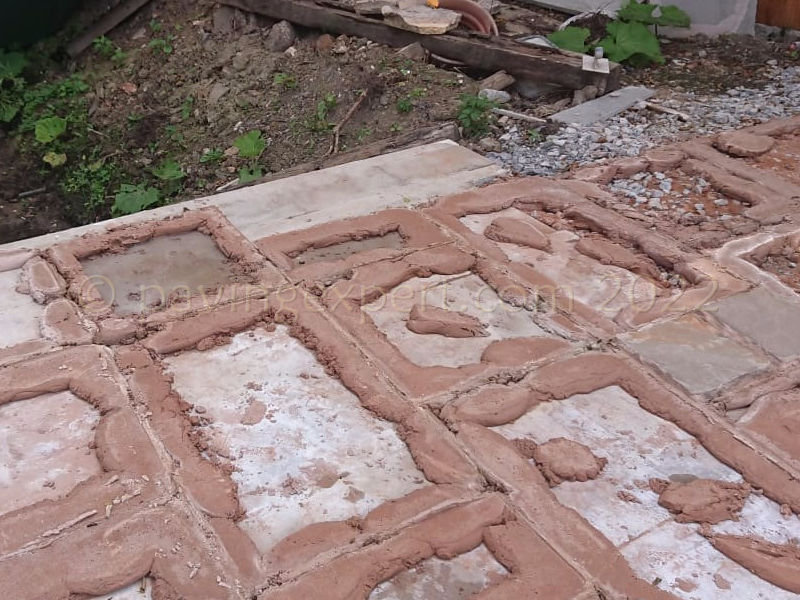
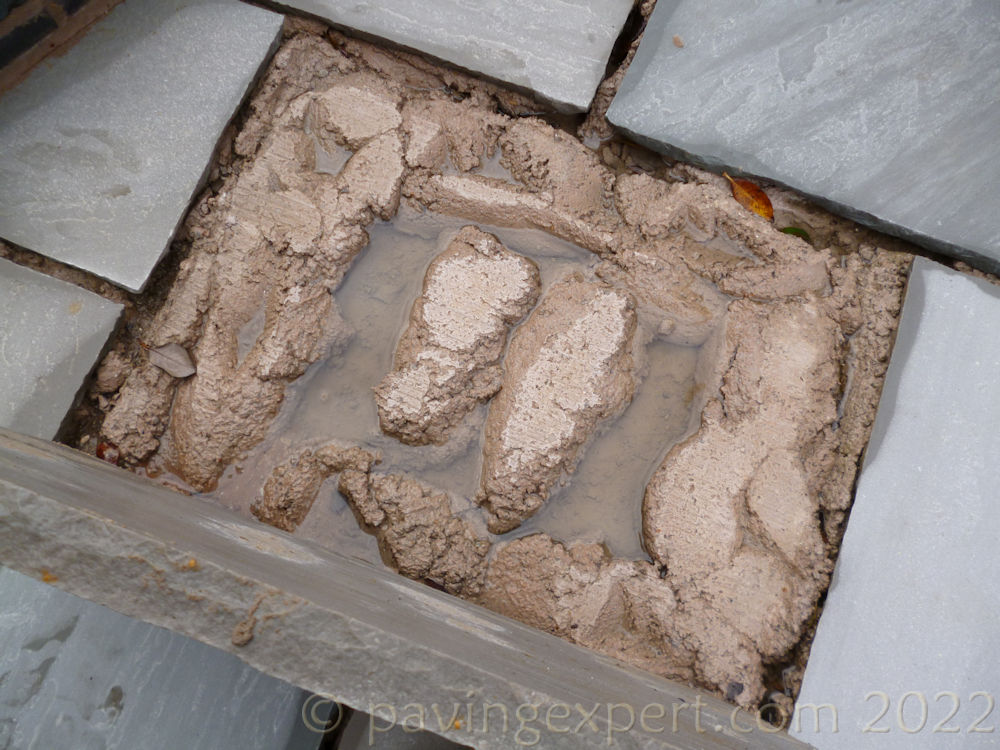
The mortar bed (or sand bed for block paving) should be between 25mm and 40mm depth. Anything less makes it difficult to ensure the paving is properly supported: anything more means the paving is likely to settle and move.
Paving laid onto mortar should also be impossible, or nearly so, to separate from the bedding. Almost all flags/slabs/tiles are now required to be laid using a primer which ensures they fully adhere to the bedding.
Joints:
There are a range of potential problems with the joints between paving units, ranging from being ridiculously wide, to being unacceptably narrow, or even tapering. The material used to fill the joints can also be a source of problems. Here’s a guide on what is reasonable to expect.
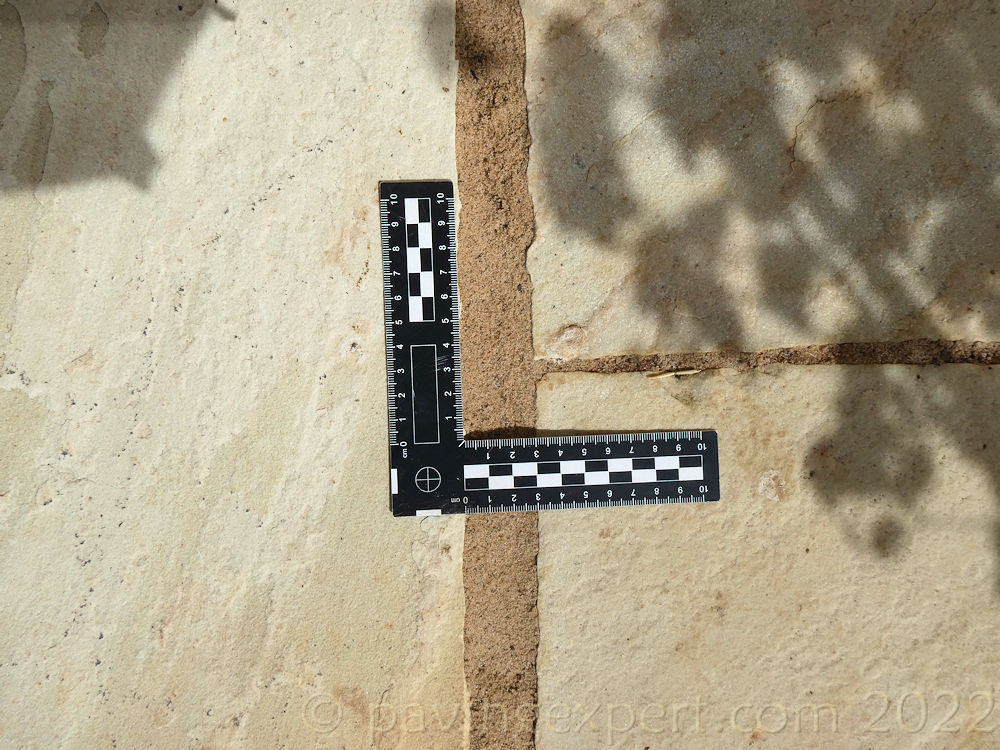
Joints should be consistent in width – every joint identical in width, unless they are hand-cut paving materials and/or laid to a random layout, which often requires joints of varying width to accommodate the paving units. With such projects, joints should be balanced, that is, the flags/slabs should be moved slightly this way or that to make adjacent joints as evenly-sized as possible.
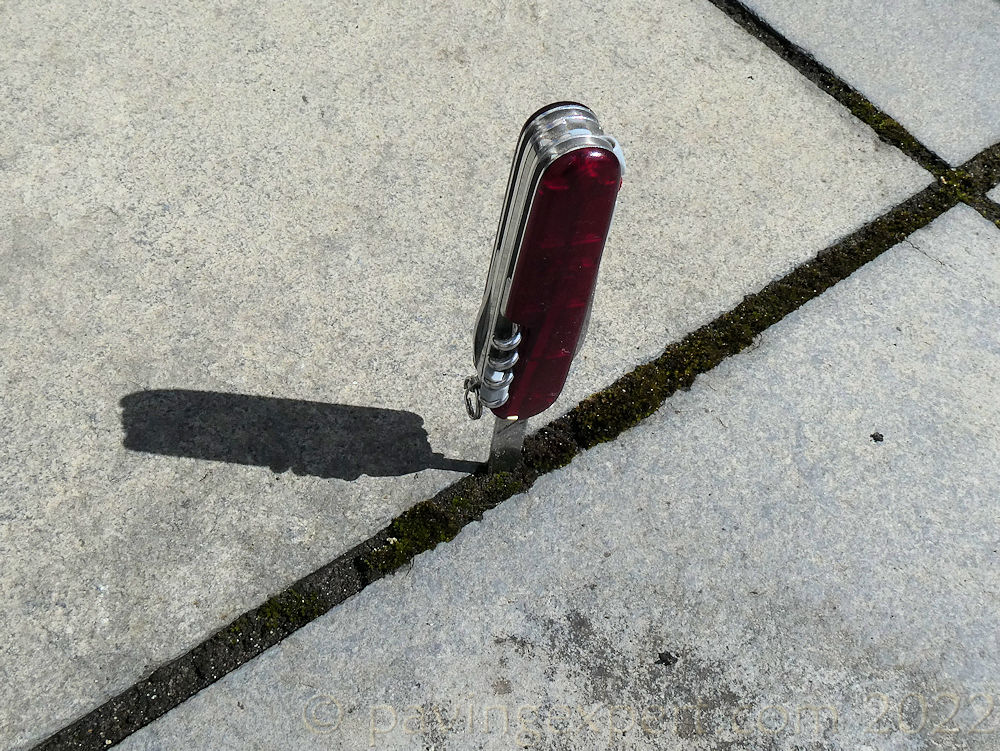
Joints should be filled with a suitable jointing material, which usually means a cement mortar, a two-part resin mortar (such as Pavestone Pointfix), or a proprietary cement slurry mortar. The one-part “brush-in” jointing compounds are common and when done well using a quality product, can give just about satisfactory service for a few years, but they are not as good as their 2-part cousins.
If you can stick a blade in, it’s probably not a quality product.
There should be no cracks in the jointing, no gaps and no missing joint fill. Joints should be filled to the top but may be tooled to give a specific profile which can be up to 2mm lower than the top of the joint.
The jointing medium should NOT stain or mark the surface of the paving.
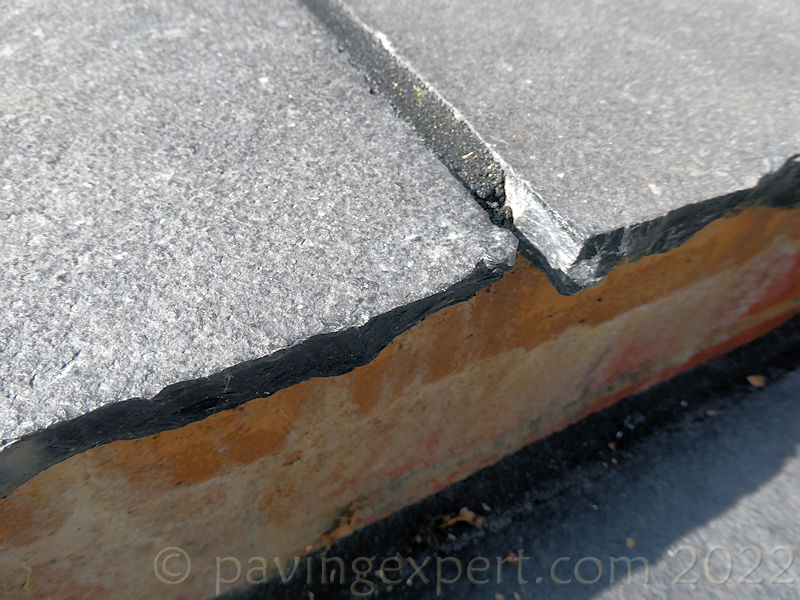
Cutting:
It’s almost impossible to complete a paving project without needing to cut some pieces. This case study patio was laid out to use only full flagstones, but the connecting path had to tie-in with the existing areas of patio and required just a single cut. Even this proved too much for the hapless installer….
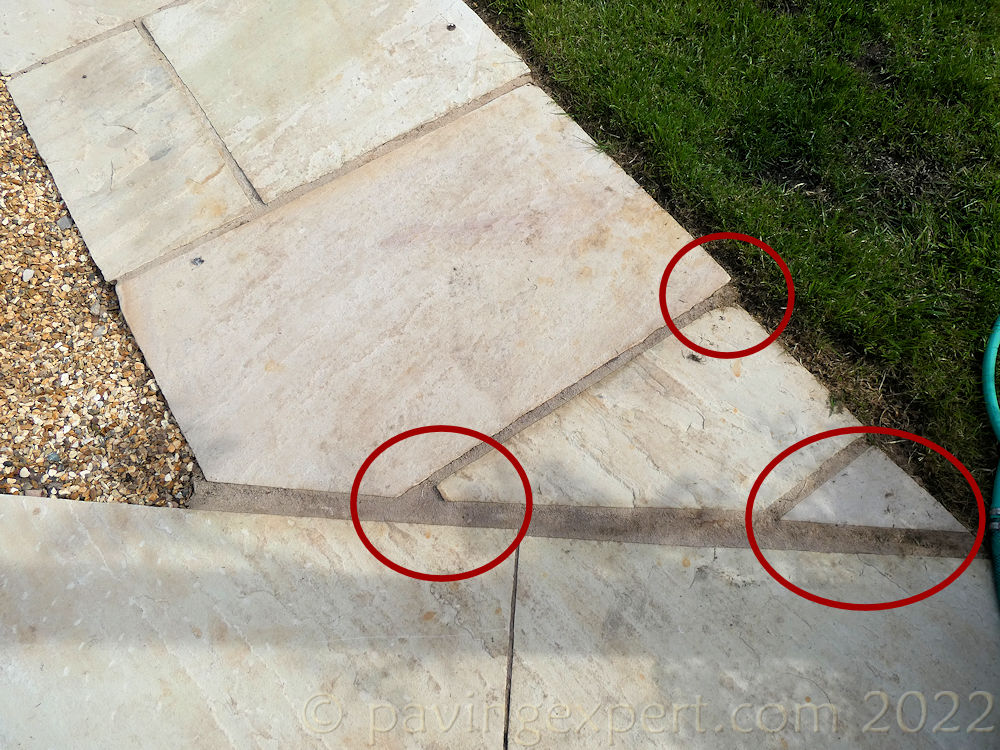
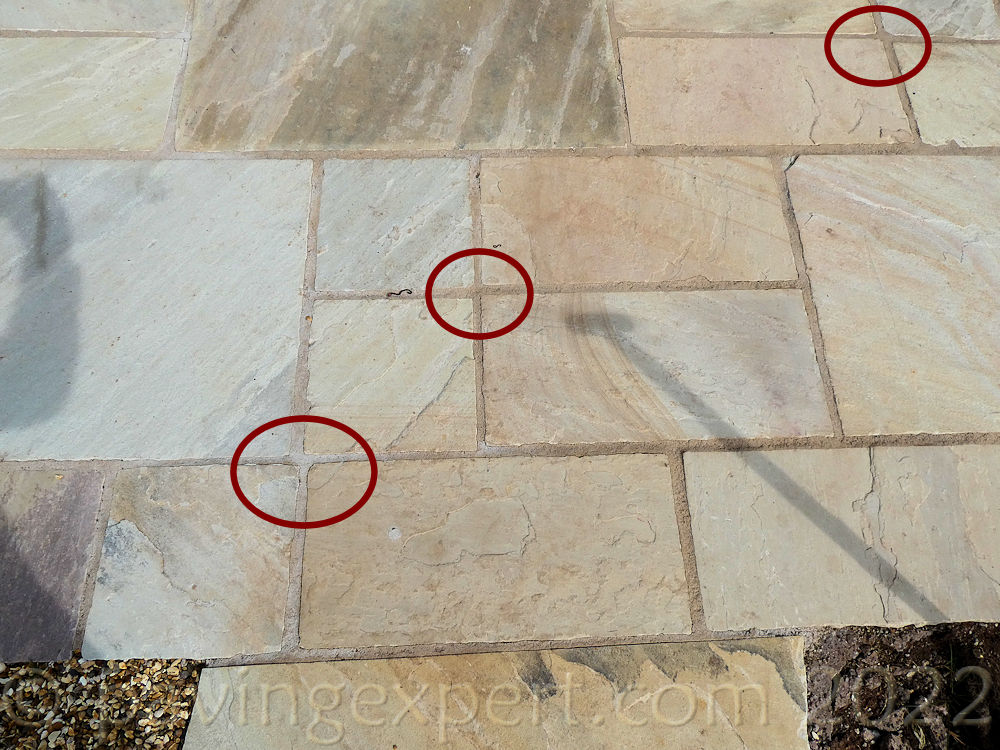
Cut pieces should fit. The paving should fill the gap as neatly and completely as possible, not finish short, as shown in the circle lower left. Small pieces of less than one-quarter of a full flag (or 300x300mm minimum) should not be used – lower right circle. And cut pieces still have to align with the other paving, not step-in or step-out, as in the upper circle. Also, having a unacceptable wide gap between the cut pieces and any adjacent edge or paving is a giveaway for the unskilled.

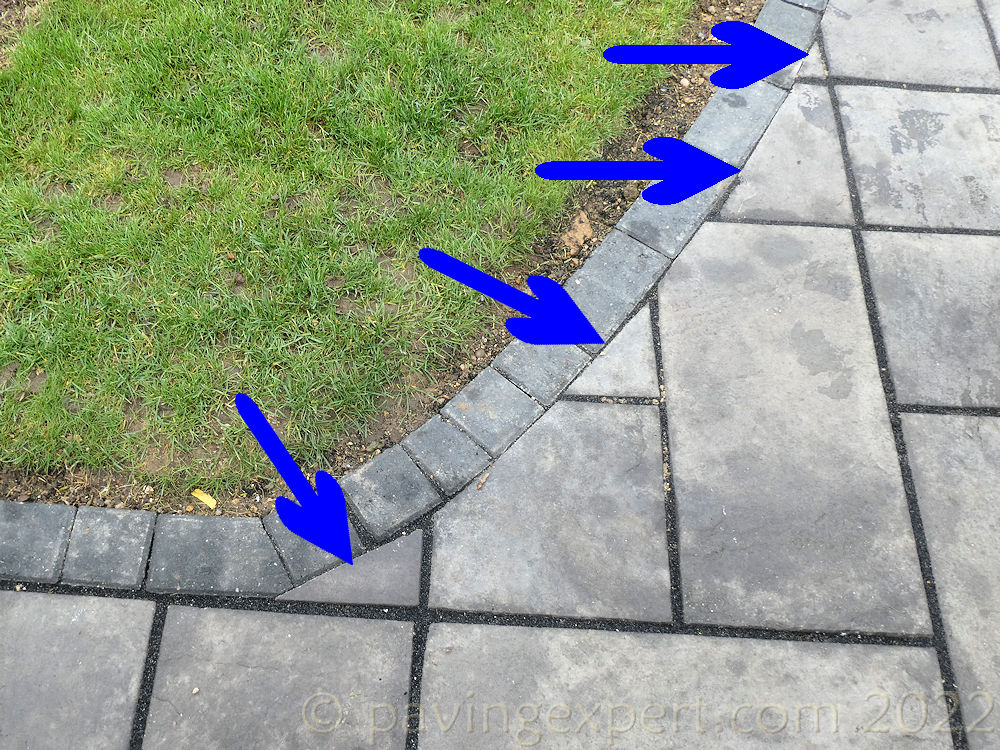
Small cut pieces are a regular feature from those with few or no real skills. There’s no excuse for any piece less 300mm in at least one direction, and preferably both.
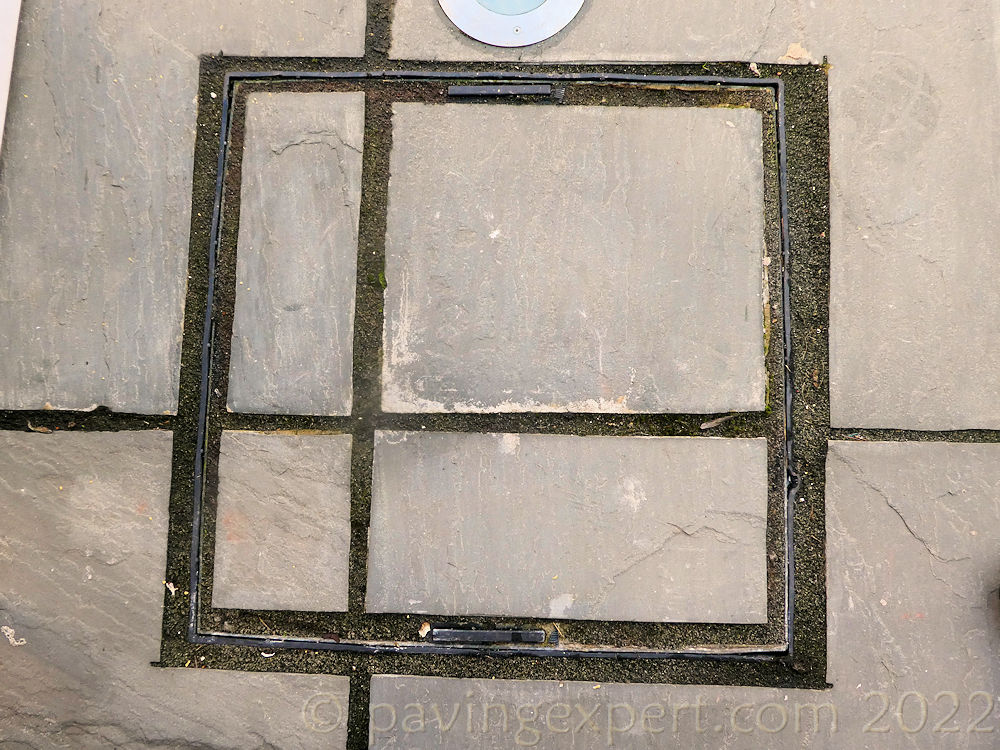
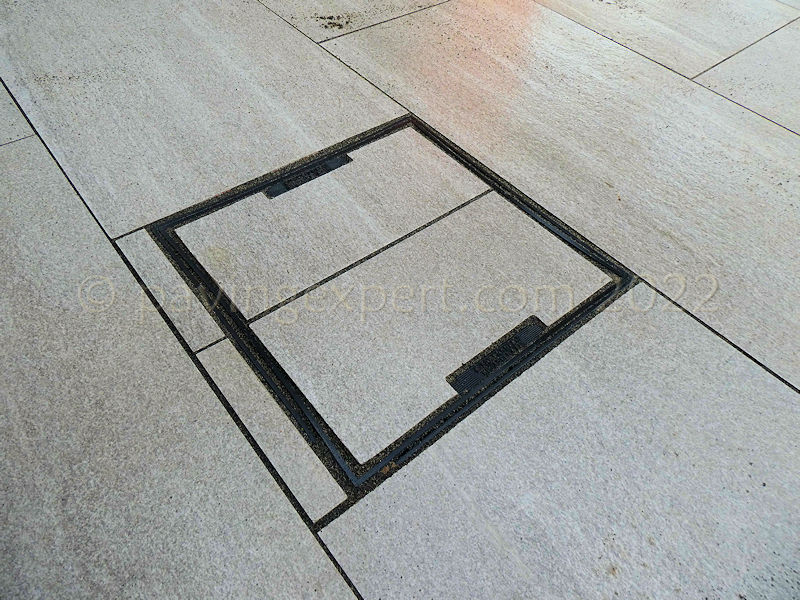
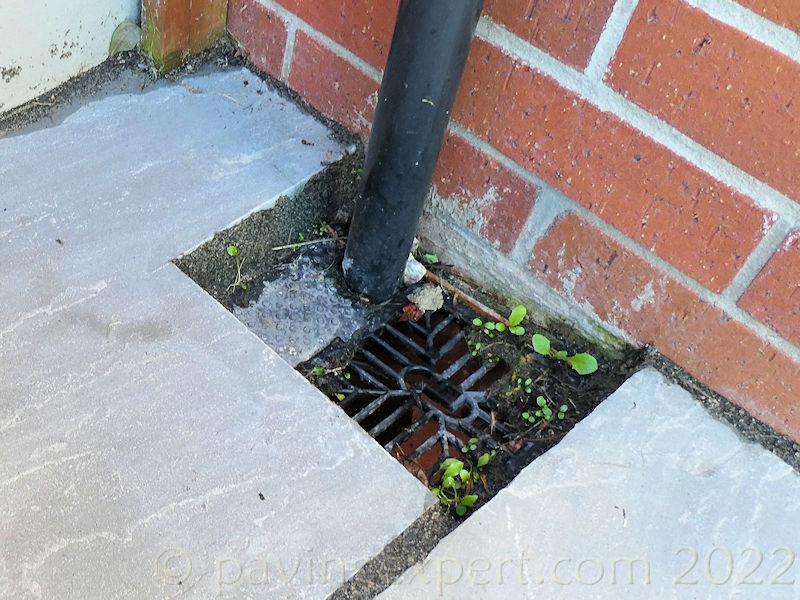
Fittings:
Recess tray covers and other drainage fittings also feature regularly amongst the minor challenges that will defeat the incompetent. Failing to cut around lifting handles, neatly or at all; leaving overly wide joints that emphasise the tray or fitting rather than helping hide them; mis-matched or ill-fitting, inaccurate cuts – all a key indicator of the unskilled.
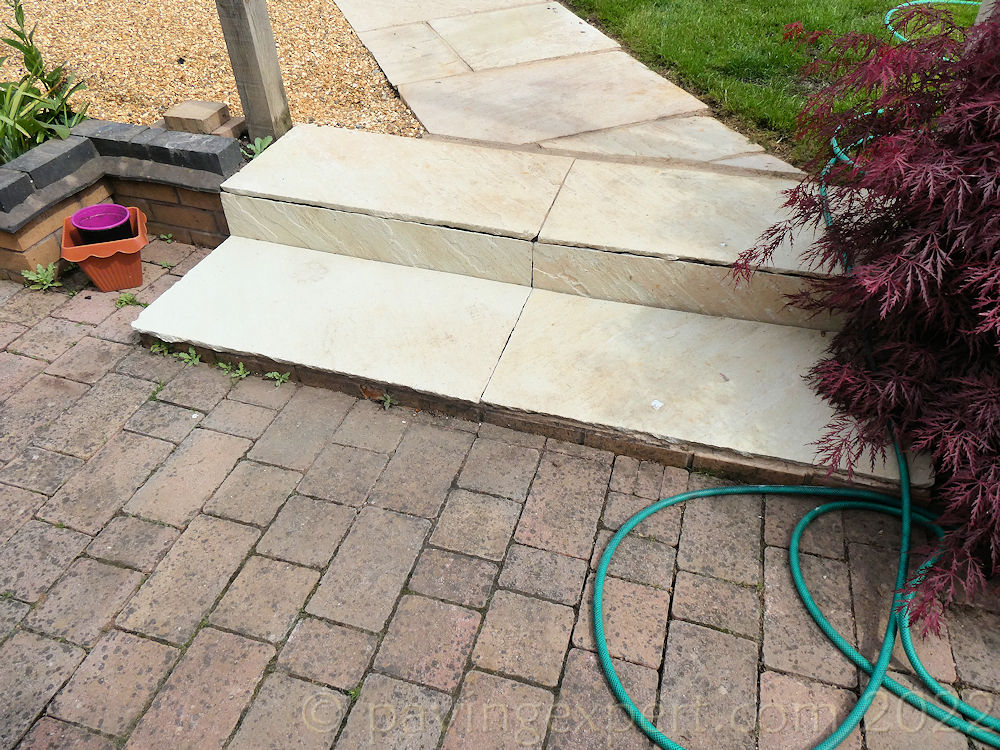
Steps:
Next, a quick guide to what’s required of steps.
They should never, ever breach (be higher than) the DPC of the property if built at a doorway.
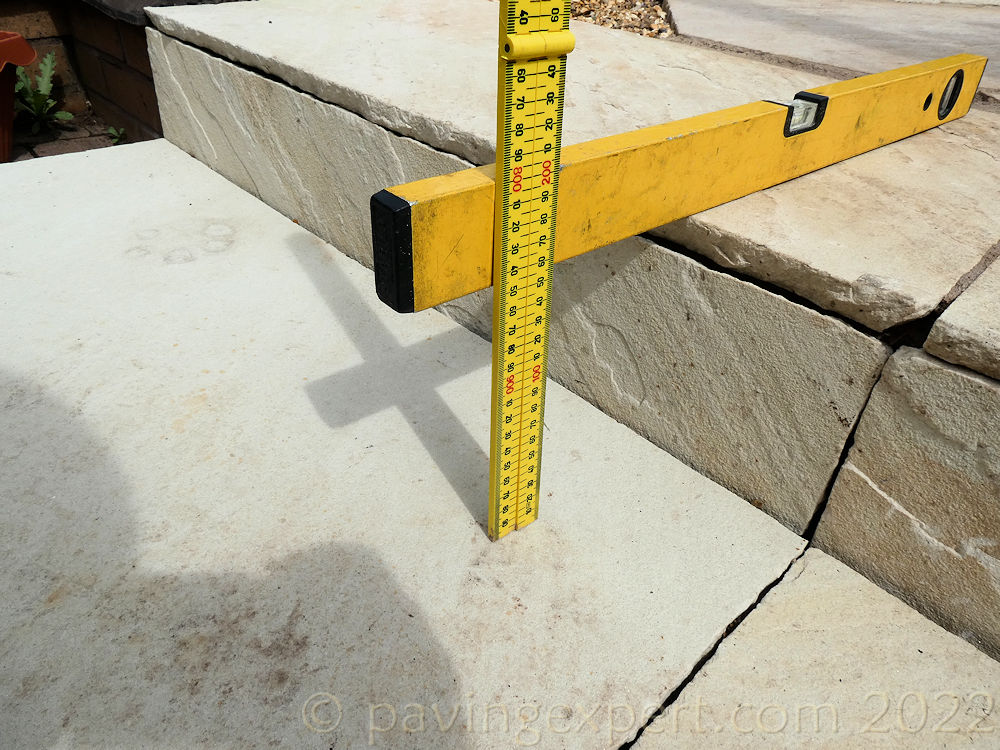
They should not have risers greater than 175mm (200mm in exceptional cases with a single step). 150mm is the ideal.
Where multiple steps are required (a “flight”), all the risers must be the same height.
The tread should be at least 280mm deep and should have a slope or fall to ensure water does not collect on the surface.
The tread should “oversail” the riser, which means it sticks out a little to prevent water running directly down the riser. Good steps will have a drip groove cut into the underside of the oversail to keep surface water away from the riser.
The treads should be absolutely firm and stable with no movement whatsoever. Treads should always be primed on the underside to ensure adhesion.
Conclusion:
Thanks to the very generous assistance of Pavestone, this homeowner was able to get their patio put right. This involved complete reconstruction by a competent installer, and Pavestone helped out by providing new flagstones at cost, in return for this case study.
The bulk of the cost was borne by the original incompetent installer….by order of the local court! All’s well that ends well, allegedly, but it’s much better if these problems are identified and corrected before final payment is made.
Further Information:

Pavestone Helpline: 01386 848 650


