Introduction:
This page is part of a series of pages that consider cutting techniques used with flags (or slabs, if that's what you call 'em). The first page examined the basic principles of cutting-in: this page looks at how notches are cuts; subsequent pages consider other cut features such as curves and flagged radii. See the menu above right or the related pages listing at the foot of this page for a more comprehensive guide to what's available.
Notched cuts
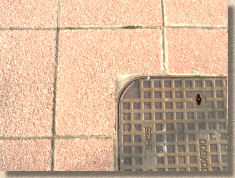
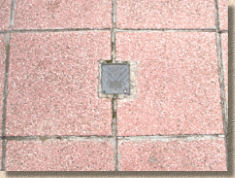
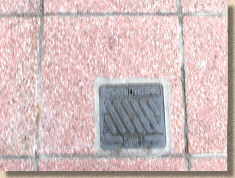
Notched cuts are those that involve at least two distinct lines of cut to remove a corner or section of the flag to enable it to be fitted around an obstruction such as a water box, manhole cover, a wall, etc. Typical notched cuts are illustrated below.

Notched cuts are best achieved using a typical cut-off saw, cutting both lines to full depth to ensure a clean break in the right location. However, there are a couple of important issues that need to be considered, namely the need for trimming and/or undercutting, and the problems that can occur when cutting out larger notches.
Trimming and undercutting
As explained previously , the circular shape of a typical saw blade preclude a complete cut when working with cut lines at acute angles (in this situation, anything less than 180°) because the blade would cut into the piece of flag that is required.
There are a number of strategies that can be used to aid the necessary trimming, and two of the more popular techniques are described below.
Technique 1: Bisect the angle
This technique involves elevating the flag at an angle that presents the uncut internal corner to the saw blade, and then cutting into the surplus material at roughly 45°, ensuring the blade does not cut into the surface of the flag. This makes removal of the unwanted material much easier when using a hammer and chisel, and greatly reduces the risk of buggering up the cut.
Technique 2: Base cutting
This technique actually takes advantage of the cause of the problem in the first place, namely the blade's circularity. By turning the flag upside down and cutting into the base, the cuts can intersect, completing the cut, and extend into the body of the flag without marking the eventual surface.
This technique requires a great deal of care to prevent the blade cutting through and emerging into what will be the top face, once the flag is put the right way round. There's also some concern that the intersecting deep cuts on the underside of the flag render it weaker than would be considered ideal. Consequently, this technique should be used sparingly and only when there really is no viable alternative.
Cutting larger notches
In theory, there's no limit to how big a notch can be cut from an individual flag, but in practice, the removal of large notches seriously weakens the flag, and the larger the notch removed, the more likely is the flag to break. The Code of Practice that deals with flag laying (BS 7533 Part 4) requires that when removing a notch equivalent to 25% or more of the flag's surface area, the cut should be mitred to prevent the risk of breakage. Although the example depicted in BS 7533 Part 4 shows an angled mitre cut, in practice it is often better to use orthogonal cuts (ie, cuts that are square to the notch) that simply extend the necessary lines of cutting.
For BS sized flags, the maximum area of notch that can be removed is as follows:
It should be borne in mind that the 25% figure quoted in the Code of Practice is a maximum, and it may be a wise move to mitre or extend the cut for a notch that is a good bit less than 25% of the total surface area. Consider a typical B50 flag (600x600x50mm). To fit it around a manhole, a notch with dimensions of 475x150mm will need to be removed. This represents a total area for removal of 0.056m² from a flag with a surface area of 0.360m², which is a mere 15.6% of the total area - well within the 25% guideline. However, this would leave a 'stump' measuring just 125x150mm on one corner of the flag. This is an obvious candidate for a fracture, as shown in the illustration, and so it would make more sense to extend the transverse cut and use the 125x150mm 'stump' as a separate piece, bedded onto a generous dollop of fresh mortar to ensure it stays put.
As with much else in the paving trade, common sense should be employed whenever possible, and if a cut flag looks as though it will break without too much persuasion, pre-empt the break by extending one of the cut lines.
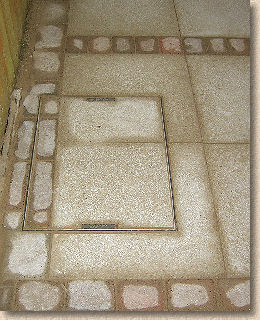
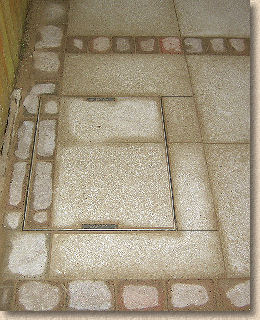
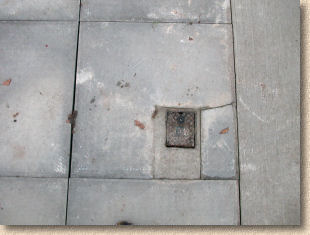
In the above pair of photos, the image on the left shows a very large notch cut from a decorative flagstone so that it fits around the recess tray cover and maintains the pattern as far as possible. Under normal circumstances, this pair of notch-cut flags are prime candidates for breaking almost as soon as a car pulls up on the driveway.
The photo on the right shows how the flags might have been cut to reduce or eliminate the risk of breakage.
The reason the notch-cut flags have not broken is that they were deliberately laid on a 100mm thick bed of strong concrete. The contractor was aware of the risk, and discussed it with the client, explaining the two options. The client chose to maintain the patterning by keeping the flags as single pieces and so the contractor used a full concrete bed to ensure the flags were as well supported as was feasible.
In this example, it's almost possible to see the notch-cut flag breaking in front of you. It can only be a matter of time before the darker-coloured notch-cut flag develops a crack running from the cut to the edge of the flag - in fact, it looks as though a crack is already forming, but that is just a trick of the light. When the photo was taken, the flag was intact. It may not have been so a couple of hours later!
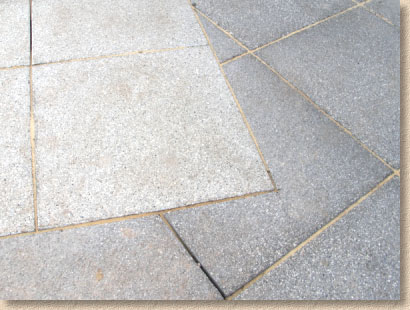
Again, the laying pattern has been given precedence over structural integrity. This is sometimes unavoidable, but the designer or client should always be made aware of the risks involved in such a strategy.
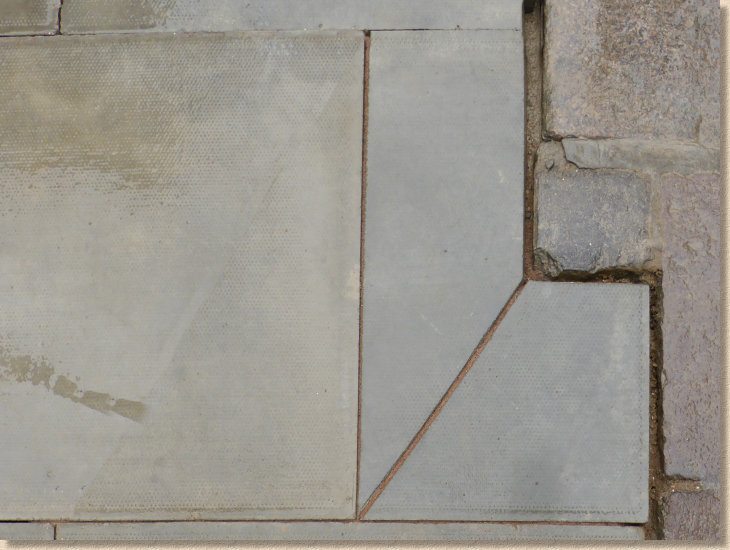
The image opposite shows an orthogonal stress-relieving cut that has been skewed to the right so that it coincides with a kerb joint at the top of the photie. This was done because there is a significant change of fall in the kerb levels at that point.
Had the piece been laid without the stress-relief cut, the top right-hand edge would have stood proud of the kerb. The relief cut allows the flag to be folded over and so better suit the profile of the kerb whilst simultaneously rendering the notch cut less liable to breakage.
However, there really wasn't any need for the cut to be angled. An orthogonal cut (90°) would have still allowed the right hand side of the piece to be folded down to meet the kerb level, and would have looked neater.
Notches with more than two cut edges
This section might be thought of as "Advanced Notch Cuts", as it takes the principles explained in the preceding section and uses them to create more complex notches, namely, those with three or even four cut edges. It is possible to have notch cuts with more than four cut edges, but they are pretty damned rare, and simply build on the technique that will be described in this section.

As discussed previously in reference to cutting multi-section internal arcs, the two cuts that start at a free edge are relatively straightforward: it's the cut(s) that have no contact with an outside edge that are more problematic.
The circular format of the blade means that such cuts may not be able to cut all the way through, and for shorter sections, the blade might not even penetrate to half depth. In the example shown opposite, the 150mm wide internal cut (B-C) can be sawn to a maximum depth of 20mm, and combined with the fact that the two side cuts (A-B and C-D) cannot cut a clean corner, there's a distinct possibility that this cut might 'go wrong' and end up breaking in a place other than that intended.
There are a number of strategies that could be used to reduce the risk of it going wrong, but just two will be examined here. The first involves creating three further cuts, from the outside edge to the internal cut line BC. These are shown in the diagram opposite.
After making the three defining cuts, a mid-point cut is made, from point E on the flag edge to point F on the internal notch line. Following that, two diagonal cuts, from A to C and D to B can be made, which should result in parts of the notch area falling away completely, as shown. The remaining pieces are (or should be) only peripherally attached to the rest of the flag, and they should be persuaded to part company with a few taps from the hammer.
This should then leave a flag with the notched area removed, but requiring minor tidying-up and trimming, as described earlier .
An alternative strategy would be to turn over the flag and make cuts in the base to match and meet-up with those cut into the face. As explained above , this strategy can be tricky and can significantly weaken the flag. If at all possible, the previous strategy of making additional cuts into the surface is a much safer option.
As with simple notch cuts, three sided cuts may need to have the transverse cut extended to pre-empt a potential breakage.
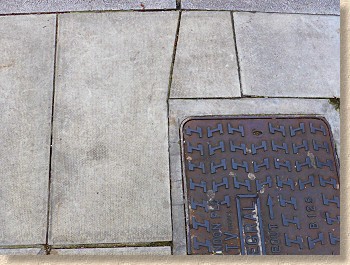
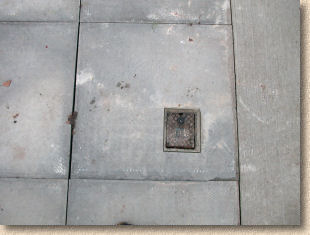
The three-sided notch cut in the photo opposite displays a number of faults. Obviously, the break to the lower right hand corner could have, and should have been predicted, and the transverse cut should have been extended out to the right hand edge to prevent this. However, note also how the lower portion of the cut out has been made up with a mortar fillet wider then the 25mm maximum required in the Code of Practice, and that the cut is 'off-centre' with a significantly wider joint to the left hand side of the stop tap box than that on the right hand side.

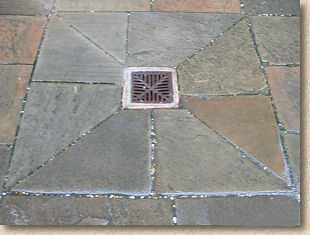
Where a large cut-out is required in the centre of the flag, such as the example shown here where the paving surrounds a lamp column, it would be impractical to use a four-sided hole cut, because lifting such a flag over a lighting column is just a nonsense. In such cases, it's always necessary to split the flag and fit two or more pieces which surround the obstruction.
The image on the left shows how this was actually done, using two 3-sided notch cuts, which are very neatly done. However, both pieces are vulnerable to stress breaks on those internal corners, and it is just about possible to make out a stress fracture running from the top left corner of the notch to the top edge of the upper piece.
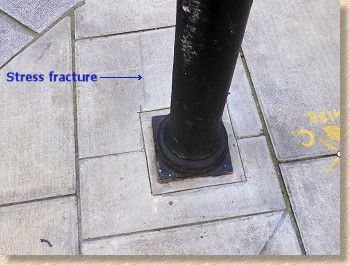

These flags were laid on a full mortar bed as part of a street refurbishment scheme capable of withstanding occasional vehicle overrun and so the engineer decided the arrangement on the left would be adequate. However, it may have been better to use four pieces, as shown on the right, eliminating those internal corners and thereby reduce the risk of breakage.
Four sided cuts
Back in the 1960s, long before the advent of cut-off saws, when I wasn't at school I'd be on site with my father and never failed to marvel at his ability to cut a rectangle out of the centre of a flag to fit around a water stop tap box, and using only the basic hand tools of a punch, cold chisel and pitcher. It took me 10 years to acquire the skills myself - I was 17 when I cut out my first water box in the late 1970s, but it was a high point in my apprenticeship, a real achievement that convinced me that I really would be a streetmason one day.
Modern apprentices have it easy, in comparison. That first box cut-out took me around 20 minutes and earned me 30p; using a cut-off saw, the same cut today would take me around 3 minutes and earn me 40p. How times have changed! A "water box cut", such as that shown below, involves making four of the "internal" cuts described above. Obviously, none of the four principal surface cuts will achieve full depth, as can be seen from the cross sectional drawing, and cutting along the diagonals will only just 'break on through to the other side' (Who sang that?)

So, working on the upper face first, the boundary cuts marking the outline of the box are done first, ensuring the blade doesn't go beyond the corners. Next, the two diagonal cuts are made, and for these the blade should just poke through the underside. Again, care is needed to prevent the blade cutting into the required part of the flag's surface.
Turn the flag upside down, mark the position of the box and then cut into the base, sawing through to join up with the face cuts made previously and to achieve a crossover of adjacent cuts that will help trim the internal corners. The result should look summat like that on the left in the diagram opposite.
With the flag still in the upside-down position, the diagonal cuts that were made previously (when the flag was face up) can be extended as shown, again cutting just beyond the corner points of the box to help in trimming those internal corners. This is shown on the right hand side of the illustration above.
Once all this has been done, the flag can be returned to the 'face up' position and the pieces knocked out with the aid of a hammer. There may be a need to undertake some minor trimming in the corners, but accurate cutting should have removed virtually all of the unwanted material. And if the cut has been measured correctly, the flag should just drop into place without a hitch. Honest!
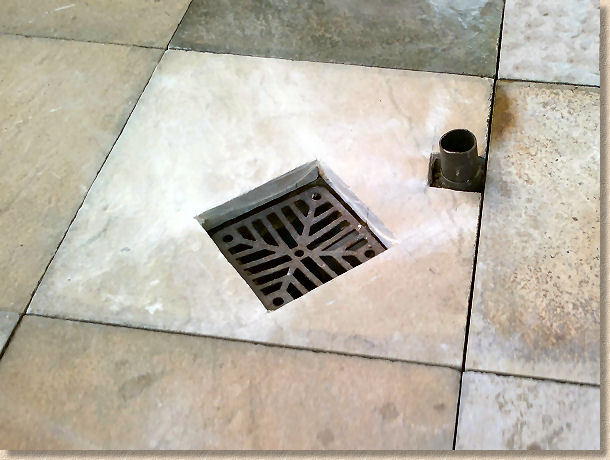
Done by DIYer Chris Jones following the guidance given above.