Introduction:
Resin bonded aggreate paving is a specialist surfacing technique that is becoming more and more popular for all sorts of paving projects. The technique involves the use of a high-strength polyurea resin to bind specially selected decorative aggregates to a base or substrate to create an attractive, hard-wearing, traffic-friendly surface, with superb slip-resistance and a high-degree of traction for both pedestrian and vehicle use.
As described on the Introduction to Resin Bound Systems page, there are two principal methods of applying a resin-bound surfacing to any pavement: Trowelled and Scatter Coat (also known as "Surface Dressing"). The Scatter Coat method is probably the more popular, as it offers a number of advantages:
- Easier to apply - no need for highly trained operatives
- Cheaper - because the expensive resin is used only at the base
- Fast - surface can be trafficked in as little as two hours
- Versatile - the resin can be applied to awkward areas, such as steps
- Lightweight - the finished surfacing can be as little as 4-6mm thick
Uses & Applications:
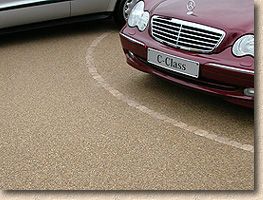
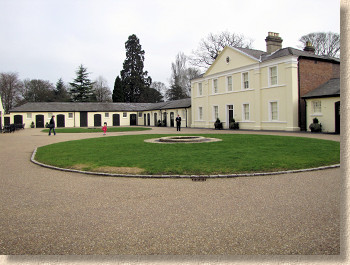
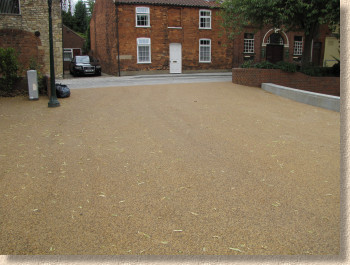
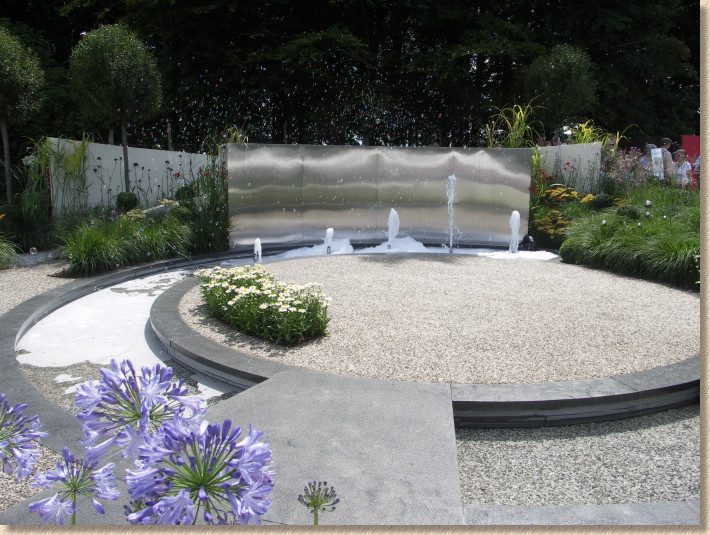
Resin Bonded Surfacing is eminently suitable for a wide range of surfacing projects where an attractive, gravel-like, natural-looking surface, with excellent anti-slip properties is required. Although it is proving to be a popular choice for driveways and patios, it is also widely used in the commercial sector for use on car parks, footpaths and cycleways, shopping malls and leisure facilities, schools and play areas, and is a market leader for use on steps, ramps, balconies, footbridges and other areas that require a simple, low-weight surface with a high level of slip resistance. Its use is not limited to outdoor applications, though - it is equally suitable for indoor applications, such as retail areas looking for a more natural flooring, for atria, corridors, factory floors, stairwells, etc.
The product can also be combined with an elastomeric waterproof membrane to enable it to be used in areas where total waterproofing is essential, such as roof-gardens, balconies, verandas, multi-deck car parks, etc. More information on these particular systems is readily available from the Technical Department of the better resin suppliers .
Construction:
Scatter Coating is a relatively simple surfacing comprising 3 layers: a base, the resin binder, and the decorative aggregate. Each of these layers contributes different properties to the finished pavement and so each requires careful preparation, which are examined below.
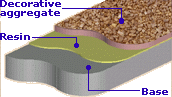
The base
Resin Bonded Surfacing is highly versatile and can be used on a wide variety of existing bases. However, these bases must meet certain requirements to ensure best results.
It must be sound and firm - no movement, no sponginess, no flexing, no crumbling
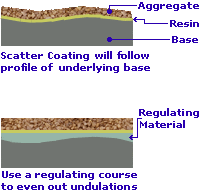
It must be reasonably level - the resin-bound aggregate is a surface dressing and relies on the profiling of the base layer to create falls and levels within the finished pavement. Any dips, hollows, peaks, high spots or other deviations from true will still be evident after surfacing with the resin-bound aggregate, therefore it may be necessary to lay a thin regulating course of suitable material (See Polymer Modified Cement Overlay Systems ) to ensure the base is at the correct level to accept the resin and aggregate.
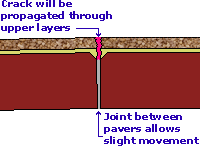
The base should be monolithic , that is, a composite whole, such as concrete, bitmac, metal or even wood. Elemental surfaces, such as block paving or flags, are less than ideal as the movement between the individual elements at the joints will be reflected through the dressed surface. However, if blocks (or tiles or flags) are securely bonded to the base (ie, rigid bedding) and therefore cannot move then Resin Bonded Surfacing can be applied directly to them.
The base should be clean , to ensure that the resin bonds properly and will not lift or peel.
Preparation
Where an existing base is to be used, it should be swept clean of any loose, organic or deleterious matter, and preferably thoroughly cleaned with a power washer to ensure best adhesion of the resin. Although the resin can be successfully applied to a damp base, there should be no standing water on the surface. There should be no oils or greases present on the surface.
When a new base is to be used, it should be prepared in advance and laid to adequate falls and levels to ensure proper drainage. Concrete should be allowed to cure for at least 4 days before applying the surface coating, and it may be necessary to treat the surface to remove any laitance . This can be done with a wire brush on relatively new concrete surfaces, or with an acid etching fluid on more established cementitious bases.
Bitmac/asphalt bases should be at least one month old to ensure that any volatiles have escaped before applying the resin, and it must be free of any oils and/or greases. Wash down with a proprietary degreaser, if necessary.
Details for constructing a suitable base can be found on the Concrete Hardstanding and the Tarmacadam Pavement pages of this website.
Where a wooden base is to be used, as with steps or access ramps, the timber should be checked for general soundness and any loose material should be removed. If there is any concern at all about the condition of the timber, it should be replaced. It's much easier and cheaper to replace a suspect tread at this stage than when the resin and aggregate has been applied.
Metal bases should also be checked for general soundness and any areas of rust sanded down to remove all loose and flaky material.
Any access covers within the pavement, such as Stop Tap boxes, drain covers, manholes etc, can be left in situ, as the relatively thin coating of aggregate applied to the base should not impede access to the fittings. To effect a neat and tidy finish, it's best to cut a 'key' around any such fittings and 'feather-in' the surfacing.
The "Key" is a strip, approximately 100-200mm wide, where the existing surfacing is chipped away to reduce its level. For a thin-coat surfacing, such as resin bonded aggregates, the key need be only 6-12mm deep, and it can be hacked out using a pick-axe, hammer and chisel, or it can be 'scored' with a cut-off saw to make it easier to break out.
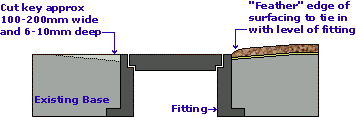
If covers are already low, damaged or tatty, it's well worth lifting them and re-fitting or renewing to a correct level before applying the surface dressing, so that the finished pavement is not spoilt. The excavated area around re-placed covers should be made up with bitmac or concrete to match the level of the base and provide an even platform for the resin and the dressing. Polymer Modified Mortar or Concrete is ideal for this type of remedial work as it can be trafficked after only 1 hour.
The resin
The resins used for this type of surfacing are typically a high performance, multi-part liquid that is self-priming and fast curing. Often, it is a polyurea-based resin with excellent adhesion to most bases and to the decorative aggregate scattered onto the surface.
It often comes in a range of colour options with the best colour to use being determined by the type of aggregate being used for the surface dressing. For example, a light coloured aggregate, such as the ever-popular Chinese Bauxite, might use a buff coloured resin, while a red granite aggregate would be better served by the browner resin.
In most cases, the resin can be applied directly to the base. No primer is needed where a concrete, bituminous or wooden base is used, although an appropriate primer must be applied to metal surfaces approximately 2 hours before placing the resin.

Safety Note: Although surfacing resins are fairly safe and non-hazardous (except for an inhalation hazard) it is good practice to reduce risk wherever possible, and so protective overalls, gloves, and goggles cannot be recommended too highly.
The component parts of the resin need to be mixed prior to spreading. Each component typically comes in a clearly marked, pre-measured pack along with full instructions. Various sizes of pack are available), so the resin can be prepared with minimum wastage, and at a rate to suit the working speed of the laying operatives.
The ingredients are mixed together in a clean container using a standard drill with mixing paddle attachment rotating at somewhere around the 500rpm mark. The mixing instructions provided by the manufacturer should be followed to the letter .
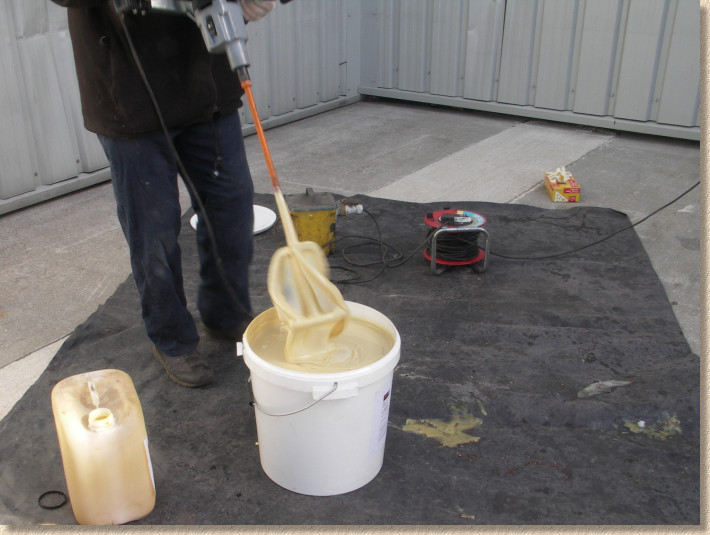
It is always best to mix full packs. Attempting to mix part packs, a bit at a time, can result in too much or too little of one component or the other in the mixed resin, and this can have a negative effect on the finished surfacing. It's really not worth trying to save a few bob by mixing a half pack - it will cost more than a few bob to put it right if it turns out that the resin has set before you've got the aggregate in place, or that it's not set properly and is scuffing when trafficked.
Once mixed, the working life is usually around 5-10 minutes, so plan the work to ensure the mixed resin is spread over the base and covered with the chosen aggregate as quickly as possible. Different contractors have different ways of working the resin, but one of the most popular methods is to empty the mixed resin out onto the base and use a long-handled notched squeegee to spread the resin over the base so that an even thickness is achieved. Use a spatula (which can be a simple piece of stiffish plastic) to clean off surplus resin from the squeegee blade.

It's worth noting that the sides of the buckets/vessels used when mixing resins and mortars are more often than not coated with unmixed resin. Scraping out the sides to "get your money's worth" will add this unmixed resin on to the base. As a result, the resin will not cure properly and could leave a sticky patch which will not hold the aggregate securely. To avoid this, do not scrape the sides.
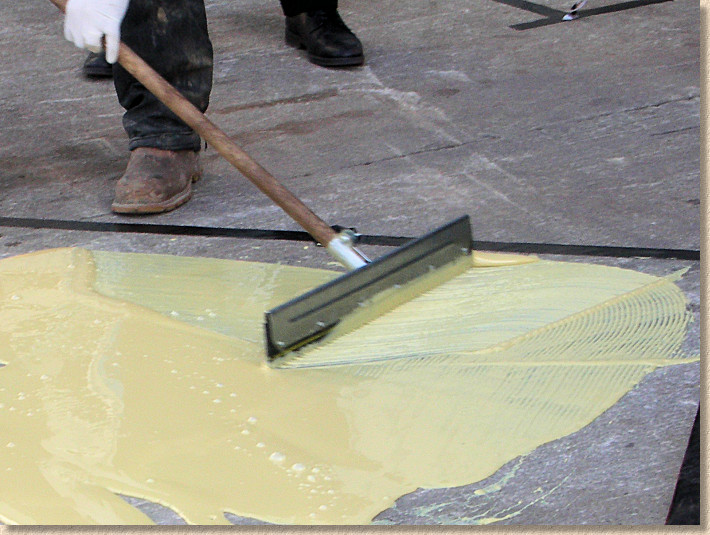
The required thickness of the spread resin is determined by the size of aggregate being used, but, as a general guide, aim for a coverage rate of around 1kg per squre metre for pedestrian areas and 1.8kg/m² for vehicular areas.
The Aggregate:
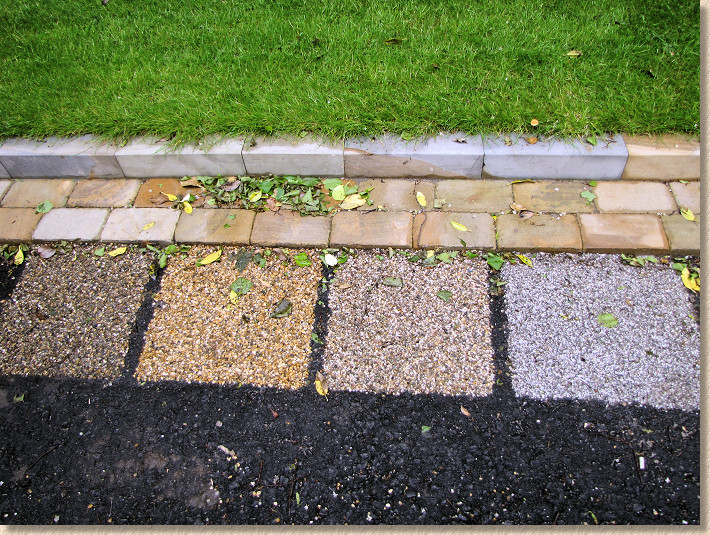
The range of aggregates available for use as the surface dressing is enormous. There is a good selection of quality aggregates in an attractive range of colours and in various pack sizes from a range of suppliers. It's worth checking with the supplier's Technical Department to ensure suitability and compatibility. Most aggregates used for this type of work are around 6mm or less - the chunky, 15mm limestone chippings that you can buy from the DIY Superstore for a couple of quid per bag are NOT suitable. Any aggregate used MUST be dry and not less than 0.5mm (unless of course you want to take a chance on achieving something different to the images shown!)
If in doubt - check with the manufacturer!
The aggregate needs to be spread over the still-wet resin as soon as possible, if not sooner. Don't have a tea-break or slope off to the toilet after spreading the resin - you have around 5 minutes to get the aggregate in place, and if you leave it too late, the resin will have started to cure and the aggregate will just sit on the surface, sticking to nothing. There's plenty of time for a brew and a butty once the resin is covered!
Again, different contractors have different methods, but a popular method is to 'broadcast' the aggregate over the surface by hand. This is often accomplished by using a large scoop to scatter the aggregate over the surface in a series of arcs, ensuring relatively even coverage.
Aim to cover to excess - it's far better to have too much rather than too little, as any surplus aggregate can be retrieved in a couple of hours when the resin is firmly set, but it's not possible to add extra aggregate to thinly covered or 'bald' areas.
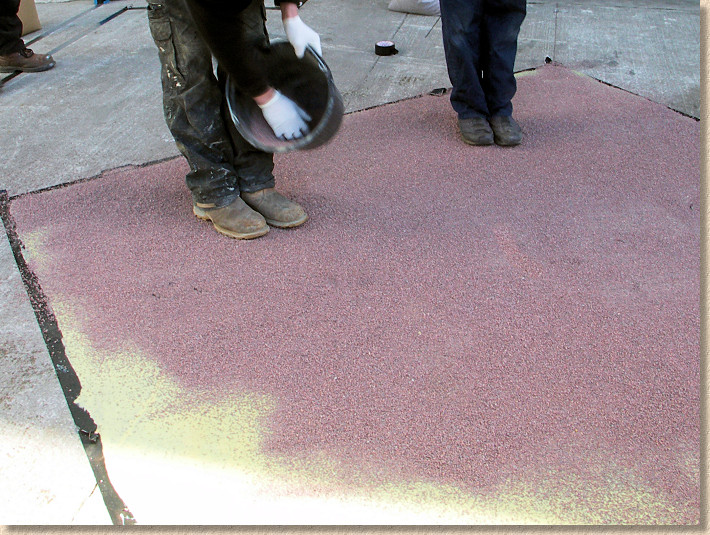
Check the coverage from as many angles as possible to ensure there are no thin areas. A plain long-handled squeegee can be used to push around the excess aggregate if small areas need a topping up. Coverage for the aggregates varies but, as a rough guide, pedestrian areas should take 4-5kg per square metre, and vehicular areas around 6-8kg/m² Don't be mean with the aggregate - you'll only regret it once the resin has set!
Contractor or DIY?
Although all of the projects shown on this page have been undertaken by experienced, professional contractors, the principles involved with this type of surfacing are relatively simple and probably within the capabilities of competent, experienced DIYers.
However, it's strongly recommended that, unless you are totally familiar with substrate preparation and resin usage, an experienced, approved contractor should be engaged to undertake the work and to ensure your 10 year guarantee.

Finishing Touches
Completing the Work
The aggregate is left to sink into the tacky resin and the lot is allowed to cure for a couple of hours or so, after which the excess aggregate can be removed. The time taken for the resin to cure depends on ambient temperature and relative humidity, so it will take longer in winter. Test that the surface is firm and the aggregate is firmly held before cleaning up. This can be achieved by use of a vacuum, or simply brushing the surface with a soft-bristled yard brush. The collected aggregate should be relatively clean (ie, not full of dust, litter or other crud) and can be re-bagged for use elsewhere.
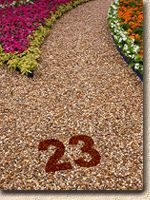
Inlays
It's incredibly easy to incorporate patterning or logos or directional information with a bit of pre-planning. A template is prepared to mask the chosen inset detail. Once the main area has been dressed and has cured, the template mask can be removed, the exposed base coated with a fresh mix of resin, and immediately dressed with a contrasting aggregate.
Seal Coat (optional)
The surface can be trafficked immediately. There's no waiting about for it to cool or to fully harden, or for the cheque to clear - it's ready for use as soon as it has set. However, the surface can be further enhanced by applying a seal coat, to ensure full adhesion of the aggregate and to protect the surface from accidental staining.
If a seal coat is to be used, then it should be applied immediately after cleaning the surface of loose aggregate, if possible. It is not recommended that the seal coat be applied if rain, frost or temperatures below 5°C are expected within 24 hours. Only the manufacturer recommended seal-coat should be used as other products may not bond properly and can invalidate the guarantee. The Seal Coat should be applied using a decorator's roller and is, literally, painted over the surface of the pavement. Coverage depends on the type of aggregate that was used, but will normally be somewhere around 2-7 square metres per litre.
After coating, the treated surface should be kept free from all traffic for approximately 4 hours. If a second application of Seal Coat is required (for a high gloss finish), then it should be applied 1-24 hours after the first coat, but before allowing any traffic onto the surface. A second coat should also be allowed 4 hours to cure before opening the completed pavement to users.