Introduction:
Jointing, pointing, grouting, filling the gaps…call it what you will, it’s always been a contentious issue for paving works. From as soon as I was able to hold a trowel, I was taught how to point flagstones – my owld feller hated that part of the job, and, if truth be told, he was a little….let’s say ‘untidy’ when it came to trowel pointing with a cement mortar. Back in the late 1960s, I’d earn one penny (1d) per 3x2 flag pointed, at a time when there were 240 such pennies to the pound, and I could easily make 10 Shillings (50p) on a Saturday, enough to keep me fully stocked with comics, crisps and mineral pop all week long!
Back then, there were three accepted forms of jointing. Trowel pointing with a cement mortar was regarded as the best but needed a lot of time and a reasonable degree of skill to keep it clean. Dry grouting, sweeping-in a moisture-free mix of fine sand with cement, was the quickest, and by quite some distance, but the resulting joints were unreliable, friable and tended to break down a few days after the payment cheque had cleared. It was a method used only on cheaper jobs.
A middle ground was wet-grouting, making the usual cement mortar into a wet slurry, wetting the paving, then using a brush to persuade the soup-like mortar into the empty joints. Great idea, but the downfall was always the cleaning. When done on a warm, sunny day, the thin smear of mortar on the flag surface would dry before the cement could cure and would rapidly turn to a dust that could be swept away, while the deeper joints remained moist and allowed the mortar to properly cure. On wet days, we could wash off with water, but there was a risk of washing out recently filled joints or diluting the mortar to the point where it because far too weak.
Nowadays, thankfully, we have methods of jointing that take the basic ideas from back then but use modern materials to guarantee a solid, reliable joint along with techniques that ensure the surface of the paving comes up clean. Modern ‘Slurry Grouting’ is now widely viewed as the best option for many pavement jointing tasks, and a pre-batched, quality-controlled cement mortar of proven performance is often the choice of many professionals.
The Technical Stuff:
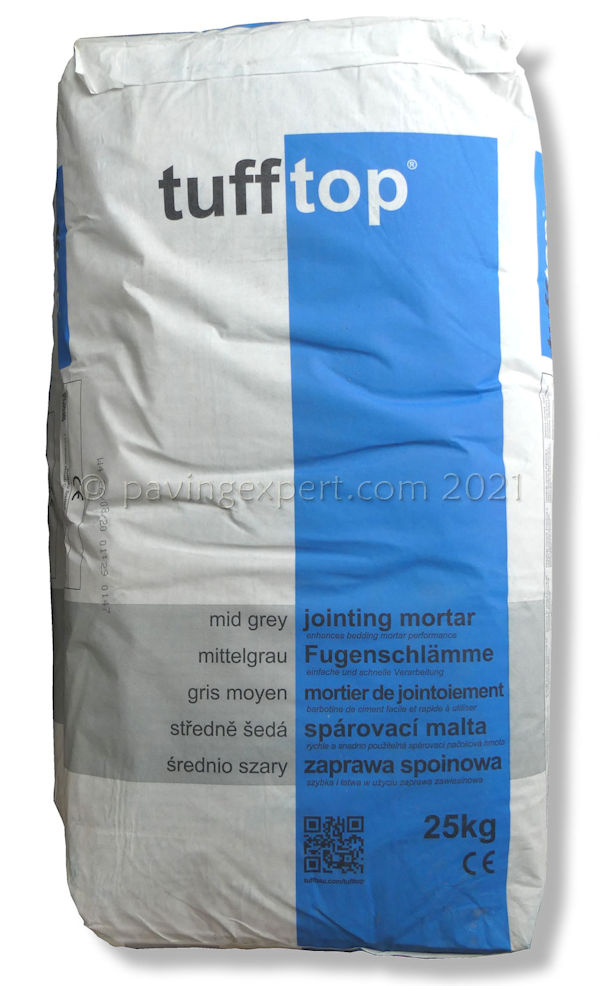
Steintec tufftop makes up for its lack of capitalisation with its class-leading performance. Specifically developed to not only meet, but to exceed the demanding requirements of BS7533, it’s the premium, pre-batched proprietary pavement jointing mortar and the one against which the others are judged.
Its formulation is based on Steintec’s many decades of experience providing specialist paving mortars to the British, Irish and European construction industry. As a brand, Steintec has consistently set the pace for paving mortars, and now with tufftop, along with its associated products for bedding (tuffbed) and bonding (who’d have guessed? tuffbond!) this suite of materials offers the leading installation option for any paving project, from commercial streetscapes to back-garden patios.
tufftop is a blend of carefully selected fine aggregate of igneous rock with high-quality cements and specially developed plasticisers that are combined to create a jointing mortar that is non-permeable, yet easy to clean, and free-flowing, yet fully self-compacting. It works exceptionally well with any concrete or natural stone paving, and may also be used with porcelains, ceramics and even clay pavers. It uses no polymers or resins.
On the technical side, tufftop develops the ideal elastic modulus to ensure a jointing medium with ample stiffness to support the paving whilst being eminently capable of dealing with the dynamic loads that all pavements must endure due to trafficking as well as the thermal stresses resulting from everyday heating and cooling.
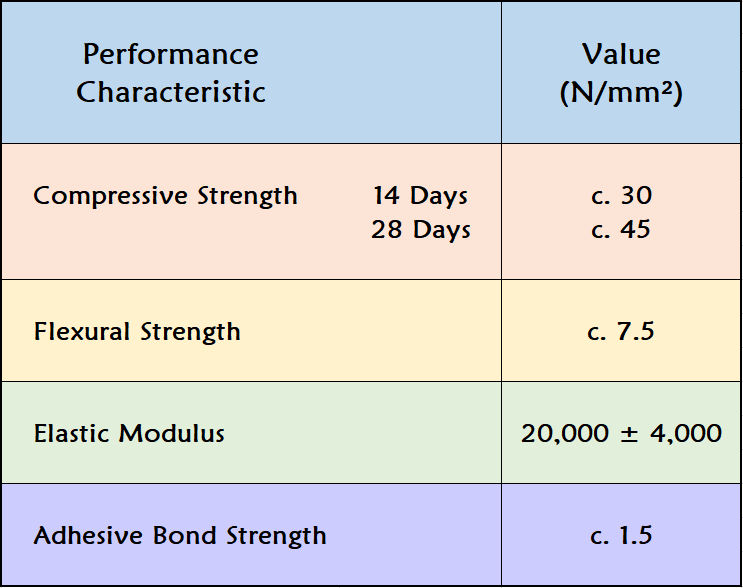
It develops compressive strengths of an impressive 30N/mm² after 14 days, and a whopping 45N/mm² after 28 days, significantly exceeding the requirements of BS7533. Flexural Strength is around 7.5N/mm², Elastic Modulus around 20,000N/mm² ± 4,000N/mm², and an adhesive bond strength of c.1.5N/mm², all of which means the cured mortar is exceptionally hard-wearing, durable and low maintenance.
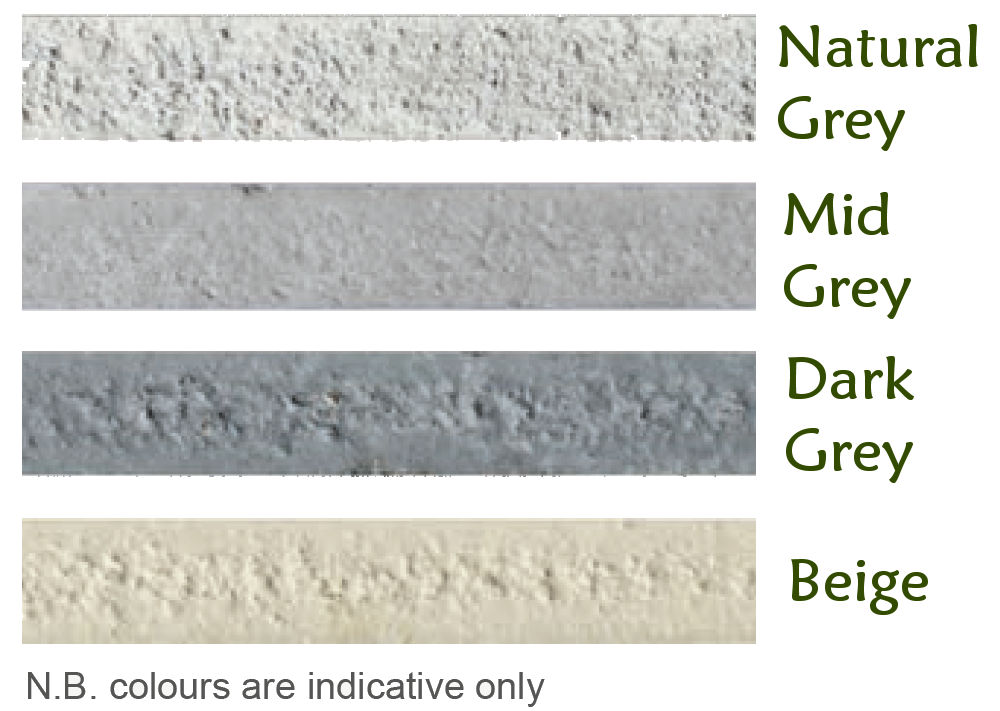
It can be used in any joints greater than 3mm width and comes in a range of four colours (Natural Grey, Mid Grey, Dark Grey and Beige) rendering it eminently suitable for almost any paving project.
The key factors for those using it on site are that it is currently supplied in moisture resistant 25kg packs. In terms of storage, shelf life is 12 months, which is more than ample for most professional paving installers.
Mixing requires around 4 to 5 litres of clean, cold water, and once prepared, there is a typical working life of around 30 minutes, although, as you’d expect, slightly less on warmer days, slightly more when it’s cooler, and speaking of temperatures, it can be used whenever the ambient temperature is 2°C and rising right up to a rather uncomfortable 30°C in the height of summer.
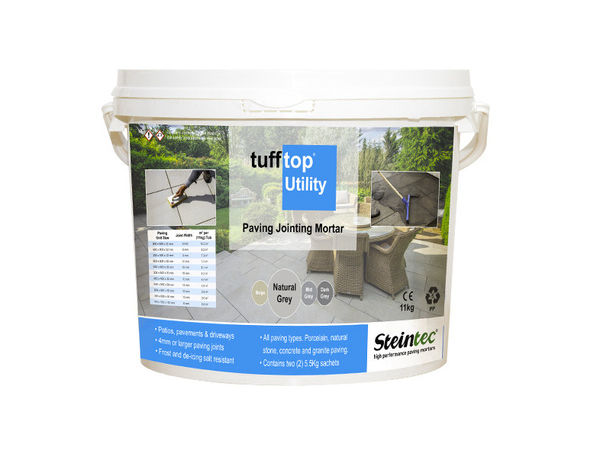
For smaller areas, consider tufftop Utility. It's the same high quality jointing mortar sealed in a pail containing two 5.5kg sachets of the dry mortar mix to which just 1 litre of water needs to be added and it can all be mixed in the packaging pail. Or make up both sachets to produce 11kg by mixing with 2 litres of water.
Ideal for DIYers or smaller repair jobs. The pails are fully recyclable or can be re-used for countless other DIY and construction tasks.
Using tufftop:
Given its impressive technical credentials, how well does it perform on site? It’s very popular with contractors, who find it easy to mix with basic tools, simple to use on all surfaces, from riven flagstones to cropped setts and even textured concrete, and, most importantly, highly cooperative when it comes to the critical cleaning phase, being easy to remove from surfaces while still unset with either hand tools or a belt cleaning machine.
For specifiers, designers and architects, tufftop delivers everything they require, being cost-effective, reliable, durable and, critically, typically leaves no unsightly haze over their beautiful and carefully chosen paving. The availability of four popular shade choices simply amplifies its appeal.
The remainder of this page gives detailed coverage of its use.
Case Study:
Private patio in Lincolnshire.
While it is regularly used on commercial projects such as re-paving of town and city centres, there is no reason whatsoever why tufftop should not be used on a less busy pavement, one with lower engineering demands in terms of traffic loading and dynamic stresses, but with the highest of all aesthetic considerations – a private garden patio.
Residential clients may not know quite as much about compressive strength or shearing forces, but they *do* know what they like, and when it comes to the little patch of heaven where their friends and family will make the most of their precious leisure time, nothing but the very best will do. And while a patio might not have buses trundling across it all day, or hundreds, thousands of pedestrians criss-crossing on their way to wherever, it is likely to be regularly subjected to spills and stains from food and drink, which all-too-often means being blasted with the bane of modern pavements, the pressure washer!
When considering a case study for tufftop, we (that is: Steintec as product manufacturers and page sponsors, along with myself as website owner and hyper-critical eye) decided that rather than show its use on a prestige streetscape where, to be honest, tufftop is already a popular choice of jointing material, we’d look at its use on a typical modern patio, and examine how it can be used by the smaller contractor, in a residential setting, on precisely the type of paving many of us will be having installed at home. A smaller project is easier to monitor, and it’s easier to show the finished results, but the client’s expectations are usually higher – there’s less room to hide, so it has to be right!

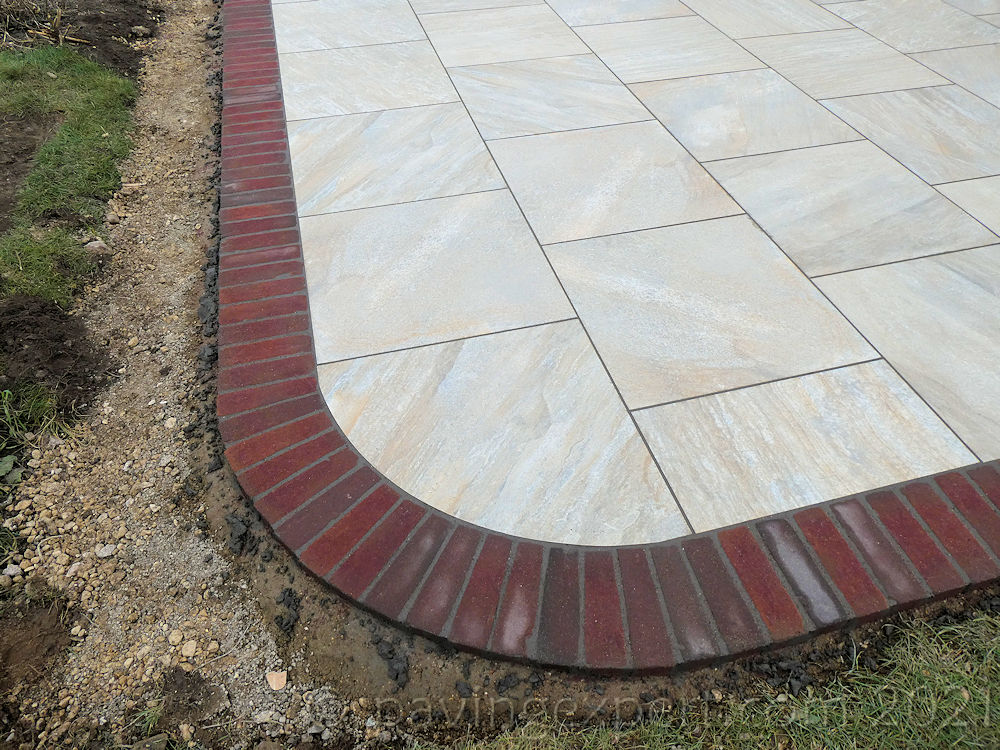
The patio under consideration comprises roughly 32 square metres (m²) of limestone effect porcelain paving, mostly 600x600mm format, with a Dutch clay paver edge to more or less all edges. Both the porcelain tiles and the clay pavers will be jointed in the one operation.
While the porcelain is, as you’d expect, amazingly smooth and stain resistant, the clay pavers have a textured face, comparatively rough and far more likely to retain any mortar that isn’t expertly cleaned, so this should be a good test of both the product and the skills on the installation team.
Preparation:
The first task is to ensure the patio area is clear of any litter, detritus or other obstructions and that it is reasonably clean. No dirty marks, no muddy bootprints, no surplus materials – just a clear and clean surface.
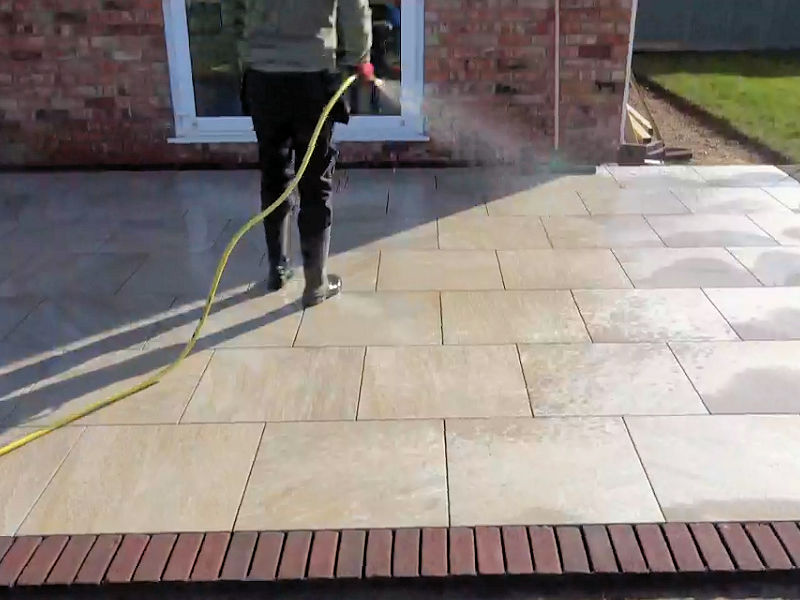
While a couple of the operatives set about preparing the tufftop jointing mortar, another operative gives the patio area, porcelain and pavers, a through wetting down, with clean cold water from a hose.
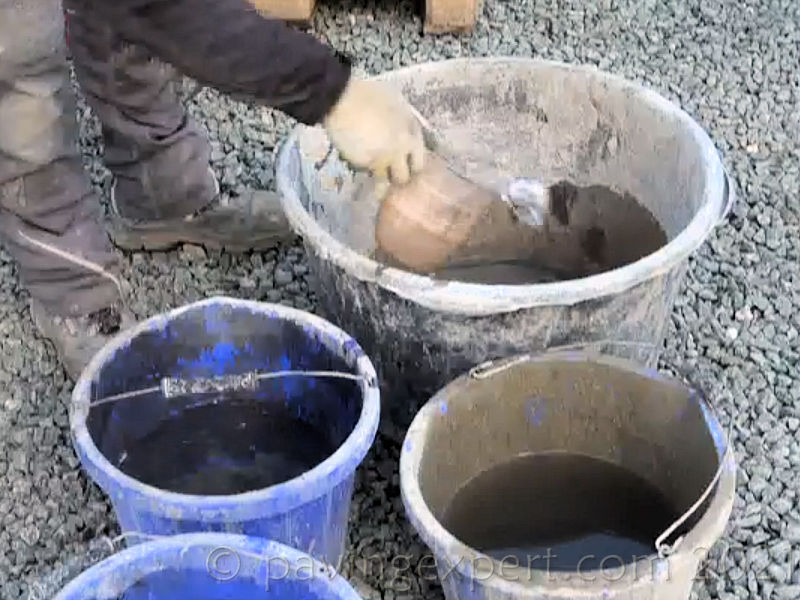
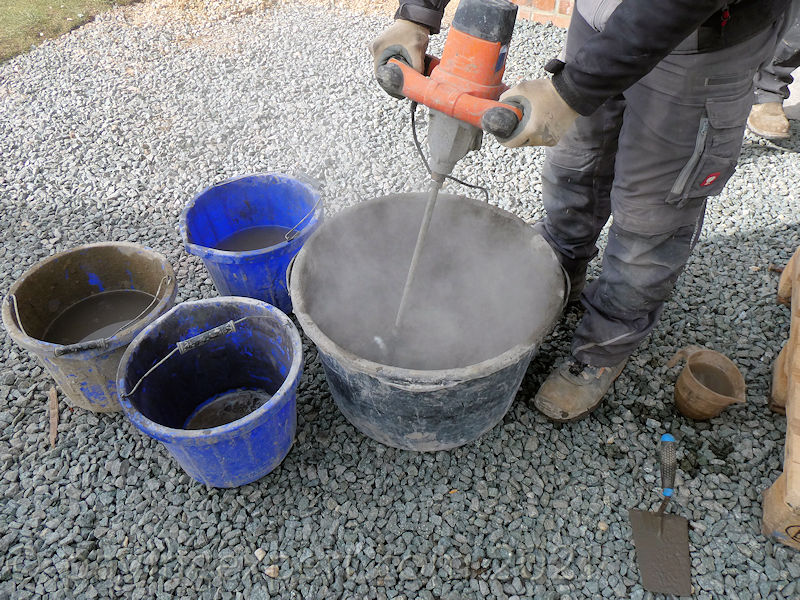
Meanwhile, over in the mixing area a couple of operatives prepare the first batch of the tufftop jointing mortar.
Mixing:
The mixing area is likely to get splashes, spills and dips from the mixing process, so it should be somewhere that won’t be adversely affected by any of this, such as an area of sub-base yet to be paved, or it could be an area of hard-standing that has been protected with heavy duty polythene and decking sheets.
Do not use an existing area of paving unless it has been protected with some form of cover. No matter how much care is taken, there WILL be splashes and sploshes, and if they’re not cleaned up immediately, they will set and become a permanent feature. Don’t risk it – protect the mixing area before starting!

Tufftop has very specific requirements. A single bag of tufftop (25kg) will need around 4.5 litres of clean water to be mixed with it to create a free-flowing, pliant, pliable and eminently workable slurry grout. Use too little, and it will be awkward and unhelpful: use too much and it will become unnecessarily overwet and there’s a risk its curing could be affected because too much water will adversely affect the all-important water/cement ratio.
With experience, it soon becomes apparent that with 4 to 5 litres of water, the slump of the tufftop mortar is more-or-less ideal. Careful use of plasticisers within the tufftop ensures that fantastic flow is achieved with minimal water addition.
Add all of the water to the mixing container FIRST. The recipe requires the tufftop be added to water, and NOT water to tufftop.
Try to use a round/circular container, with gently rounded or chamfered internal corners. This will be most effective. Rectangular containers or containers with square internal angles will provide too many places for unmixed mortar to lurk, and, if this improperly-mixed mortar finds its way onto the pavement surface, it could cause problems.
To add the water, use a measuring jug, or a smaller bucket marked at 4.5 litres, to ensure consistency. 100ml or so either way would not be catastrophic, but accuracy and consistency are the keys to success.
Once the water is in, a whole bag of tufftop is emptied into the large mixing bucket.
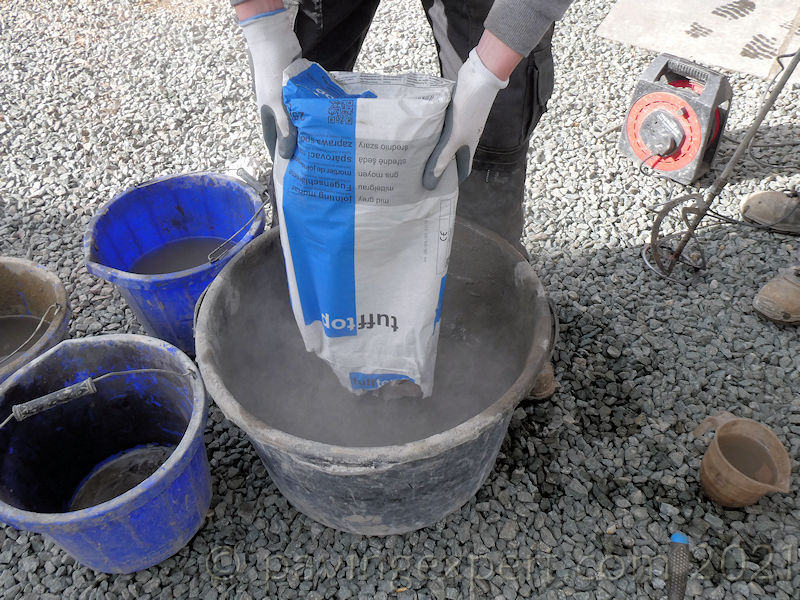
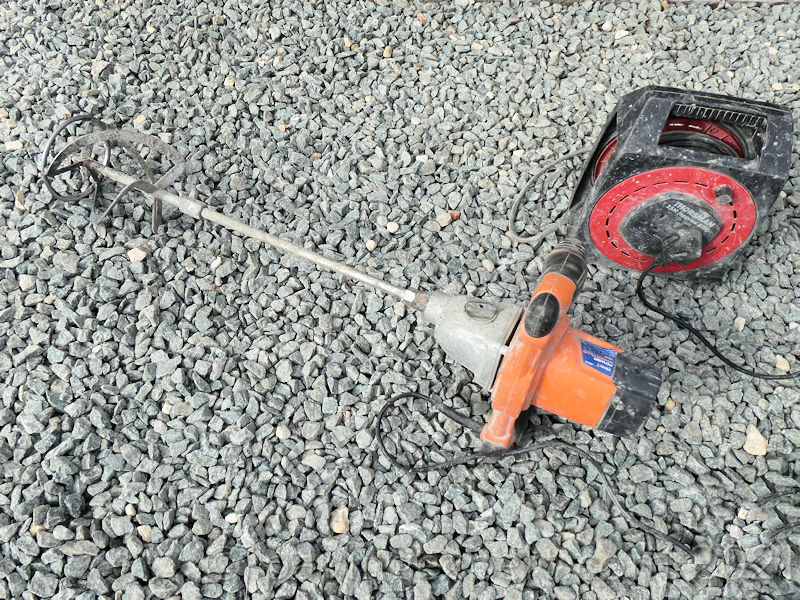
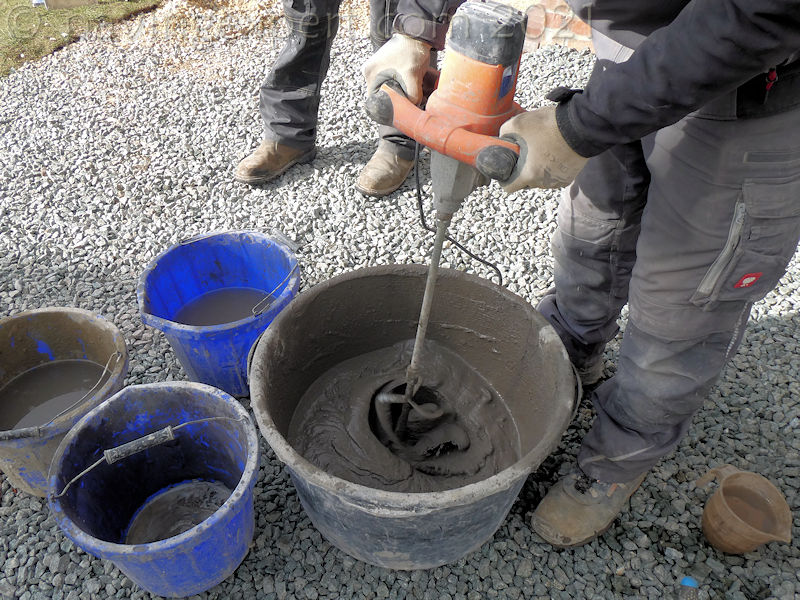
Back at the mixing area, 4.5 litres of clean cold water is in the mixing container, and the full bag of tufftop has been added. It needs to be thoroughly mixed, and the best way to do that is with a powered mixing paddle.
There are drill-mounted paddles; there are dedicated paddle mixers; and there are even twin paddle mixers. It’s not overly critical which is used as long as it is capable of thoroughly mixing the mortar at relatively high speed. It will take a couple of minutes or so to mix all of the bag, but, as with the choice of mixing tool, timing is not critical – it’s thoroughness that matters.
Move the mixing paddle around the container, working through different parts of the mixture, drawing it in, and moving it around.
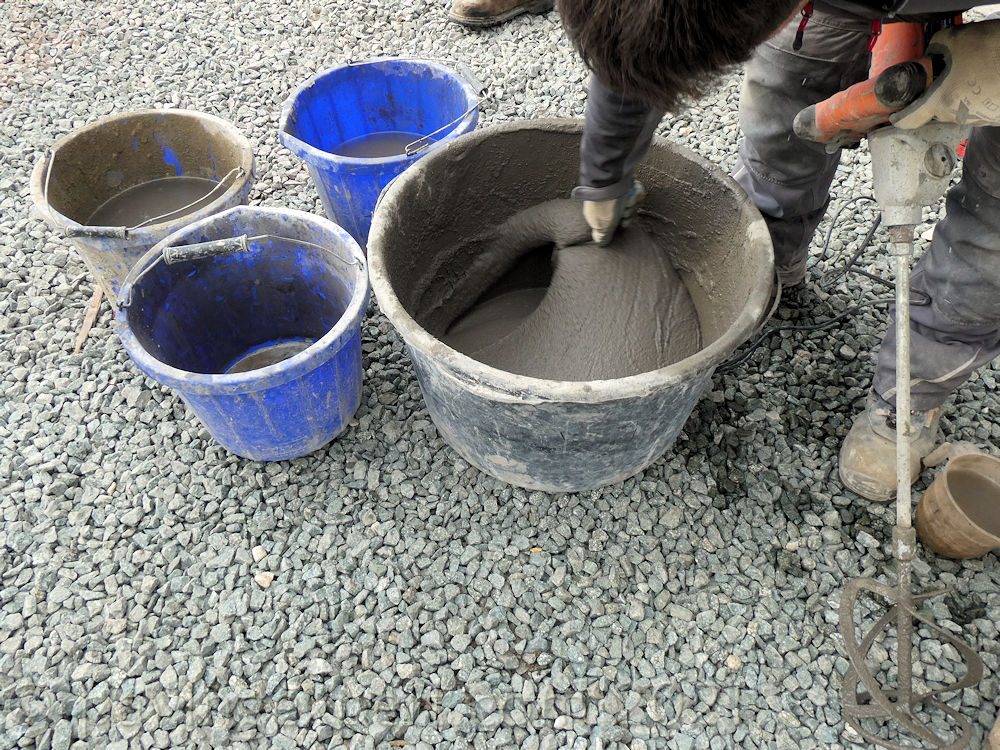
ALL of the mortar, even the bits hiding in the deepest corners, must be mixed, and the target consistency is a smooth, regular and even mix, with no lumps, no drier/wetter bits. One, smooth, even mix is what’s required.
Reach into those corners with the mixing paddle, or stop the mixing and use a trowel to dredge up any mortar that is attempting to hide, blend it in with the mixed mortar, and then start-up the paddle mixer once more for a final 30 seconds or so of thorough mixing.
Another handy tip, just in case you are tempted: don’t use a tumble action mixer, the so-called standard, rotating drum “cement mixer”. These are fine for knocking up a bedding or bricklaying mortar but, sadly, they don’t quite ‘cut the mustard’ for a fine-grained, pre-batched, premium-quality, jointing mortar. This mortar really does need a mixing paddle.
A couple of minutes is usually adequate. Some contractors will add a splash or two of additional water at this stage, and then mix that in for another 30-60 seconds, to achieve their own preferred consistency. As long as it is a ‘splash’ and not a deluge (so: not more than 100-200ml), it should be fine, but always start with the factory-recommended slump of 4.5 litres per bag.
As experience with tufftop is gained over various projects with different paving materials, it may be that an installer finds they actually need only, say, 4 litres of water when working with porcelain, or that they really do need the full 5 litres when jointing cropped granite setts. Experience: it cannot be bought!
As soon as the mixing is complete, it’s ready to use. Bear in mind that, on a reasonable day in the British or Irish climate (say 20°C), there’s a working life of around 30 minutes, so no hanging around for a cuppa or nipping to the shop for a butty. Working life is slightly longer in cooler weather, but in the heat of summer, it will be less – be aware!
Spreading the Mortar:
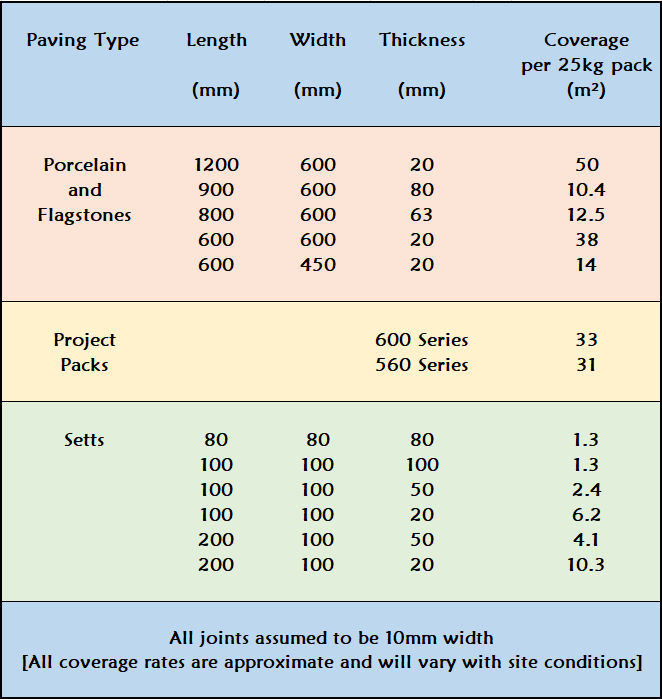
The coverage rate for a single bag mix of tufftop is determined by the type of paving that is to be jointed. The table opposite gives a rough guide of what to expect, but, as ever, things may vary under different site conditions.
Where expected coverage is low, say 2~5 m² per mix, the container can be emptied in the one spot and spread from there. When more coverage is expected, then tipping-out a quarter or a third of the container in discrete spots may work better. If there’s only one operative doing the spreading, then empty out only as much as will be spread in a few minutes, rather than having ‘piles’ of the mixed mortar sat on the pavement surface, waiting to be dealt with.
Where adjacent walls or other surfaces could prove difficult to clean should they become accidentally contaminated by the jointing mortar, it’s best to take pre-emptive action and protect with barrier sheets or temporary protective gels that can be removed with ease once the jointing work is completed.
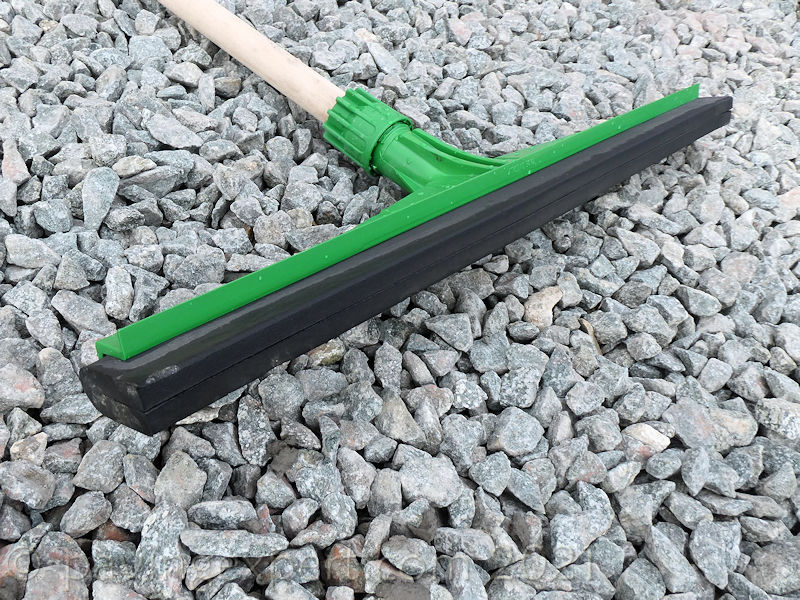
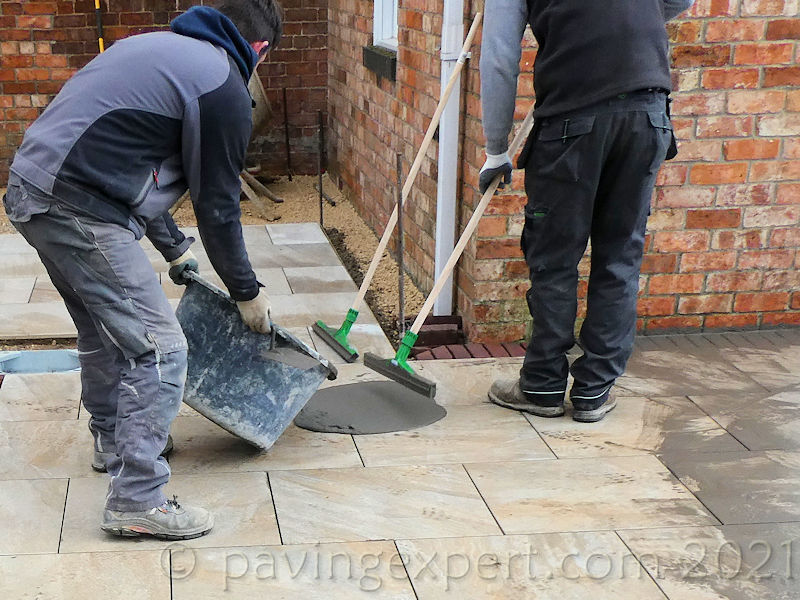
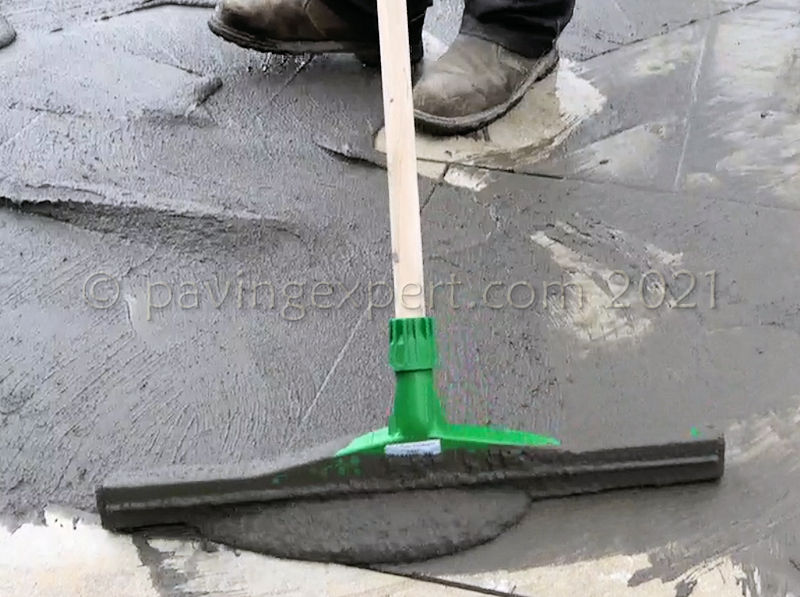
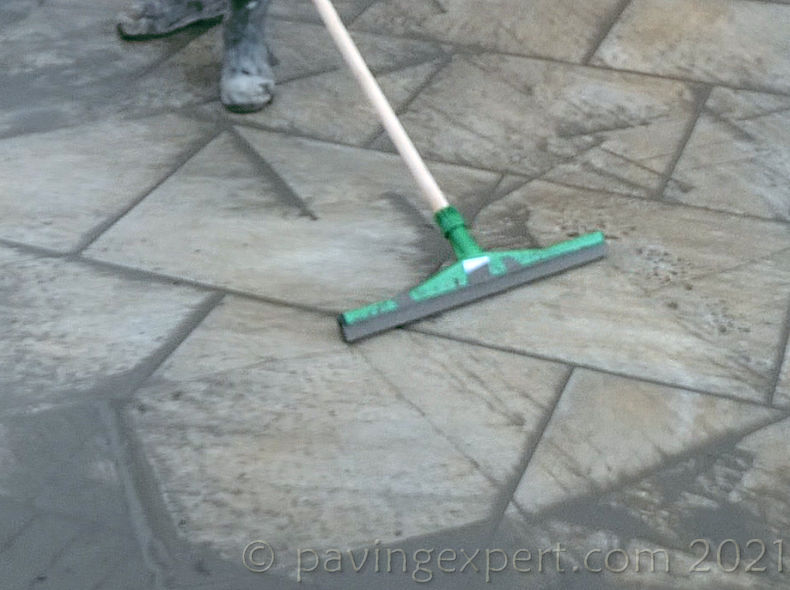
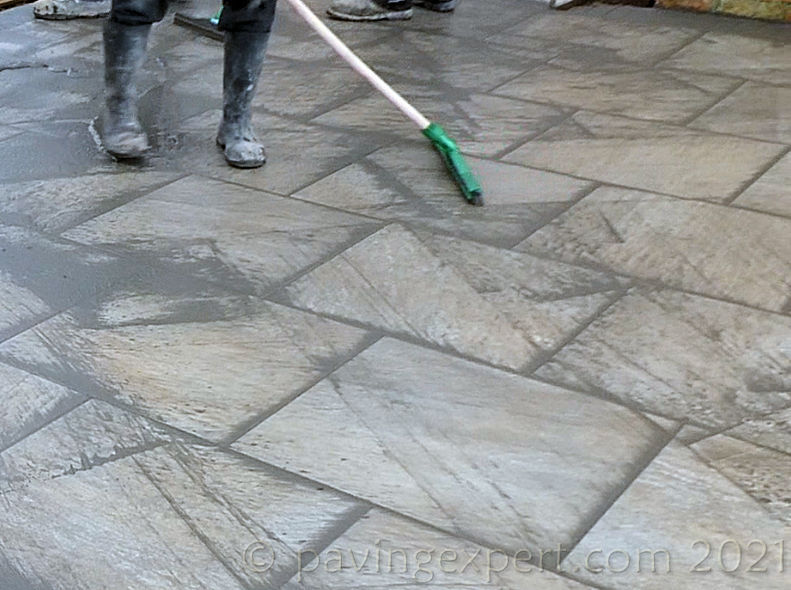
By far the best tool to spread the tufftop mortar, regardless of what the pavement surface may be, is a squeegee. The flexible blades are superb at pushing and pulling the fluid mortar across all sorts of surfaces, and they excel at removing any excess, too.
A handy tip is to think about the type of blade that’s fitted to the squeegee. A stiff rubber blade is fine for smoother surfaces such as porcelain or sawn stone, whereas a comparatively softer PU foam blade gives better results with more uneven surfaces, such as textured paving or cropped setts. That’s not to say that the type of blade is critical: far from it. A stiff blade will work well enough with setts, as will a foam blade on porcelain, but there could be a slight advantage to using the more surface-suitable blade, if the choice is available.
The tufftop mortar is moved back and forth over the open, empty joints. The mortar flows freely and will drop int the joints under gravity, but it is likely that several passes will be needed to ensure the joint is properly full.
For the filling process, it’s not critical for the squeegee(s) to be worked across the joints diagonally, but, given a choice, diagonal working usually gives best results. However, there are likely to be situations where it is necessary to work ‘square’ to a particular joint due to lack of working space. While this is not detrimental, it will require extra care to ensure the squeegee blade does not remove mortar from filled joints rather than coaxing it in to not-yet-full joints.
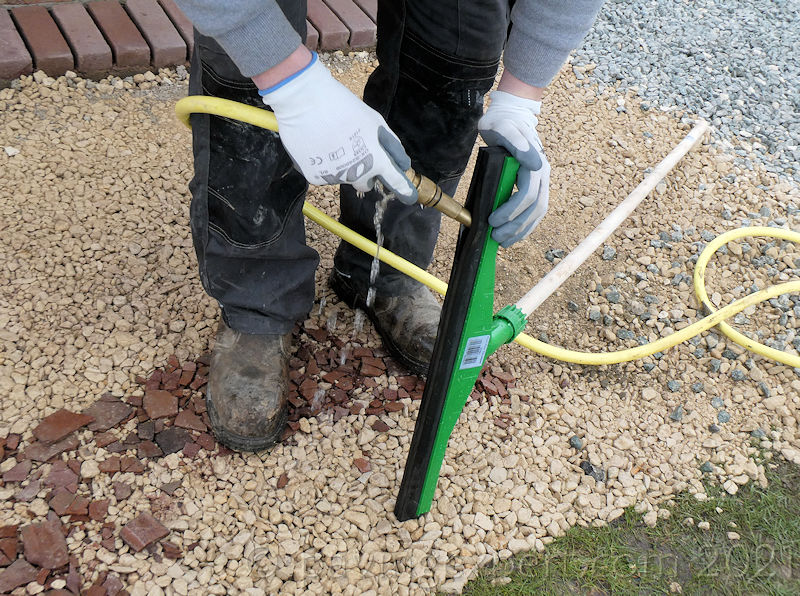
Keep the surface damp. Mist lightly with additional water, if necessary, to keep the mortar fluid and mobile.
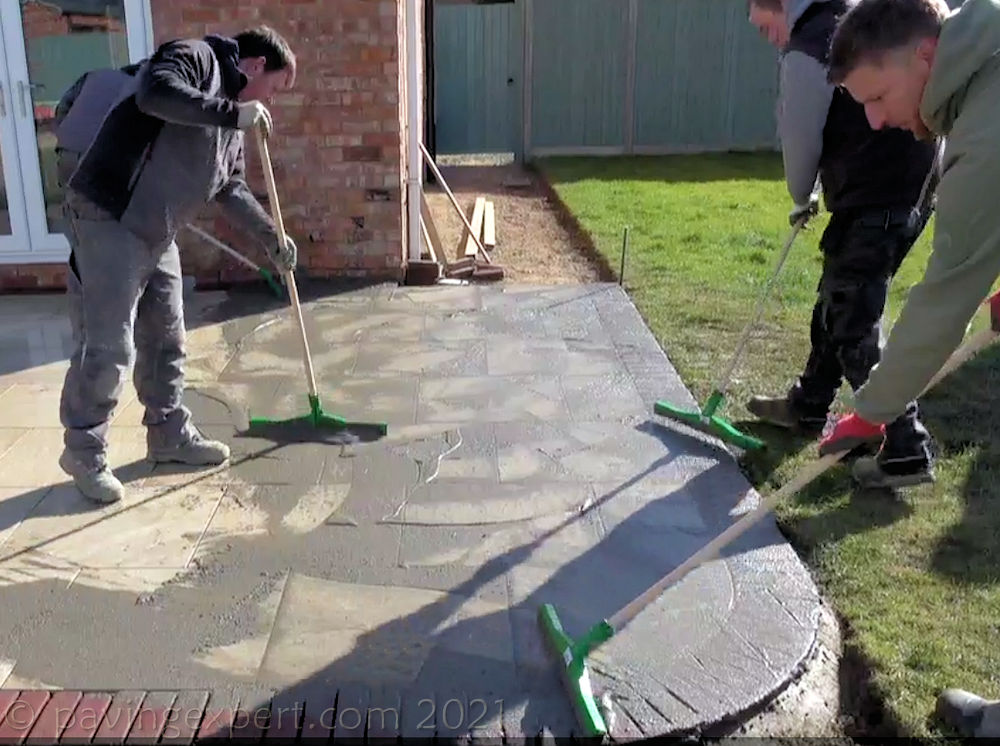
Work quickly, but conscientiously, checking that joints are being thoroughly filled. Work in a sequence, across the width of the paving, gradually moving the tufftop along and bringing in additional freshly-mixed mortar when required.
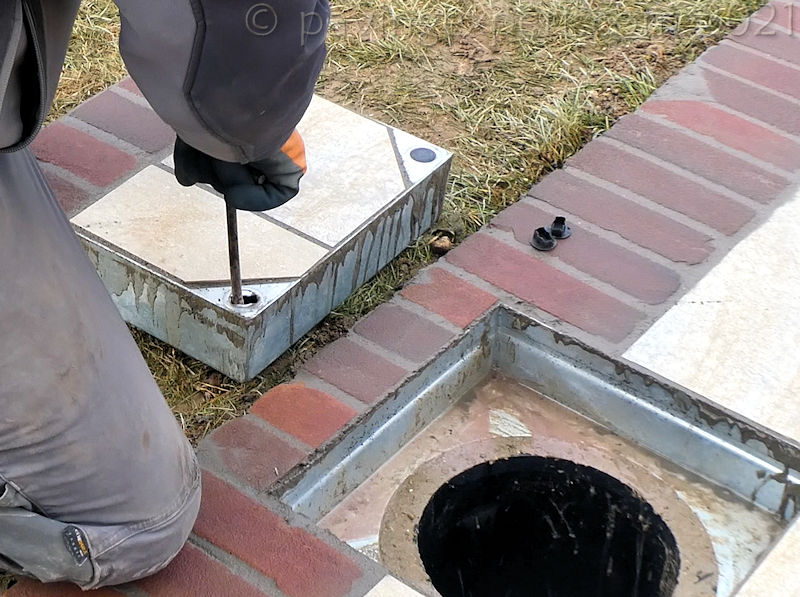
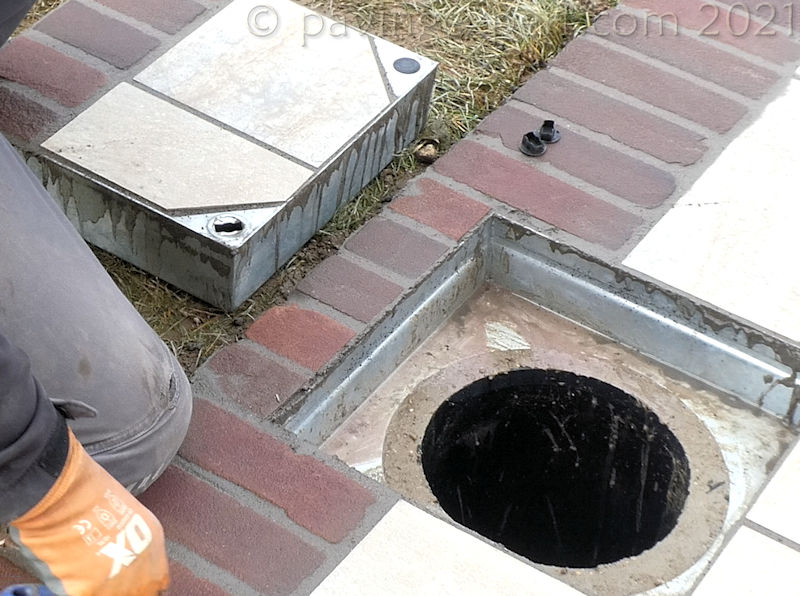
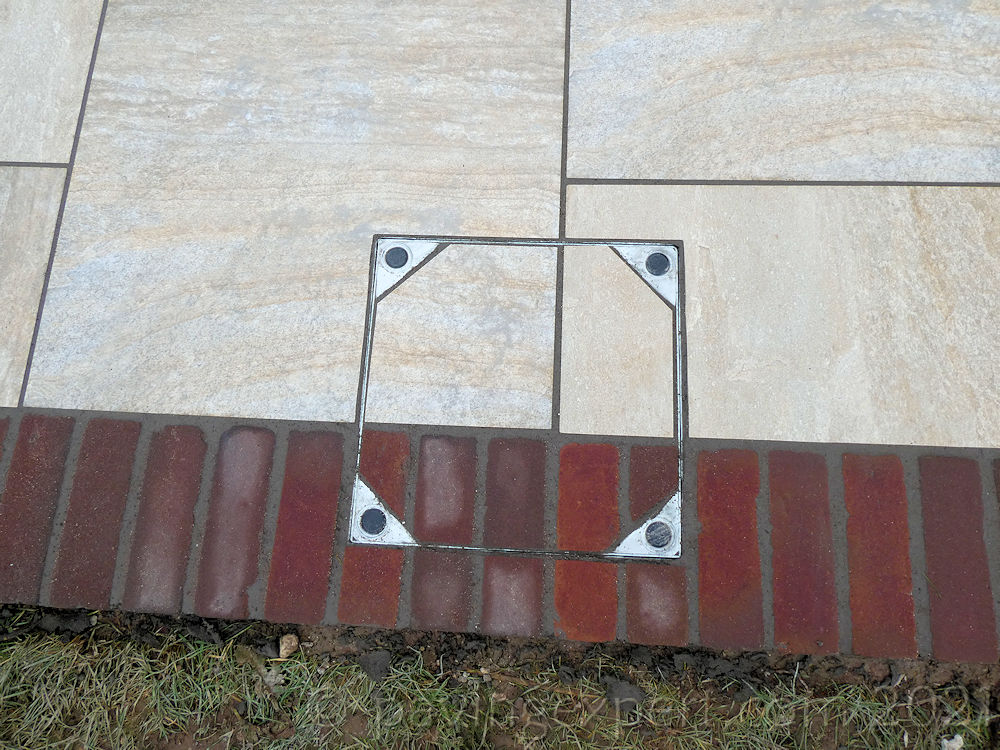
On a similar note, it’s usually a good idea to either remove access covers, or to seal them with tape or lubricating grease prior to jointing. Should tufftop finds its way into the gaps between access covers and their frames, it may prove very difficult to lift them at a later date!
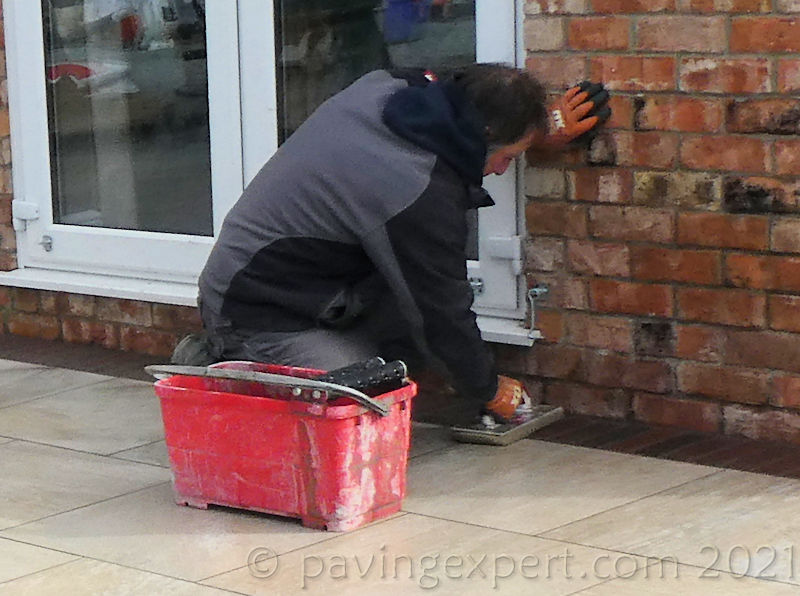
Once joints are definitely full and there is no further settlement of the tufftop within the joints, work over the area again with the intention of removing as much surplus mortar from the surface as is possible. This part of the task really does require diagonal movements across the joints to minimise the risk of accidental mortar removal. Again, mist lightly with water, if it helps, and work consistently with the squeegee blades to clean the jointed paving, drawing the salvaged mortar to as-yet unjointed sections of the pavement.
The full cleaning process can begin as soon as the joints are definitely full. When working as a team, one or two operatives will typically drop back onto the cleaning phase of the work as soon as there is a significant area jointed. On some smaller projects, say 50-60m² or less, a team might decide to complete all of the jointing and then drop back as a team to start the cleaning, which is permissible as long as the jointed areas are kept damp by misting with additional water. What needs to be avoided is having the mortar dry out (NOT the same as curing) on the surface of the pavement.
In any situation, the pavement needs to start being cleaned within 20-30 minutes of jointing being completed.
Cleaning:
There are two main methods of cleaning and many jobs will use both in conjunction for best effect.
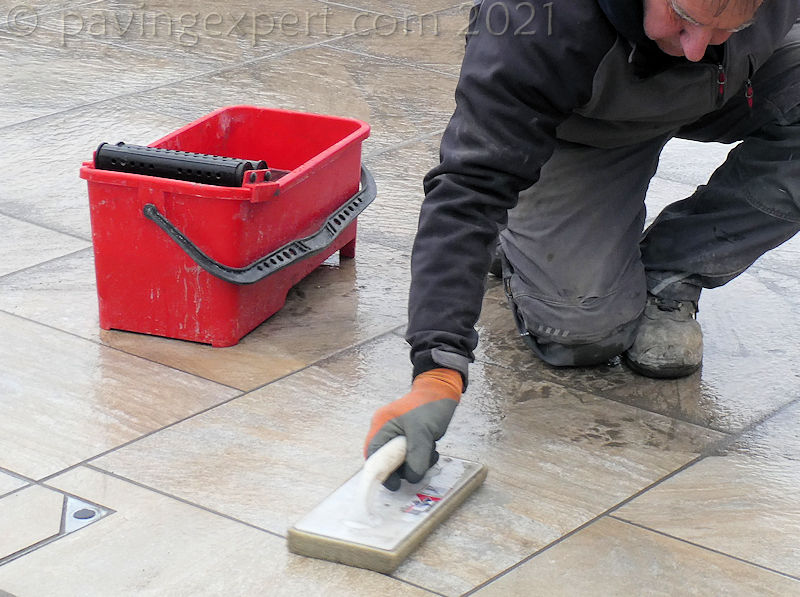
Manual cleaning:
Manual cleaning using special sponges and ‘Washboy’ buckets is effective, but labour intensive and comparatively slow. Mechanical cleaning using a belt cleaner machine is much quicker, but often the machine cannot reach edges against walls or into tight corners. Even when a belt cleaner machine can reach all or nearly all of the pavement being jointed, some ‘touching-up’ work with manual sponges will almost always be necessary, if only to tidy around access covers, gullies, lighting columns, and the like.
It may seem irrelevant what sponges or other cleaning aids are used, and some penny-pinching contractors resent spending a few extra quid on a proper Washboy bucket, but it really does make a hugely significant difference. By using an appropriate cleaning sponge and Washboy, the time spent cleaning can be cut in half. The correct sponges will often clean a section of paving in a single pass, and a good quality Washboy, used on every pass of the cleaning sponge, will keep those sponges effective at removing every last speck of the mortar.
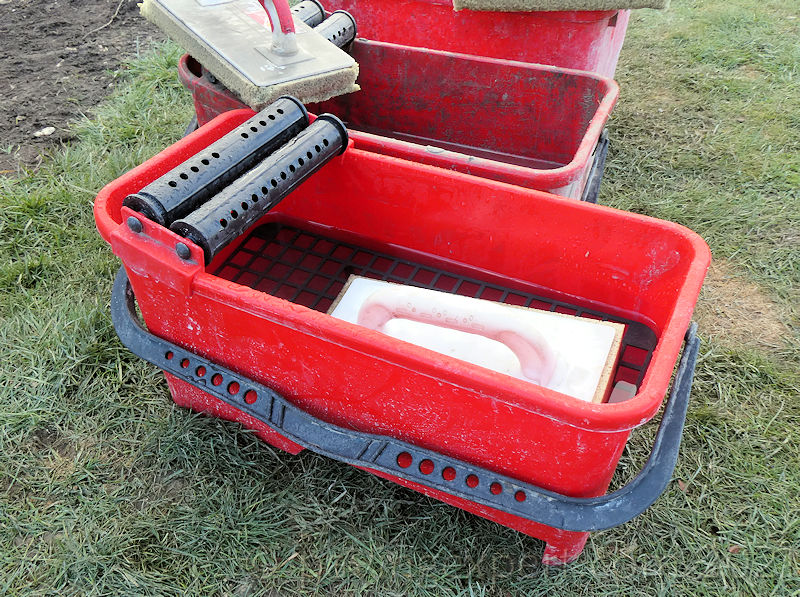
The Washboy needs to be filled to the marked level with clean water. The better quality buckets have a grating which sits just below the water level and acts to help the sponge shed collected mortar particles when it is rinsed. The dual rollers then squeeze out any excess water ensuring the cleaned sponge is just damp, and not sopping wet, when returned to clean the paved surface.
Make single passes with the cleaning sponge, in one, smooth, consistent movement, drawing the sponge in one direction. Don’t try to clean too much in that one pass – drawing the sponge across half-a-metre at a time is ample, and then rinse it in the Washboy, repeatedly pressing it against the grating to draw in then expel cleaning water, and, when clean, run it over the dual rollers to remove any excess water, before returning to the jointed surface and making another, single cleaning pass.
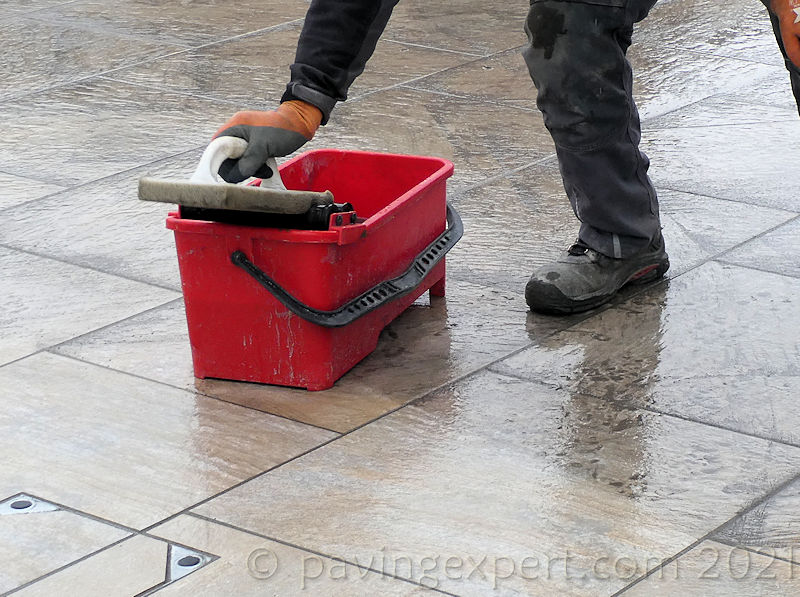
Slow and steady works best. Working in short passes, thorough cleaning after each pass, and regularly changing the water in the bucket always gives better results. Be thorough – the mark of a true craftsperson is how effectively they can clean the jointing work. Nothing smacks of amateurism more than smearing or snots left be rushed, careless cleaning.
When changing the water in the Washboy bucket, do NOT empty into a drain of any description, for the same reasons as outlined above. Empty on an area of unpaved sub-base, or onto an area of sand that will filter-out any mortar particles and that can be shovelled-up and disposed of properly on completion of the work.
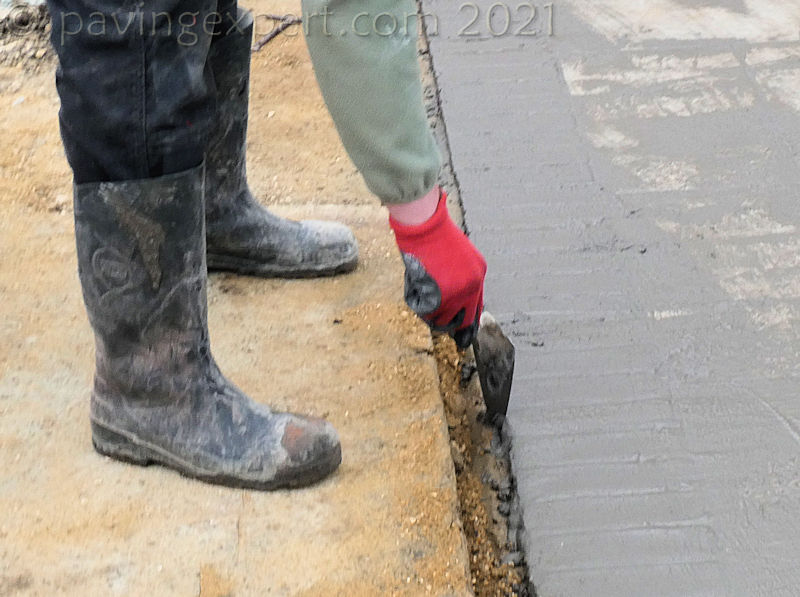
Take extra care against walls and other vertical surfaces: they may require some cleaning, too. Work carefully around drainage covers, access fittings, gullies, channel drains, lighting or signage columns. Also, tidy any open edges, where tufftop mortar may have spilled over, to remove any excess and/or build-up to present a clean, mortar-free edge as far as possible. Running a trowel along an open edge will remove much of any excess.
Again, it’s the quality of the clean that reveals the competence of the installer.
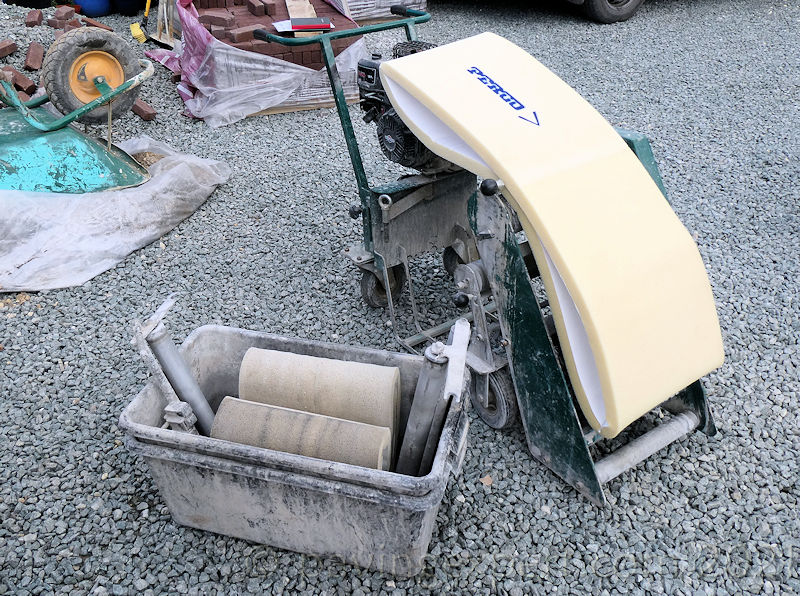
Mechanical Cleaning:
There are several different belt cleaning machines on the market, and many experienced contractors will have their own personal favourite, a piece of kit that suits the way they work. However, they all work on the same principle.
A looped belt of tough sponge passes over the pavement surface, where it sponges-off any residual jointing mortar in a single pass before rising up and over the drive roller, across a removal blade or screen to rid it of whatever has been picked-up, and then into a trough of cleaning water where the residual mortar is washed off before the sponge emerges over yet another roller to squeeze out excess water before returning to the pavement surface for yet another pass.
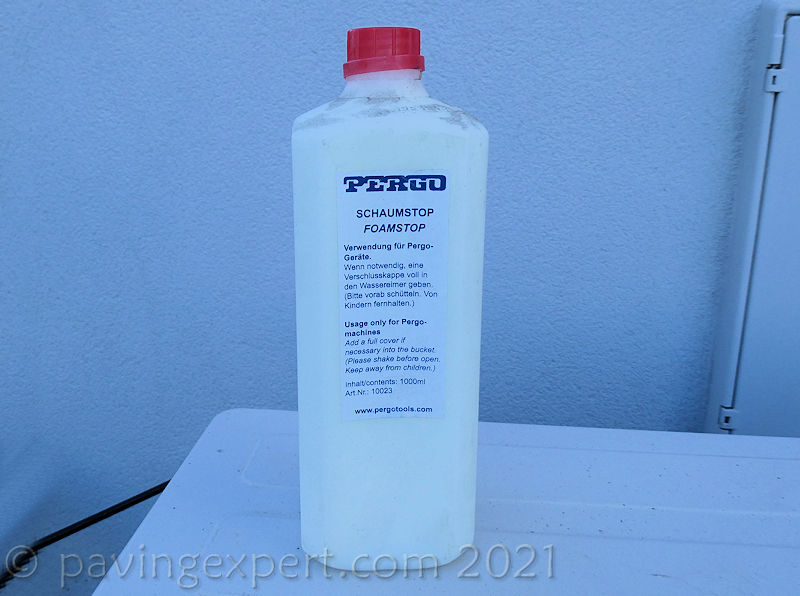
The cleaning water should have an anti-foaming agent added before use to ensure maximum cleaning efficiency, and, naturally, it will require changing every so often to keep the sponge belt as clean and as effective as possible.
Also be aware that the sponge belts will wear out over time and will need replacing, but it’s a simple and inexpensive task.
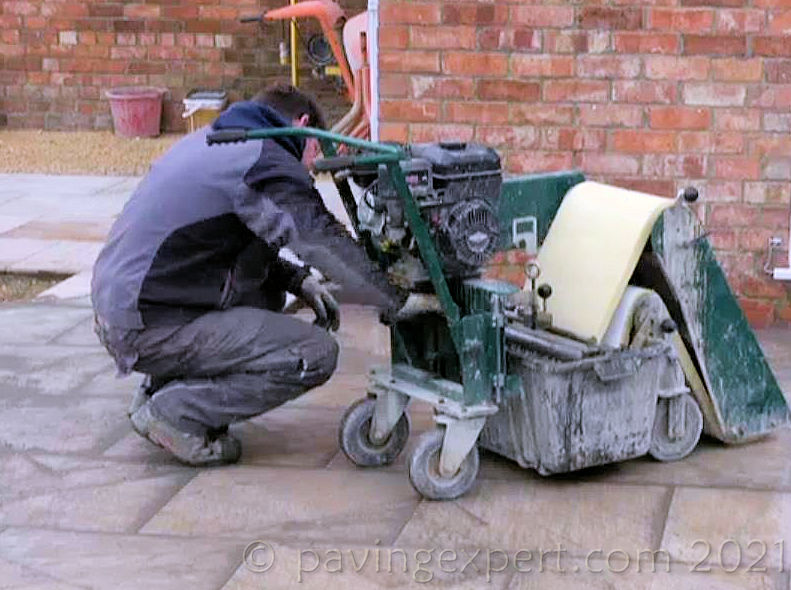
Once the Belt Cleaning machine is set -up, filled with cleaning water and ready to go, the height at which the sponge belt passes over the paving needs to be set. Too low and it will ‘drag’ on the paving, impeding free rotation of the sponge belt, and making the machine awkward to handle as well as marring cleaning performance; too high and the sponge belt will merely skim over the surface picking up precious little excess mortar and requiring repeated passes to clean any section of the pavement.
Part of the skill of the machine operator lies in setting the sponge belt to the ideal passing height for any particular surface, and this is something that is learned by experience. A properly set-up belt cleaner will clean thoroughly and effectively in a single pass on smoother surfaces, and just one or two passes on textured or coarser surfaces.
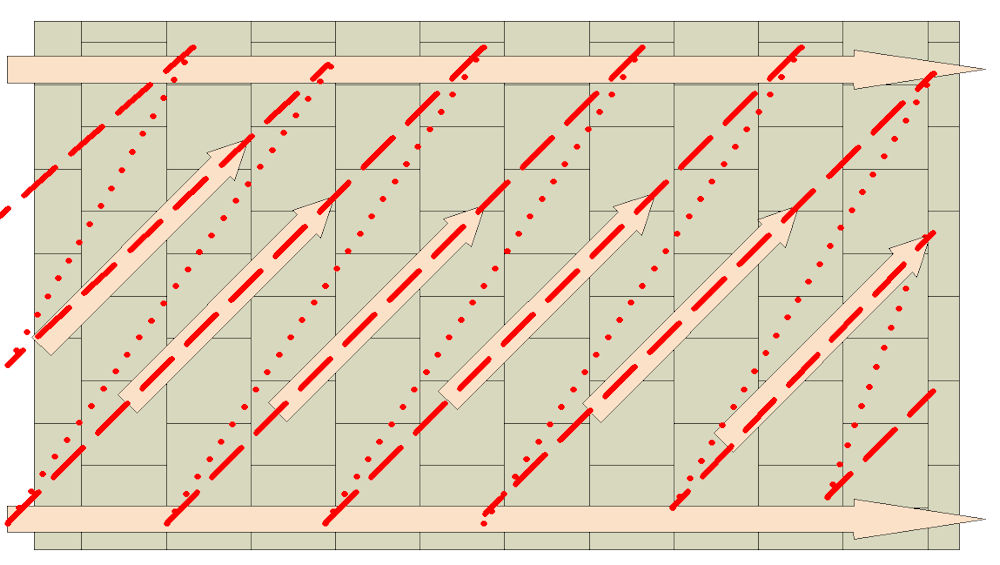
The exact layout of any given pavement will determine the most effective cleaning strategy for a belt cleaner, but, in a sweeping generalisation (see what I did there!) it’s usually best to clean the edges first with a pass or two ‘square’ to the paving, and then work ‘on the diagonal’ to clean between the edges, gradually creeping further along the pavement with each pass, slightly overlapping the previous pass each time to ensure a full clean.
Even the best operatives with the most amazing belt cleaning machines can’t get into every nook and cranny, so there will be some ‘sponge work’ required to ensure all of the paving is completely clean. Again, this is what separates the craftsperson from the bodger: that extra 5-10 minutes spent making sure it’s all as clean as is humanly (or mechanically!) possible.

Cleaning Tools:
As a cementitious material, tufftop has the potential to befoul any tools not cleaned immediately after use. It should be regarded in exactly the same way as a ‘traditional’ mortar: it *will* set hard; it will adhere to trowels, squeegees, sponges and cleaning belts, so anything that has been in contact will need to be cleaned by thorough rinsing with clean water.
In particular, the sponge belt used on the cleaning machine will need repeatedly running through troughs of clean water to remove as much of the residual mortar as possible.
Squeegees, trowels, mixing paddles, buckets, and any other tools can usually be cleaned in a couple of minutes, and the better they are cleaned, the longer they will last.
Finishing Off:
Naturally, it will take some time for the freshly jointed paving to become fully ready for use. The time needed to reach a ‘safe’ level of curing will vary from job to job, dependent on the type of paving, the joint width and depth, and the nature of the bedding material. As a rough guide, give patios three days protection from use; 5-7 days for driveways; and 10-14 days for larger commercial works, if at all possible.
During that time, it’s usually a good idea to have some barriers or flutter tape to keep out the curious. The occasional pedestrian is probably not going to do much harm, but if some eejit decides to drive across it too soon, it could well disturb the hydration and curing process, resulting in cracked jointing and a pavement that may need to be re-done.
It’s best to protect the surface from precipitation for the first 24 hours, especially if heavy rain is expected, as this could batter the still-not-fully-set mortar in the joints. However, there needs to be some ventilation, so, if covering with polythene sheeting or tarpaulins, use props placed on the paving (and NOT over joints) to support any cover 100mm or so above the pavement surface.
If an overnight frost is expected, it’s not the right time to be jointing the pavement. The ambient temperature in that first 24-36 hours needs to be above freezing and, ideally above 3°C if at all possible.
Hazing:
On a very small number of projects, there could be a light haze of cementitious material remaining. In most such cases, any hazing will probably weather away in a few weeks. Much of the perceived hazing will actually be loosely-held surface dust that will disappear after a few days of wind and/or rain, and should be of no great concern.
It’s *always* best to give the freshly-jointed paving a month or so to see how it fares. Should there be no significant improvement in the appearance of any hazing after that period, it may be worth considering a specialist cleaning process, such as exceptionally careful washing with a dilute phosphoric acid, but seek advice before undertaking any aggressive cleaning procedure and NEVER ever, not for a second, even consider washing it all down with hydrochloric or ‘brick’ acid. The tufftop would probably survive such treatment; and the hazing may well be banished; but there’s a high risk the paving will be badly damaged.
In severe cases of hazing or cementitious residue, this usually suggests insufficient cleaning, maybe failure to change the cleaning water often enough, but even jobs that have been meticulously jointed can very occasionally be afflicted and it’s often due to climate and/or environment rather than any issue with the tufftop or the installation. We know that cooler days can affect the curing process, and hotter days can cause over-rapid surface drying. Some types of stone and concrete seem to hold on to the very finest cement particles no matter how much cleaning effort is made, and, sadly, there’s not much that can be done to prevent it happening.
If staining appears to be a problem following jointing with tufftop, always seek specialist advice before charging in with some ‘remedy’ a mate down the pub told you about.
The overwhelming majority of projects are completed without any issues, as long as the guidance provided by Steintec Tuffbau, and that suggested here, are followed. There are literally thousands and thousands of perfectly good installations which have been successfully completed without any problems whatsoever and have gone on to provide many years of trouble-free service.
Video:
Naturally, we filmed the work as it took place.....
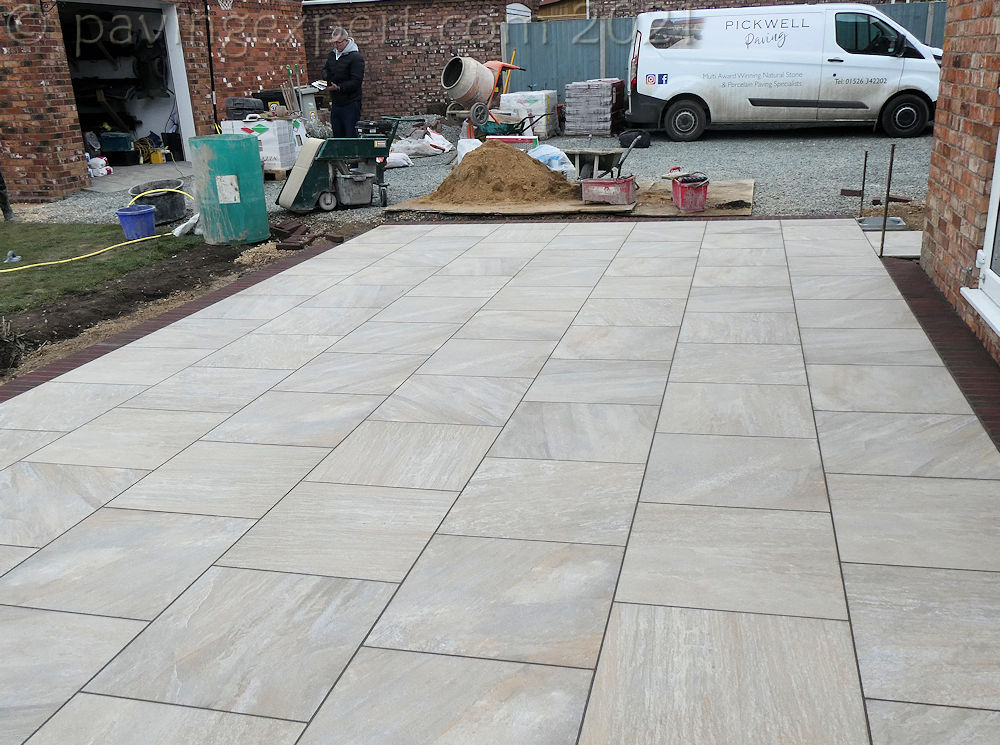
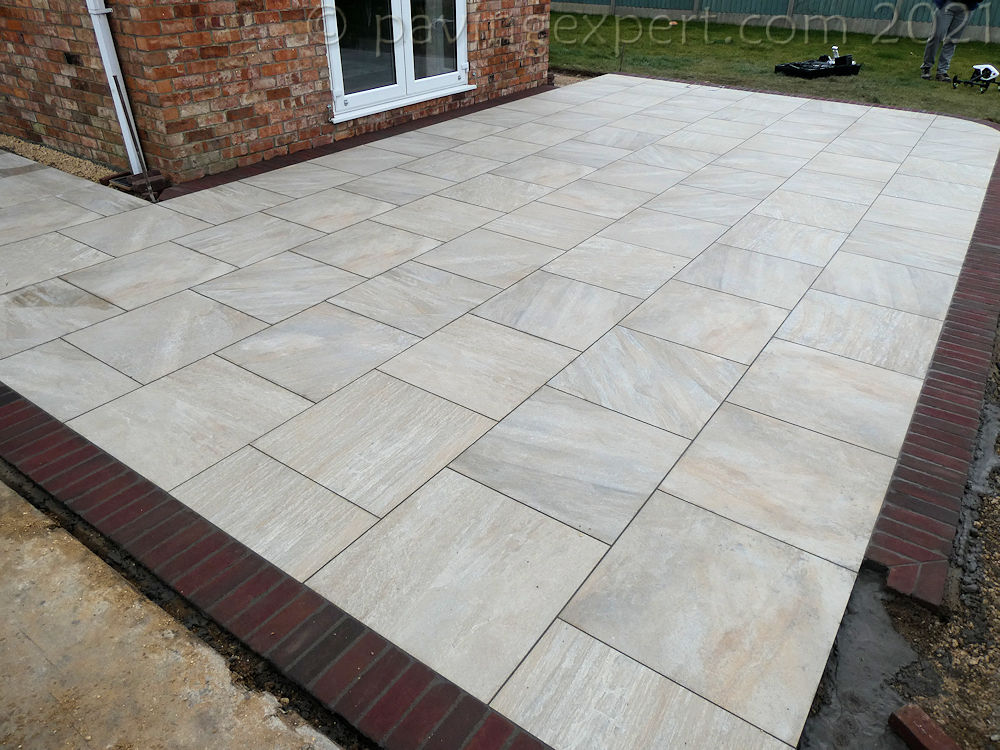
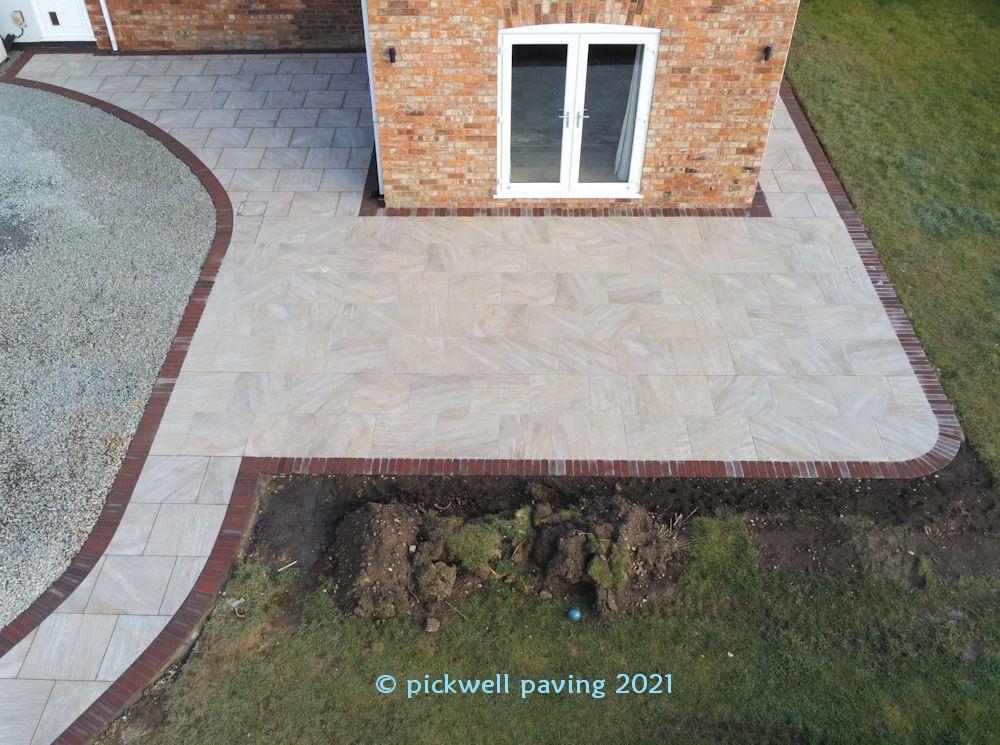
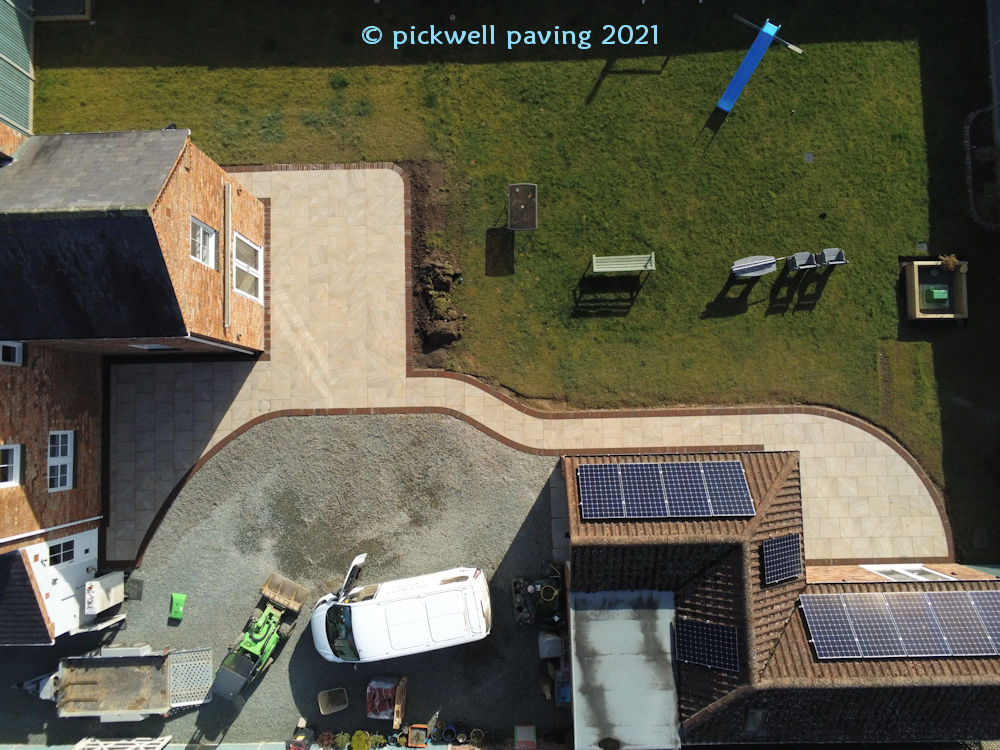
Finished Project:
A few images showing the job on completion....

Further Information:

SteinTec Tuffbau
1 Northwick Road,
Canvey Island,
Essex,
SS8 0PU

Tel: 0203 598 9800

