Introduction:
This is a fairly straightforward variation of Pattern Imprinting concrete. A concrete substrate is prepared and a paper stencil of the chosen pattern is laid over the still-wet surface before a colour-hardener is applied. The stencil is peeled away once the surface has dried, leaving an imprint of the pattern with the colour on the non-masked areas.
There two main methods of creating a stencilled surface:
- - Wet-cast - the stencil is applied to a freshly laid concrete substrate
- - Spray-on - stencil is laid over an existing surface and colour applied
Wet-cast:
Much of the information given for the preparation and specification of PIC applies to wet-cast stencilled concrete. The only significant differences in technique concern the treatment of the surface once the concrete has been placed and floated.
The PIC Construction page contains full details on the necessary preparatory work, concrete, edgings, and crack control joints.
Once the concrete has been floated, the stencils can be laid. These are fabricated from a plastic-coated paper and are supplied on rolls of approximately 100m in length, in a variety of patterns, including the ever-popular 'ashlar stone', 'brick paving and 'cobblestone'. On many projects, a contrasting edge course pattern is laid, often a 'soldier' brick effect. For projects where a coloured 'joint' is required (rather than the plain concrete colour) a dye can be added to the concrete by arrangement with the ready-mix supplier prior to placement.
Any surplus stencil is easily trimmed off with a craft knife and then the colour-hardener is broadcast over the surface, exactly as is done with PIC, and then floated into the surface of the concrete. A second coat of the colour hardener is applied and this too is floated in, although it can be left unfloated to create a roughcast finish which gives enhanced traction.
Once the surface has dried, the stencil is carefully peeled off, revealing a lightly imprinted effect and a contrast between the coloured unmasked area and the plain (or alternatively coloured) "joint", where the stencil was. As with PIC, some touch-up work may be required, although there should be no 'snots' or non-patterned areas to be re-worked, as there often is with Imprinted Concrete.
The used stencil is disposed, as it is intended for one-time use only.
Finally, once the colour hardener has cured (usually 24-72 hours) a sealant is applied to protect the surface and enhance the colour. An acylic sealant will allow the concrete to continue to 'breathe' and lose moisture as it cures over the next month or so, whilst enabling the pavement to be used for normal residential traffic.
Spray-on:
This method is used to apply a stencilled finish to existing suitable substrates, such as concrete or tarmac. As there is no excavation and casting of a new slab, this method works outs considerably cheaper than the wet cast method described above and can be used to completely rejuvenate old, tired surfaces, provided they are structurally sound. Using this system over cracked or crumbling concrete is a complete waste of money; it is a surface dressing, not a repair system.
The cementitious overlay systems used for this method are specialist materials and are considered more fully on a separate page .
The existing surface must be carefully prepared prior to application of the base coat and spray-on topping. Concrete surfaces should be power washed and/or acid-etched to ensure a good bond can be achieved between the base coat and the existing concrete. Tarmac surfaces should also be power-washed to remove all detritus and then must be sealed with a special primer coat. Access and drainage fittings in the surface should be suitably masked off before applying the coatings.
Once primed, the coloured base coat can be applied. This is usually a high-strength cement-based coating that is spread by means of a float or a squeegee to evenly cover the surface. It dries rapidly to ensure the work can progress with minimal interruption and 'hanging around' for the contractor.
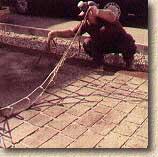
Next, the chosen stencil is laid out over the base-coated surface, laid flat so that it adheres to the base coat with the plastic-coated face downwards , and checked for alignment. The stencil mask used for spray-on applications is exactly the same as that used for the wet-cast system described above, coming in rolls containing approximately 100 linear metres. A contrasting pattern is usually chosen for the edges, often a 'soldier course' pattern, so the edging stencils are laid out first, and then the main pattern stencils, which are neatly trimmed to fit in with the edge stencils.
The top coating is a high-strength cement based powder which is mixed with the chosen colour dye from a range of around 30 different shades. The mixed colour topping is fed to a hand-held hopper with the aid of a small air compressor and then carefully sprayed over the surface by the operative in a number of sweeps to achieve an even coverage.
Once the top coat has dried (usually a couple of hours) the stencil is simply peeled away to reveal the pattern. Finally, after 2-4 days, a quality 2-coat resin sealant is applied to enhance the colour and protect the surface from accidental staining. This sealant, like most others used for sealing decorative concrete, will need to be re-applied every 2-4 years to keep the surface in best condition.
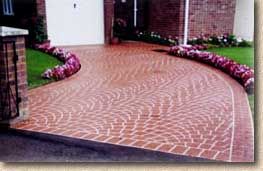
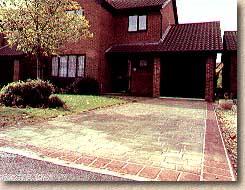
The finished spray-on stencil driveway.
Thanks to James Adams of Stencil-Tech Ltd. for the use of the images used to illustrate the above techniques.
Close Up:
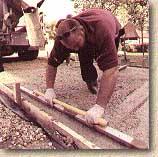
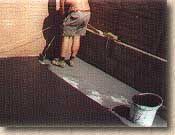
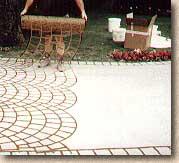
1 - The concrete base is prepared with a fine finish that will, in effect become the 'jointing' of the pattern once it's complete.
This is a smooth, paste-like PMCOS that is trowelled or squeegeed over the plain concrete base, and then a lightly adhesive bonding agent may be applied via a spray to ready the prepared surface for the stencil and the coloured/textured overlay.


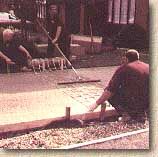
2 - A paper stencil is carefully positioned over the prepared base. The stencil needs to 'stick' to the base, hence the light adhesive, because its real purpose is to act as a masking tape, protecting parts of the base from being covered with the coloured/textured overlay that will happen in the next stage.
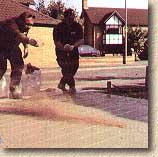
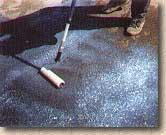
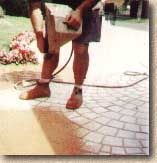
3 - The PMCOS overlay is applied. This can comprise several different colours, with a main colour applied first and then subsidiary colours spattered over that main colour, to create the multi-tonal, textured finish.
In this example, the main colour is a reddy-tan which is then 'spattered' with ;ight-grey contrast.

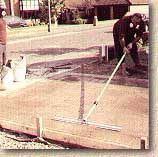
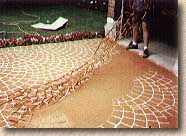
4 - The stencil is simply peeled away and the finished effect is revealed......
