Introduction:
Attenuation cells, (also known as Storm Cells, Soakaway Modules, and Storm Crates) are the modern equivalent of a soakaway. They allow surface water to be stored in one location and gradually released back to the ground, a bit at a time, at a pace the ground can handle, rather than in one sudden deluge, as happens during a storm or downpour. In effect, the transfer of water from the surface to the ground is attenuated , is slowed down and stretched out over a longer period.
If you dump 1,000 litres of water onto a patch of ground in one go, unless you're on sand or gravel, it's unlikely the ground will be able to absorb all that water instantly: attenuation cells work by taking all the water as fast as it's delivered, returning what it can to the ground as quickly as possible, but storing the surplus until the ground is ready and able to absorb it.
Attenuation cells are specially manufactured, modular cells that provide lots of space (void space, as it's termed) within a cheap, lightweight structure that is capable of supporting quite significant loads when buried. Some cells can be placed beneath pavements and are strong enough to carry both foot and low-speed vehicular traffic - this is often the basis of Permeable Pavements .
Calculating size
The cells that will be used are modular, and can be 'clicked together' to give the required storage volume. The volume, or size of soakaway that will ne needed is determined via a relatively simple equation.....
Vol [m³] = Area [m²] × (50mm per hr/3000)
This equation is explained in more detail on the Soakaways page, but for now, we are going to assume that we have a driveway or patio covering 24m² that needs to be drained.
The equation tells us that the volume of storage we require is ...
Area multiplied by 0.01667 (50 ÷ 3000)
which gives us ... 24 × 0.01667 = 0.4m³
Getting Started
Our ever-so-friendly local Builders' Merchant (don't laugh!) stocks a range of suitable cells with dimensions of 1000x500x500mm, which is 0.25m³. We need 0.4m³, so we'll need to use two of these cells, giving us a potential maximum storage volume of 0.5m³.
Now, we could stack the cells one on top of t'other, which would give is a system measuring 1 metre long, 1 metre high and half-a-metre wide, but given that we need around half-a-metre of 'cover' over the top of the system, and at least 100mm of gravel underneath, that would entail digging a hole 1600mm deep. If we lay the cells side-by-side, the whole need be only 1100mm deep (500mm cover + 500mm cell + 100mm gravel), which is far easier and a good deal safer, given that any excavation deeper than 1200mm is supposed to be shored up to prevent collapse.
Two cells, side-by-side gives a plan area of 1000mm x 1000mm, and we know the hole has to be at least 1100mm deep. Allowing for a bit of working room, the hole to be dug will need to be at least 1300 x 1300 in plan, giving 150mm working room all around. It's really not worth trying to skimp on the plan size of the hole: digging a hole that's a measly 1100 x1100mm allows only 50mm working rooms, and it's bound to be a struggle getting the cells aligned, levelled and just where we want them with so little working room. It's almost guaranteed to end up with the hole having to be extended because getting the geo-textile wrap in place is proving to be impossible, or you've taken all the skin off your knuckles trying to get the cells into place.

So: that's decided - the hole will be a least 1300 x 1300mm and 1600mm deep. As with any soakaway structure, it needs to be at least 5 metres away from any building, and it really need to be constructed above the water table and on ground that will actually absorb the water. Heavy clay soils can be a problem and the ground permeability ought to be determined before deciding to install - see the main Soakaways page for more information on testing permeability.
The site of our attenuation system has been identified. It's roughly 10 metres from the patio area, close to a small clump of trees that will help drink-up the water, an the garden itself is pretty well-drained, as there's a porous Old Red Sandstone just a couple of metres below the surface. A simple, trapped gully will be installed on the edge of the patio nearest the soakaway, and a pipe will link the gully (which could be a linear channel , if preferred) to the cells that are about to be installed. As long as that pipe has fall from the gully to the soakaway, it will function. As luck would have it, the site of the soakaway is roughly level with the planned patio, but as the soakaway is to have at least 500mm of cover, achieving a fall of at least 1:100 will not be a problem.
The Installation
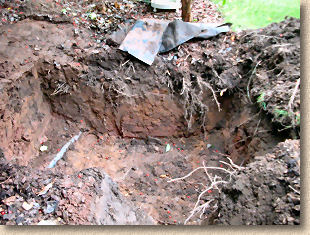
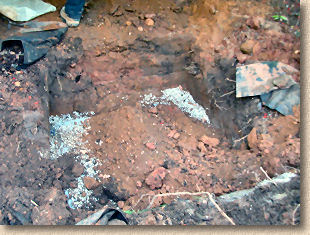
A mini-digger has been brought in to dig the hole. The topsoil is put to one side, as this will be used to bury the cells once the construction work is complete. The poor-quality sub-soil and clayey overburden (the reddish material in the photo) will be carted off site or lost elsewhere. As digging proceeds, a black cable duct is exposed (on the left hand side of the photo) so the hole has to be shifted over to the right by 300mm or so, to avoid damaging the duct (which carries a power cable to a garden building).
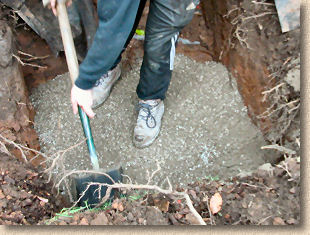
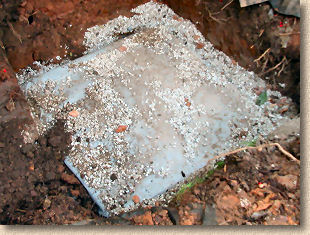
Once big enough and deep enough, the bottom of the hole is 'blinded' with approximately 100mm of a 10mm clean gravel (any clean, non-limestone gravel, from 6mm to 20mm would be suitable, as long as it is clean: ie, no fines, no dust, no sand). This is done both to level up the base of the hole so that the cells sit comfortably and are fully supported on their underside, and to provide a bit of extra storage capacity in the system. The gravel is levelled out and can be checked with a straightedge or even a spirit level to ensure it is level and even.
The next step is to line the hole with the permeable geo-textile, which, in this case, is Terram 1000. The purpose of the geo-textile is as a separation and filter membrane . It prevents clays, silts and other sediment from entering the soakaway cells and thereby reducing its storage capacity. When just one or two cells are being used, it would be practical to assemble them up at ground level, wrap them in the geo-textile, fasten it in place, and then drop the lot into the hole, but with larger multi-cell systems, it's easier to line the hole first, and then place the cells.
Flatten out the geo-textile as far as possible, with the aim of having it relatively flat on the base of the hole, out of the way at the sides, and plenty of surplus that can be wrapped over the top of the cells once they're in place. The geo-textile for this installation has been cut as a rectangle measuring 3000mm wide and 4500mm long (or t'other way round, if you wish). This allows it to be wrapped all around BOTH cells with plenty of overlap and surplus that can be trimmed if necessary - again, always better to have too much rather than too little.
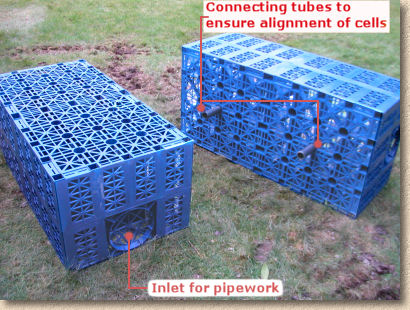
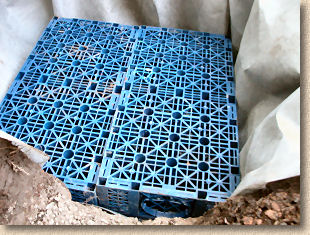
Next is the fun bit: placing the cells into the hole. With this particular model, link tubes of 40mm plastic pipe are used to loosely interconnect adjacent cells. These are more important when larger, multi-cell installations are undertaken, as they ensure the cells are correctly aligned. However, they are not essential - the cells will function perfectly well without them. The cells need to be 'nestled down', to be certain that the base of each cell is lying flat on the bottom of the hole and is evenly supported across its entire base. Once the cells are flat and secure, it's a simple matter to adjust their position within the hole so that there's a relatively equal gap all around.
In the photo opposite, note how the right-hand cell has been placed to ensure the inlet is on the top of the end face and is aligned with the trench that will accommodate the pipe from the patio gully.

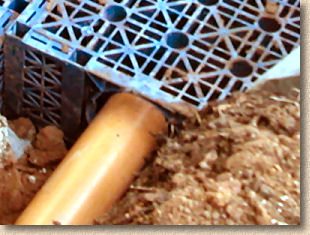
The grille within the inlet panel is easily removed. In some cells, it can simply be pushed out, or persuaded with a few taps from a hammer; on other cells, it is removed by sawing through the sprues.
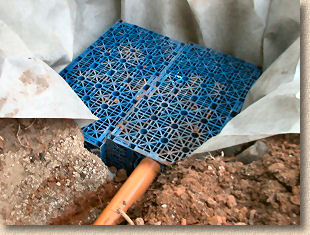
A 110mm diameter uPVC pipe is being used to connect the patio gully to this soakaway, and the trench was excavated previously. The pipe is laid pretty much as described on the Laying Drainage Pipes page, with 100mm or so of clean 10mm gravel used to line the bottom of the cut. The pipe is cut to length as required and fed into the soakaway cell via the inlet panel.
Once the linking pipe is in place, the geo-textile can be wrapped over the top top face of the cells, tucked in at the sides and trimmed as necessary to get a neat finish. It's important to ensure that the whole structure is wrapped: any gaps will allow detritus and backfill material to find its way into the cell structure, reducing the storage capacity and compromising its function. There are special 'sticky tapes' that can be bought and used to seal down any loose edges of the geo-textile, and to secure it around the inlet pipe, but with a bit of care and patience, it is possible to manage without them. Any loose 'flaps' that are proving to be a problem, or pieces that need to be held in place can be stapled, stitched, glued or taped as necessary - once the backfill is in place, the geo-textile will not be able to move.
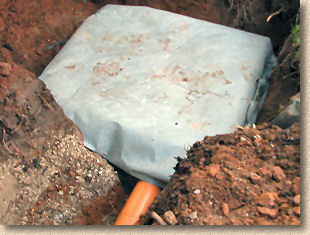
And then it's simply a matter of backfilling. To ensure there are no awkward voids around the soakaway structure, and to guarantee that the geo-textile is pressed firmly against the structure, the gap around the sides should be filled with more 10mm clean gravel. The top of the structure can also be covered with 75-100mm of the gravel, and then the 'as dug' material stockpiled during excavation is used to completely fill the hole, adding 150mm layers and compacting each before adding more material.
And that's it! Over the next few months, the backfill will settle slightly and may need to be topped up. This particular soakaway was covered with bark mulch during the spring and you'd never know it was there.
For installations beneath pavements, the backfilling is replaced with capping layers and sub-base material, each layer being fully compacted, and brought up to formation level for the paving, as shown in the cross-section drawing below.
SUDS Pages