Introduction
For many years this has been the most popular method of construction as Local Authorities sought to re-use the large stockpiles of setts, cobbles and cubes accumulated when older streets were re-surfaced or ripped up entirely, as in the slum-clearances of the post war years. With the influx of cheap setts and cubes from overseas in recent years, it has become the standard method for most public and commercial works. It is also the method used most commonly used on private driveways and other low-traffic projects, although we expect to see it superceded in the coming years as flexible construction methods for light-use pavements prove to be reliable, as well as faster to lay and more economical over the lifetime of a pavement.
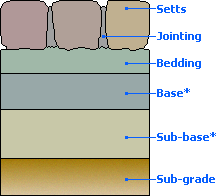
Rigid refers to the fact that there is no movement in the paving. Most often, the setts are laid on a concrete or cementitious bedding layer, with joints that are intended to be solid and immovable. Large areas of rigid sett paving are usually broken up into discrete bays by Movement Joints at regular intervals although this will be determined by the actual layout of the work.
The planned use of the rigid sett pavement will determine the exact structure of the work; light-use areas, such as patios, driveways and pedestrian only areas, may consist simply of the setts laid on a cementitious bedding layer over a prepared sub-grade, while trafficked areas will normally include a sub-base layer of DTp1 or similar, and/or a base layer of concrete (Cement Bound Material or CBM) or dense bitumen macadam (DBM). Any base or sub-base will be designed by an engineer who will take into account such factors as anticipated loadings, traffic levels and ground conditions.
Many elements of the construction work for a flexible sett pavement are identical to those given on the flexible construction page, so be prepared for some repetition.
Preparation
Decide where the pavement is to run, and/or consult the site layout plan. Mark out the extent of the pavement with sand guide-lines or aerosol spot-marking paint, if required. Determine how excavated spoil will be carted away from the site and the materials brought in, making sure that access will be maintained during the works.
See Setting Out pages for details on setting lines and levels for a pavement.
It is a good idea to dig wider than the planned width of a pavement. An extra 50-100mm at the edges of a patio or driveway makes handling much easier, but for larger projects, such as forecourts or carriageways, an extra 300-500mm may be required.
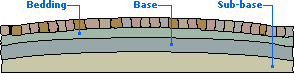
With sett pavements for vehicular traffic, such as driveways or carriageways, the construction is traditionally cambered (i.e. slightly higher in the centre than at the edges, as most roads are) to assist rapid drainage to the edges and subsequent run-off into gullies. Patios and pedestrian areas may be set out as a flat plane, rather than cambered.
See Drainage Page
Sub-grade
Remove all weeds and other unwanted organic matter from the surface of a 'green' site - this is known as a 'site strip'. Reduce dig to formation level - this is the level at which the actual construction of the pavement begins. Excavate any soft spots and fill with compacted sub-base material. If the area of the paving is troubled with weeds, the exposed sub-grade may be treated with a general weedkiller such as Glyphosate, but it is unlikely any weed will be able to penetrate the upper layers.
The depth of dig is determined by the planned end use for the pavement.
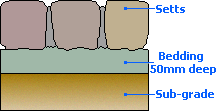
For paths, patios and other areas of light, pedestrian traffic the depth of excavation below finished level is...
Average depth of setts + 50mm
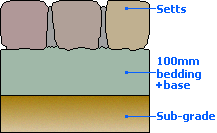
For driveways, hardstandings and other low-speed private pavements the depth of excavation below finished level is... Average depth of setts + 100mm
(Note: A sub-base may also be required.)
For public or commercial pavements, or any site anticipating loads above 5 Tonnes, carriageways, lay-bys, taxi-ranks etc., the depth of excavation below finished level is...
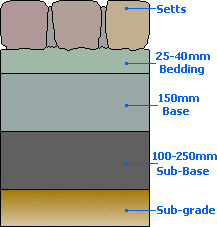
Average depth of setts + 25-40mm + 150mm + 150mm
(Note: base and sub-base thickness of 150mm has been assumed.Full design guidance for public and commercial pavements is given in BS7533: Part 10
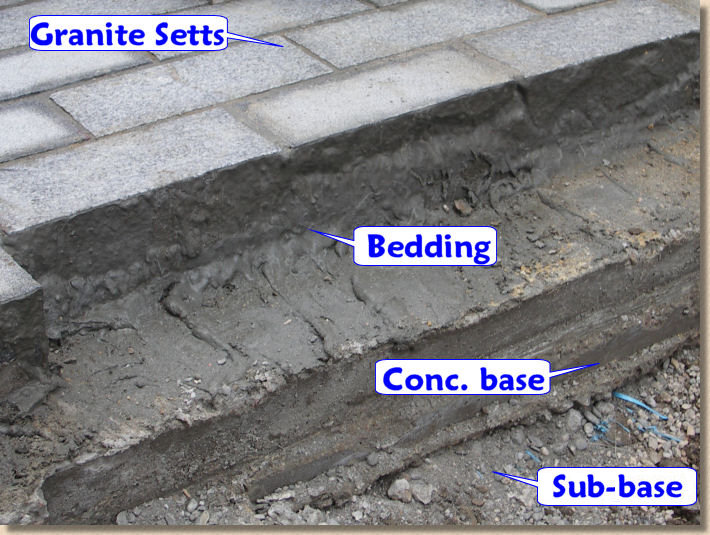
If an edging or kerb is required, this is the point to construct it. Brick edgings, stone kerbs or channels, or setts laid lengthways are all suitable, but, as the setts are to be laid on a concrete bed and solidly jointed, an edging is not essential. However, a channel course along the edges of driveways helps add authenticity.
Sub-base Course
(optional)
This will normally only be required for heavy load applications as a preparatory or improvement layer for the laying or base course. It may be omitted completely if the existing sub-grade is deemed satisfactory, or it may consist of a 30-50mm 'blinding' of DTp1 granular material or lean-mix concrete (possibly CBM1), just to prepare the ground for a more robust base or laying course. Most commonly, it will be a layer of DTp1 or CBM1 or 2 , approximately 100-150mm thick.
See the sub-base page for more information about the types of materials and construction methodologies for this critical layer.
Any low spots in the sub-grade can be filled with DTp1, crushed hardcore, crushed stone or compacted bedding material. If the area to be paved is such that it requires raising or elevating to a higher level, then the lift should be constructed as a sub-base layer, rather than building-up with bedding material. The finished surface level of any sub base, should be accurate to within 20mm.
Base Course
(optional)
Again, this layer will normally only be required for carriageway or heavy load applications. The base course should consist of a compacted layer of concrete or cement bound material (CBM 3 or 4) 100-150mm thick, or a layer of Dense Bitumen Macadam (DBM) 70-100mm thick. However, a base course has to be designed to take account of local ground and traffic conditions, as laid down in the Design Manual for Roads and Bridges , and so, should be designed by an engineer familiar with the site conditions.
If a mass concrete, or CBM is used for the base layer, it should be given adequate time to achieve a modicum of strength before being subjected to the additional loads of the bedding and paving layers. Normally, a cementitious base layer such as described here would be given 3-7 days to begin the curing process before construction work on the rest of the pavement proceeded. When a DBM is used, it should be laid to the usual working practices, and properly compacted before being used.
A base layer should always be laid to the profile of the pavement, so that, for example, a pavement that is to have a cambered surface should have a cambered base layer, accurate to ± 20mm.
Bedding layer
Traditionally, setts were bedded on ash or clinker material on top of the sub-base or base course. In some situations, the ash/clinker would be enhanced with a sprinkling of lime, or possibly a cement, but often it was clean ash or clinker, thoroughly compacted with a hand punnel.
Nowadays, the usual method is to bed reclaimed setts on a "lean-mix" concrete, such as a C7.5P, a cementitious bedding mix, such as that described on the Mortars and Concretes page, or, occasionally, a lime mortar. On larger commercial or civic projects, a specified bedding mix may be preferred, using particular selected aggregates and replacing all or part of the cement content with Pulverised Fly Ash (PFA). This will be done at the discretion of the Resident Engineer.
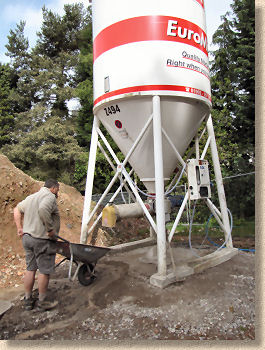
For light-use pavements, a 4:1 moist mix of coarse sand with cement is usually adequate for a bedding layer. On commercial or public projects, there is a trend towards using pre-batched mortars to ensure consistency. These may be delivered to site in 25kg packs or in 10-16 Tonne silos, depending on the scale of the works.
For a rigid construction, new hewn setts are laid on a cementitious bed. Because of the variable depth of reclaimed stones, it's not usually possible to prepare a screeded bed, although it can sometimes be done with more regularly sized cubes and setts. The flexible construction page gives more detail on screeding a bedding layer.
Bond bridge or slurry primer
Increasingly, especially with new materials, contractors and DIYers are using this technique to ensure the setts adhere to the bedding and do not come loose. It relies on using a chemically-enhanced cementitious goo daubed on the underside of the setts to literally glue the units to the bed.
The hows, whys and whats of using a bond bridge (or slurry primer if you prefer that phrase) are considered on a separate page .
Alignment
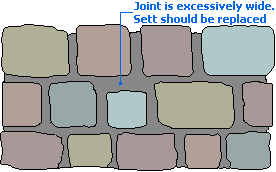
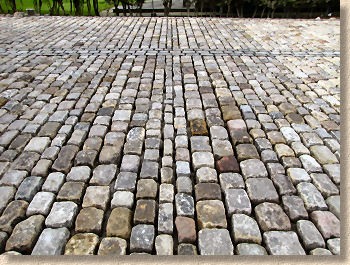
While newly cut setts tend to be fairly regular in size, allowing relatively tight joints, reclaimed materials tend to be much more variable, and so it is not uncommon to see joints ranging from 10-30mm in width, although, once joint width is getting over 25mm, it is better that the setts are re-sorted or re-dressed to make the course width more regular.
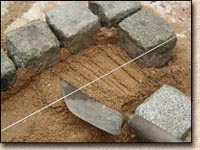
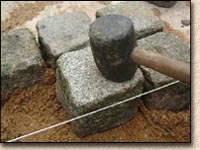
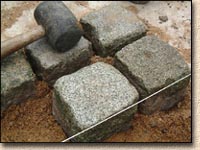
The setts should be laid to a taut line, to aid coursing and levelling accuracy. Basically, a string line is stretched from one edge of the paving to the opposite edge and parallel to the line of courses. The individual setts are then laid on the bedding mix and tapped down with a mallet until they are just touching the string line, and as close to the preceding course as possible.
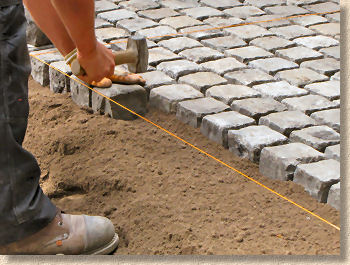
Setts are traditionally laid with one edge just touching the string line. Normally this is the leading edge but occasionally the back edge is used by some streetmasons for reasons that escape me! This has the effect of creating running joints that are NOT precise. The leading edge of one course, which will be truly aligned, lies opposite the back edge of the following course, which may be uneven due to the permitted tolerance within both new and reclaimed setts.
While this may (and does) result in somewhat uneven joints, it has to be accepted that it does produce the best-looking finished pavement. The alternative would be to carefully sort each and every sett into accurately matched widths (known as gauges), which would massively increase labour costs and has the effect of detracting from the rustic, natural appearance of cropped or reclaimed setts.
Where accurate and true joint width is considered essential for aesthetic reasons, then sawn, rather than cropped or riven, setts should be used.
Laying
A semi-dry cementitious bedding material should be spread out approximately 25-50mm thicker than the required depth and then levelled-off with a trowel to prepare an individual bed for each sett that will be 10-20mm high. Put out only enough bedding mix to extend the paving one course at a time. This is sometimes known as 'windrow bedding'.
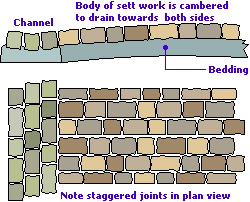
With the exception of decorative work requiring a stack bond or other specific pattern, it is important to stagger the longitudinal joints on subsequent courses. This is not merely for aesthetic reasons, but is done to create a greater degree of interlock within the pavement surface, so that any force exerted on an individual stone is dissipated over a number of courses.
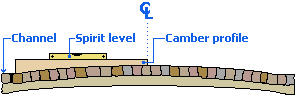
Wider areas of sett work should be cambered, ie, made slightly higher in the centre of a course than at the ends - see diagram opposite.
Cambering
There are a few different methods for creating a camber within a sett pavement. On projects of a regular pavement width, a camber template may be created out of timber ply and used as a surface profile guide, laid over each course of setts and used to check level accuracy.
This method is suitable for widths up to around 3.0 metres - pavements wider than that require a camber template that is unwieldy and prone to buckling under its own weight.
For wider pavements, a string line may be used with its surface level set by means of intermediary steel pins at, say, quarter-width, half-width, and three-quarter-width. It is important that the relative position and uplift added to each of the pins is regular. For example, on a 6m wide pavement, intermediary pins may be set at 1.5m, 3.0m and 4.5m - if, on a subsequent course, the inter-pins were established at 1.2m, 3.6m and 5 m, this could result in a distorted camber that could be noticeable within the body of the completed pavement.

This method relies on some interpretation and extrapolation by the sett layer, but is part of the craft and should not be beyond the capabilities of a skilled streetmason. It is important that the sett layer stands back from the pavement every couple of courses or so to ensure the camber is regular and that there are no obvious high-spots or hollows.
Jointing
Once a reasonable section of the setts have been laid and checked for alignment as well as finished profile, the joints between adjacent setts can be partially filled to about one-third depth with the bedding mix , which should be packed in tightly with a pointing bar, or can be watered in with a watering can and rose. Make sure none of the bedding mix or other cementitious material is left behind on top of the setts; it will set and stain them.
Normally, rigid sett work has the joints pointed with a cement mortar, although pitch/bitumen was once popular and is the jointing of choice for authenticity and heritage projects. The more up-to-date take is to use a resin mortar which is quick, relible and stain-free. See the separate page for more details on jointing methods.
On larger jobs, this preliminary jointing is used to prevent further movement of the setts until final sealing is undertaken at the end of the project. However, we have always preferred to keep 'up-to-date' as far as practical with jointing as it reduces the chance of detritus, litter or other deleterious material falling into the open joint, which then involves extra labour to clean out before final sealing.