Taking care of paving:
No matter how well a pavement might be laid, and no matter how much was spent on quality materials, all pavings, from the very top-of-the-range to the not-quite-so-good, require some basic maintenance to keep them looking their best. Those glib salesbods that promise "maintenance-free" paving of one form or another are clowns. Maintenance keeps paving in prime condition: lack of maintenance allows paving to deteriorate.
Even if it's just a basic wash-down with soapy water, all types and forms of paving will look so much better for it, while certain types of paving tend to need a bit more care and attention to ensure they always look as smart as possible. The good news is that cleaning is usually easy and even the most decrepit, neglected or abused pavement can often be given a new lease of life with just a little effort.
Dealing with weeds
Weeds are simply plants that are growing in an inconvenient place, and there's few places more inconvenient that your new paving that's just cost you umpteen grand. There are two common myths regarding weeds and paving, so let's deal with them right at the outset.
1 - Myth Conception - certain types of paving/surfacing are "weed-free"
2 - Myth Behaviour - weeds grow up through block paving
Firstly, there is no such thing as a weed-free surface. If detritus is allowed to accumulate on a surface, it will only be a matter of time before some weed or other decides to set up base camp in said detritus. And secondly, when properly constructed, weeds do NOT grow through block paving, and all that nonsense about putting a "weed barrier" beneath the paving is spouted by eejits who know nothing about how paving works. Weeds will grow into paving, by colonising the sand-filled joints or settling onto accumulated detritus, but it is very very rare for weeds to grow through 200mm or so of pavement structure (the only exceptions being the notorious Japanese Knotweed , and some forms of Mare's Tails).

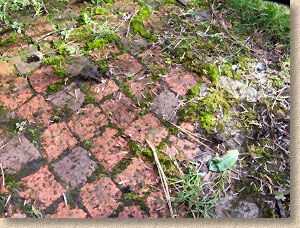
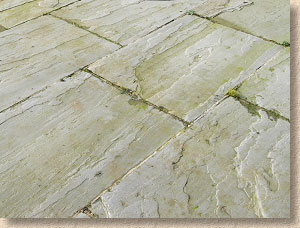
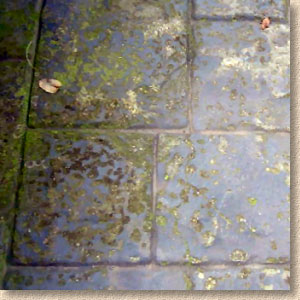
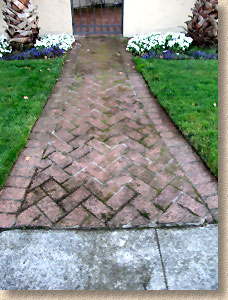
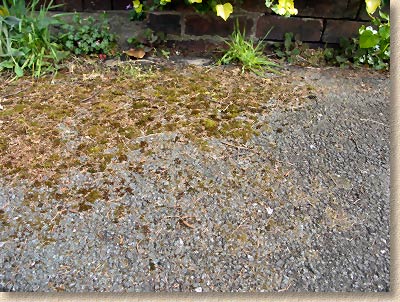
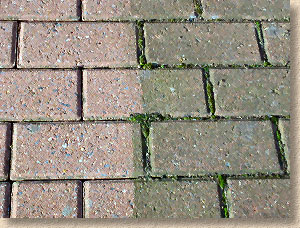
There's no point blaming the paving for scenes such as those shown above. There's nothing intrinsically wrong with the paving or in the way it has been constructed. It's the bone-idle human beings responsible for the paving that need a kick up the backside!
When a car gets dirty and covered in traffic grime, is it the fault of the car? No: we understand that the owner ought to have cleaned the car occasionally. And it's exactly the same with paving! It needs care and attention to keep it looking and performing at its best.
Getting shut
Weeds can usually be pulled off the surface of most paving, or scraped off using a hoe or similar tool. Where roots have been sent down into the jointing, removal of the weed often brings away some of the sand, and this should be replaced as soon as the surface is clean. Partially-filled or empty joints are detrimental to pavement performance.
Keeping weeds at bay
Once a paved surface has been cleared of weeds, it makes sense to keep it weed-free for the future. Generally speaking, regular trafficking, by foot or by wheels, will limit the ability of weeds to re-colonise an area, but for those areas experiencing little or no traffic three simple anti-weed strategies are available:

1 - Regular brushing - this disturbs newly emerging weeds and gets them before they can fully establish themselves

2 - Weedkiller - Although this might be some people's first choice deterrent strategy, I prefer pro-active to re-active treatment, which means stopping the weeds before they settle in rather than killing them once they've established. However, weedkillers have their uses and, when used with care, can be very effective at killing off existing weeds and deterring re-colonisation for a period of weeks or even months. There are also a growing number of so-called "Weed Preventers" which are chemicals that are applied to a paved surface after cleaning. These work by killing off any seed or weed that dares express an interest in emerging from the treated surface. The effective period for these products varies, and it would seem that the effectiveness is also highly variable.
Look for products that have been specifically developed for use with paving or in gardens, rather than general herbicides, which kill everything. Those chemicals sold as suitable for paving or garden use tend to be slightly more selective and target the weeds without discolouring the paving or killing off adjacent lawns or bedding plants.
Contact weedkillers work, as the name suggests, by coming into contact with the weed and are suitable for rapid killing of simple surface weeds. For the more determined weed, a systemic weedkiller is probably a better option. These tend to take longer (by a couple of days or so) to kill off the weed, but do so by being absorbed and taken into the whole plant, and not just the above-ground leaves and stems.
Always follow the manufacturer's instructions and try to avoid washing-off onto planted areas.

3 - Sealants - A good quality sealant will prevent weeds settling into the pavement structure. However, even the very best sealant cannot prevent the build-up of detritus, and if this is allowed to accumulate on top of a surface, the weeds will quite happily take up residence, regardless of the sealant.
Basic cleaning:
The simplest and safest way to clean paving is to scrub it with soapy water. Some people will swear that hot soapy water is more effective than cold, but in reality, ANY soapy water will do. Use wash-up liquid or an acid-free soap-based floor cleaning product. If there is any hint of a warning about use of the particular product with limestone or marble floors, put it back under the sink and find summat else. Acids and acid-based cleaners can have a deleterious effect (some would say an horrific effect) on certain types of concrete and natural stone paving, as will be explained later .

Other than a bucket or pail in which to keep the soapy water, the only equipment needed is a stiff brush, that is, one with tough, rough, thick bristles rather than the finer bristled types which we refer to as 'soft brushes'. Incidentally, "daft" is an olde-englyshe word meaning 'soft', hence the expression "as daft as a brush". However, a "daft" brush is not what is needed for cleaning - make sure the brush being used has stiff, rugged bristles and isn't in the least "daft".
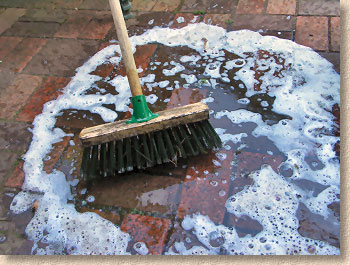
The soapy water can be swilled onto the surface of the paving and then, with brush in hand, it's simply a matter of scrub, scrub, scrub, using the mechanical action of the brush in combination with the chemical action of the soap to loosen any surface detritus. It's been noted that this is particularly good exercise for shiftless or truculent teenagers, although some form of monetary incentive is usually required. I'm happy to let them do it for free, but if they insist on crossing my palm with silver, I wouldn't want to offend them by refusing!
Wash off the loosened dirt with clean water, again using a bucket or pail to swill it across the pavement, taking all the muck with it. A hose can be used if preferred, but, as will be repeated on more than one occasion in what follows, care must be taken to ensure the jointing, in whatever form it might be, is not loosened or removed.
Acid warning
As mentioned above, acid-based cleaning products should be avoided whenever possible: for many types of paving, they do more harm than good. In particular, watch out for "Brick Cleaning Acid", or any "patio cleaner" that has hydrochloric acid (or other acids such as Muriatic) listed in its ingredients. They may clean your paving, but there's also a significant risk that they'll ruin it.
Stone paving
Most granites, basalts, porphyry, slates and quartzite seem to be unaffected by acid or acid-based cleaners, but proceed with caution and test a small discreet area first.
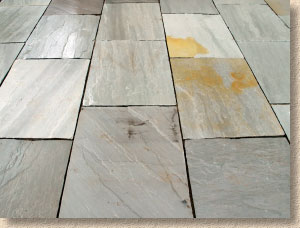
York Stone, Pennant Stone and Liscannor are variable: some pieces will exhibit no reaction to acid or acid-based cleaners, while others will turn orange. It's related to the iron content, and as this varies from stone to stone, it's best to test before committing larger areas to acid cleaning
Indian sandstones, Limestones, Marble and Travertine: avoid like the plague. Many of the paler Indian sandstones exhibit a violent rusty reaction to acid, although the extent of the reaction does vary from stone to stone and from quarry to quarry. Limestone is dissolved by hydrochloric acid - one of the definitive tests used by geologists to confirm a particular rock as a limestone is the effervescent reaction to hydrochloric acid. Marble and travertine are metamorphic limestones, so they, too, are best kept well clear of acids.

There are ways and means that may help with stains caused by acid or rust in general. They're not infallible, but they could be worth a try..... read more.
Concrete paving
Plain, uncoloured concrete is 'etched' by washing it with hydrochloric acid. The acid 'eats away' at the top few microns of the concrete surface to reveal a pristine surface beneath. While this may be great for cleaning up dirty or discoloured concrete, it is less successful when used on coloured concrete, which uses dyes based on iron oxide to create various colours within the concrete. The acid reacts with the iron oxide and can have a dramatic affect on the shade, turning buffs, soft reds and browns into strong orange or tan hues.
Clay Paving
Generally immune to acid, but test first.
Shifting algae, mosses and lichens:
Algae:
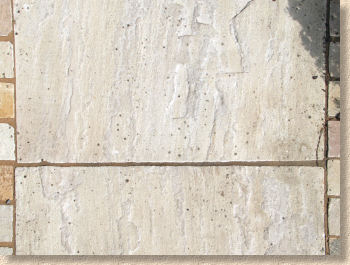
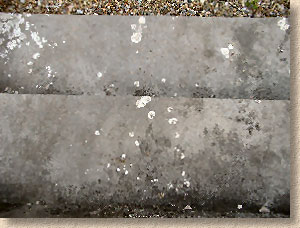
As more and more patio owners have come to realise, some of the imported sandstones (and, to a slightly lesser degree, some of the imported limestones) seem to become covered in a greenish growth almost as soon as the cheque has cleared. Sadly, far too many contractors and many of the importers/distributors are less than forthcoming with information on what it is, why it's happening, and how it can be removed. There is, as is to be expected with a natural material, significant variation in where, when and how badly it can appear, but it's safe to say that it's more prevalent in wetter western half of both major islands. So, we see more of it in Galway than we do in Dublin, and more in Southport than in Southend.
The green is an algae. It is ubiquitous in the environment, floating around as spores and looking for a damp-ish and permeable surface where it can set up camp, invite a few of the relatives to move in locally, and set about breeding. Algae are colonies of very simple plants. They eke out an existence by finding a home where the rainwater can dissolve a smattering of basic minerals from the substrate, which they then absorb and use to promote their growth. As long as they remain as simple algae colonies, they are fairly simple to shift, and one of the best ways of evicting them from the surface of any paving material is to use bleach.
A cheap, off-the-shelf, household bleach is ideal. It doesn't need to be thick and gloopy; it doesn't need to be able to kill all known life-forms; it just needs to be a bleach, plain and simple sodium hypochlorite, NaOCl in aqueous solution. In fact, the thick, gelatinous, gloopy, bowl-clinging bleaches are best avoided as they are less fluid and tend to stay in one spot, over-bleaching that small section of paving on which they lie while having little or no effect on adjacent areas. If a bleach boasts of having anionic surfactants, that's all well and good, but isn't actually necessary (unless you're planning on cleaning the bathroom with the same stuff!)

There's some variation in the strength of household bleaches, although most tend to be 3-8%. It's important to be aware that the ability to kill algae means that bleach also has the ability to kill other plants, possibly including your bedding display or an adjacent lawn, so always dilute with equal volumes of clean water before applying and make sure there is plenty of clean water readily available to dilute and neutralise any accidental spillages as well as for cleaning off the treated pavement.

AJ Smith of Dorset has experience of working with chemicals and he emailed to advise....
"When mixing water and the Sodium Hypochlorite (bleach) one should add the sodium to the water, not water to sodium. This way there is less danger to the user from splashing."

The diluted bleach can be applied via a watering can, or simply by preparing the liquid in a bucket and swilling it over the surface. Leave it to work its nastikemmickle magic on the algae for a few minutes, and then rinse off with plenty of clean water. The bleach will be effectively neutralised by dilution and by contact with soils and other surfaces.
It may take two, three or more 'treatments' to eliminate the more stubborn algal colonies, and, in the longer term, it's a good idea to repeat the treatment every two or three months as a 'pre-emptive' strike to deter any re-colonisation.
That old classroom science favourite, Copper Sulphate (CuSO 4 ) is used as an algaecide in some countries where it is readily available 'over the counter'.
Be aware that it is not readily available to the general public in Britain and Ireland due to it being acidic in solution, potentially poisonous through skin absorption and it risks causing severe damage if splashed into the eyes. I *know* it used to be in chemistry sets of the 70s and 80s, but it's long since been replaced!
Manie Fourie from AM Driveways (Paving) in South Africa recommends 50g of the distinctive blue crystals to 10 litres of clean water which is then poured or sprayed over the afflicted area. One week later, the area can be hosed down and brushed to remove the now-dead algal residue. Applying another dose of the solution at this stage will protect the paving against re-colonisation for some time.
Use of Copper Sulphate as a biocide is not deemed acceptable in some countries so check local legislation before trying it.
Lichens:
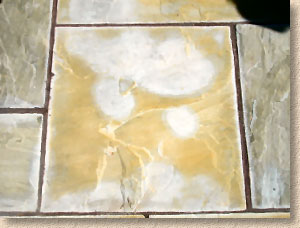
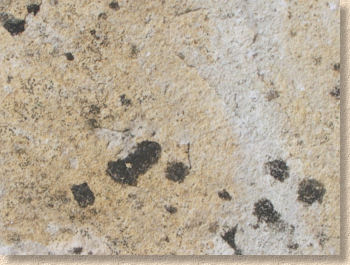
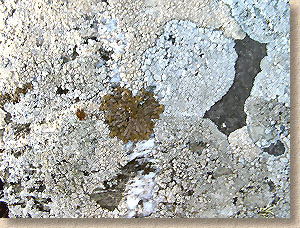
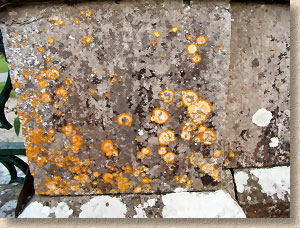
When pavements are left uncleaned for an extended period of time, circular or near-circular 'spots' that are mistaken for a stain are often observed to develop. Sometimes these spots will be dark or almost black, but they can also be creamy white, and they can be seemingly impossible to shift.
These spots are often a lichen, which is an unholy alliance between an alga and a fungus. The alga does the chlorophyll stuff while the fungi has penetrating root-like features referred to as 'hyphae' that are able to force their way into the substrate, enabling enhanced levels of mineral extraction along with a superb holdfast. The fungus swaps some of its mineral wealth with the alga in return for some of the chlorophyll-derived sugars. This is a classic example of a symbiotic relationship: both partners benefit and are better-off, ecologically speaking, than they would be on their own.
Which is all well and good for the botanists out there, but it doesn't half make them bloody hard to shift when they're disfiguring your paving with all their symbiotic goings-on.
As with the simpler algae, a fungicidal wash or a bleach is the answer, but it's likely that repeated, localised treatments using will be required, along with a very stiff scrubbing brush, or, in extreme cases, a wire brush. There's a good chance that the surface will be altered in some way on a permanent basis. This can be due to over-energetic scrubbing, which inevitably scratches the surface to some degree, but it's also likely that the lichen will have chemically altered the paving material by removing minerals that contributed to the pigmentation.
So, the answer is little and often rather than massive doses of fungicide or super-strong bleach and all-out wire brush warfare. A good strategy might involve treating the damned spot every other day, allowing the liquid to penetrate for 30-60 minutes and then washing off with boiling, soapy water and a good scrub with a nail brush or similar.
It might take half-a-dozen treatments or more to remove every last trace: don't expect miracles on the first application. It's also a good idea to treat the surrounding area in the same way, so as to avoid creating a super-clean spot within a slightly stained pavement in place of an unsightly lichen blob. If the lichen(s) are on one paving element, say one block or one flag, treat the whole element rather than just the spot.
Lichen colonies as large as that shown here are reasonably rare, but the little sods do seem to have a fondness for Indian sandstone and the end result can totally disfigure a pavement. Should they ever get as bad as this, it's probably better to replace the affected units rather than spend hours a-dousing and a-scrubbing, and then give serious consideration to protecting the paving with a good quality sealant.
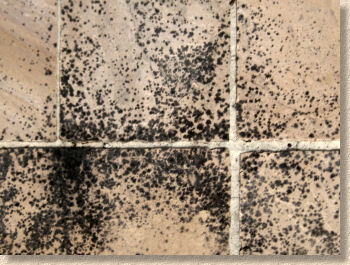
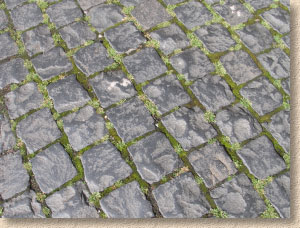
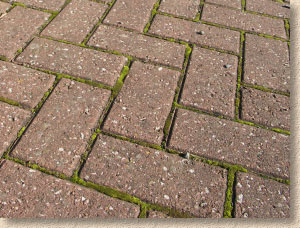
Moss:
Moss is a more advanced plant than algae or lichens and, generally speaking, it is found on pavements where detritus and debris has been allowed to accumulate. One of its more common haunts is the joints of block or flag paving, where the chamfered profile of the blocks (or flags) create an ideal location for the collection of smaller organic material while the sand jointing offers an excellent reservoir of moisture.
Worryingly, there are commercially available "Moss Killers" available from garden centres and the DIY Sheds that, while doing what it says on the packet, can also re-colour the paving to a less than fetching shade of orange, regardless of what colour it may have been originally. The lethal component of many Moss Killers is Ferrous Sulphate, and it's that ferrous bit (chemist's name for iron) that causes the colour change by, effectively, creating a rust-like deposit on the surface of the paving that becomes a medium-long term stain, while the sulphate bit gives the moss the biochemical equivalent of a good kicking.
There are mosskillers that do not rely on ferrous sulphate. Armillotox is one such product that is popular with gardeners as it has pesticide properties that got it into trouble with the EU for a period, but it is now sold as a cleaner, rather than a pesticide. Jeyes' Fluid is another, similar product that may be more readily available. As far as is known, neither of these products has a deleterious effect on the paving itself.
Most moss can be removed by sweeping and/or scraping. Unlike the algae and lichens, it tends not to penetrate the surface of the paving but to sit atop the crud that has been allowed to accumulate on and around the paving. If chemical warfare is deemed necessary, then a standard weedkiller such as PathClear or Glyphosate will do the job just as effectively as mosskillers without re-colouring the paving.
And yet again, bleach is your friend if you're looking for a deterrent to re-colonisation, but for moss, preventing the accumulation of crud and detritus on which the plant can thrive is even more effective. Regular brushing, hosing down or, with suitable care and attention, a bi-monthly power washing will remove any collected crap and this combined with a bleach wash-down can be enough to keep the moss at bay permanently.
Keeping it clean
Power washers:
Power washers have now achieved the status of standard household appliance, albeit one of those appliances that seemed like a "must-have" at the time but now spends most of its life expanding its cobweb collection in the corner of the shed.
Used properly, they can help keep paving in tip-top condition, but in the wrong hands, or used to excess, they can ruin a pavement and considerably shorten its service life, especially if the high-pressure water jet is allowed to remove that critical jointing material.
So prevalent is the use of power washers, and so critical is their correct use, that a separate page has been created to examines their function and use.
Jointing stabilisers:
Several types of paving rely on having sand-filled joints to achieve the necessary load-bearing ability. While the sand (or similar loose material, such as splitt) does a wonderful job at creating phenomenal vertical interlock between adjacent paving units, the fact that it is, as stated, a loose material, can result in it being removed all too easily by repeated cleaning, as well as by natural phenomena such as wind and surface water (which we lump together as agents responsible for 'scour'). If too much of the jointing material is lost, the structural integrity of the pavement is severely compromised (big words which mean the paving is knackered).
So, it should be fairly obvious that it's a good idea to keep as much of that critical jointing material in place as is possible. Maybe there's some way we could 'glue together' all those individual grains and help them to stay put. Indeed there is: and the simplest form of 'glue' is known as a jointing stabiliser or joint stabilising compound.
These products are generally water-dispersed 'glues' that are applied to the whole pavement. While the water evaporates, the glue jollop binds together the loose grains of jointing material. Now, this glue does not have the amazing strength of epoxy resins or "Super Glues". In fact, if you lift a block out of a pavement that has been treated with a jointing stabiliser, you should be able to crumble the sand jointing away from the edges of the block. The key thing is that the stabiliser binds the sand sufficiently to withstand scour and the occasional dousing with a power washer. They will not give loose jointing the ability to withstand direct jet impact from a power washer, and there is some indication that they deteriorate with age, but they work just enough and for long enough to allow the jointing to self-stabilise with the help of washed-in crud and detritus. They can be particularly useful for paving that has slightly wider than normal joints, such as some of the decorative block pavers that have rounded corners or edges, and for tumbled blocks with distressed arisses. They are NOT the answer for jointing loss in pavements where the joint width is greater than 6mm, such as sett paving, cobbles, riven flagstones, etc. These paving types need specific jointing materials that are, almost without exception, permanently and firmly bound in some way or another by means of a cement, a resin or a bitumen.
Sealants:
For pavements that require regular cleaning, or for pavements that need to be protected from accidental staining, a sealant of some description is likely to be the answer. A properly applied quality sealant can keep a pavement in near pristine condition, and can extend its service life by ensuring jointing stays in place while water ingress is kept to a minimum.
However, there are sealants, and there are sealants, and consequently, a separate page has been given over to their consideration. Just to confuse matters, there's a second separate page for Block Paving Sealants .