Introduction:
Paving that is constructed from individual elements can usually be repaired or replaced quite easily, and, more importantly, invisibly. One piece constructions , such as tarmacadam, concrete, pattern imprinted concrete etc., that require repair or replacement can only be cut out and patched, usually leaving a visible reminder of the repair.
Replacing individual elements
This strategy can be used with brick and block paving, flags/slabs, and any other paving type composed of individual units.

An extensive case study following the removal of blocks from a pavement and the subsequent repair is available starting on this page
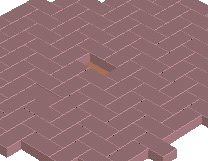
Replacing block paving
To replace an individual unit, or an area of paving, one unit needs to be completely removed from the paving. Other units are then easily removed if required. There are two simple methods for removing this first unit...
The non-destructive method
The unit is gently levered up, using the heel of a trowel or a bolster etc. to prise 2 opposite edges of the block or flag. In the illustration opposite, a block is being removed, but the same principles apply to removing a flag. Once the levers are in place, the block is 'jiggled' upwards, working each side a little at at time, until it can be lifted free of the pavement. The block is usually undamaged by this process, and can be re-used.
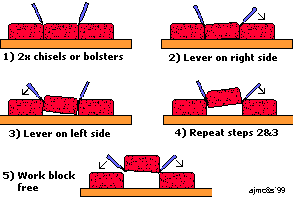
Use point or heel of trowel to prise up one edge of block. In this example, a half-block is being removed first as the cut edge makes insertion of the trowel point/heel that much easier
The first trowel is used to maintain the elevated position of the first (cut) edge while the second trowel is used to prise up the opposite edge.
Continue to jiggle the trowels to persuade the sides upwards, alternately, until block comes free.
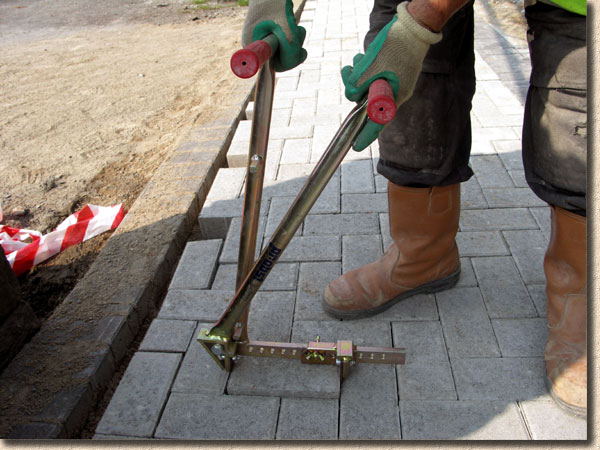
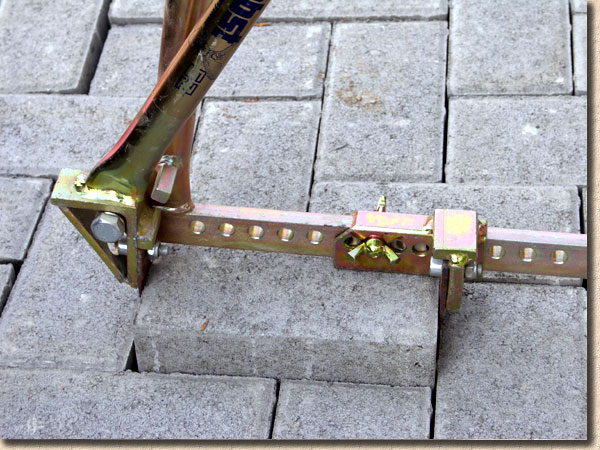
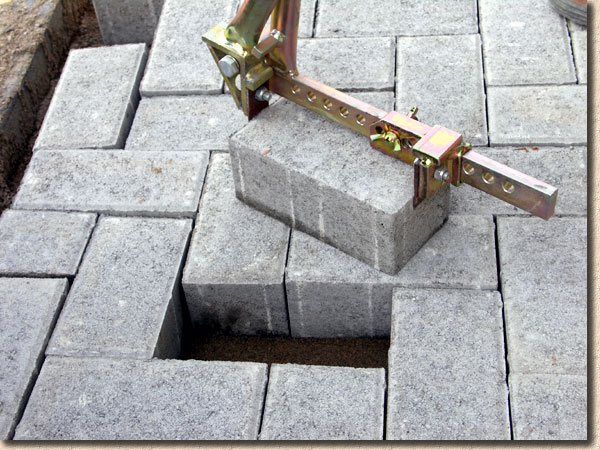
Professional contractors will normally use a tool known as a "Block Extractor" to remove individual blocks
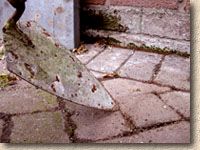
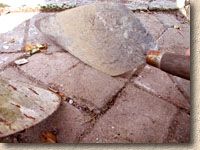
The destructive method
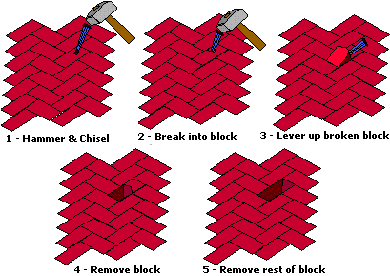
A sharp chisel can be used to break into the block, and then used to lever the broken parts of the block free of the pavement. The chisel or a point chisel, is driven into the block at an angle of about 30° from vertical until the block breaks. Obviously, this method results in the block being un-usable, so make sure you have spare or replacement blocks to substitute for the broken one you have removed.
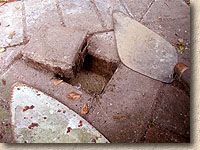
Once the first unit has been removed, other, adjacent units can be removed fairly easily by levering from beneath. With flags, it may be necessary to cut out any mortar jointing to 'free' the flag, and blocks can sometimes be held quite tightly by the jointing sand, and may need to be 'jiggled' free. Note that some blocks and bricks, particularly clay pavers, have 2 usable surfaces, and so by turning them upside down, you should be presented with a new, undamaged or unmarked face.
Take up as much of the pavement as is required, stacking the blocks close-by for re-use. Brush off any jointing sand adhering to the edges of the blocks or chip off any mortar adhering to the edges of flags. The exposed bedding layer can be floated, trowelled or screeded to prepare it for replacing the paving units. If correcting levels, add or remove bedding material as required. Over larger areas, the surface level of the bedding layer is easily checked using a straight-edge timber and one of the salvaged blocks as a guide. Leave the bedding approximately 5mm high to allow for re-compaction.
Replace the blocks/flags as required once the bedding is prepared, supplementing with spare or replacement units, and reseal with dry jointing sand or mortar joints. The area of repair will need to be re-consolidated, preferably with a vibrating plate compactor for block or small-element paving, or a mall for other flags. Check the level of any sealing sand again in 3-4 weeks and top-up if required.

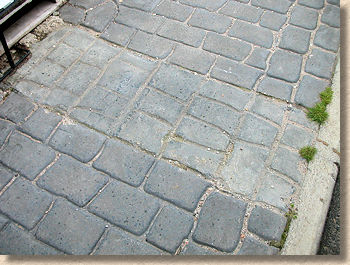
When replacing damaged or stained block paving, straight block-for-block substitution over the affected area can result in a noticeable patch of newer, un-faded paving within the existing. As contractors, we pre-empted this problem by leaving each client with a square metre or so of 'spare' blocks on completion of the works. This wasn't simply for fade-matching, but also to ensure that replacement blocks were from the same batch as the originals; it's not unknown for manufacturers to alter moulds, reposition spacer lugs, and amend colour mixes over time.
When no such stock of batch-matched paving is available, the visual impact of the new blocks can be 'toned down' by mixing in with clean existing blocks taken from the immediate vicinity of the staining. So, for a 1m² stain, we might take up 2m² of paving, discard the spoiled blocks, mix in the replacement blocks, and relay the lot.
In most cases, 12 months later, it's impossible to differentiate between the originals and the replacements.
Replacing flags/slabs
and other 'mortared-in' pavings
The method used to replace these types of paving are very similar to that described above for block paving. The mortar joint will need to be cut out, preferably with a power-saw, although it can be chiselled out with a hammer and bolster. Lever the paving unit out of the pavement, store or discard as appropriate and prepare the bedding layer for re-seating the unit. Butter the receiving edges of the pavement with mortar before replacing the units. Tap down to level with a paviors mall, and then re-point the joints.
Patching non-elemental surfaces
Tarmacadam, concrete, pattern imprinted concrete (PIC) and resin surfacing are 'monolithic' rather than modular, so can only be patch repaired, and this will usually result in the patch being noticeable, no matter what is done to try to hide the repair. PIC and resin surfaces are particularly difficult to repair without the patch being blatantly obvious, but even bitmac, which we all think of as being 'black' is nearly always impossible to match in terms of colour, texture, wear and weathering.
Whenever possible it's usually best to get the original contractor to repair or patch these surfaces. They should know just what materials and techniques were used originally, and so should (in theory) have the best chance of effecting a 'less noticeable' repair.
Note that the the term "Tarmac" ™ © ® is the name of a publicly listed company and they become annoyed enough to set big, expensive and scary lawyers upon those who take their name in vain by using it to refer to the material "tarmacadam", even though the name has entered the vernacular in the same way as, for example, "Hoover", "Biro" and "Sellotape". Throughout these pages, we have sought to use the contentious term as little as possible, preferring to refer to 'bitmac' or 'macadam' instead.
Patching Tarmacadam
The area to be patched should be marked out, allowing ample working space and keeping clear of any cracks or crumbling by at least 100mm. Use a dust-suppressed Power Saw to cut right through the surface at the entire perimeter of the repair area. The unwanted surfacing can then be chiselled or jack-hammered out, or removed with a pick and spade, and disposed off-site. The saw cuts ensure a clean, straight edge to the patching. A normal hand-held cut-off saw is usually adequate, but for larger areas, a trolley-mounted floor saw is preferable.
The vertical edges of the cuts should be coated with a jointing compound (often known as "cold pour"), available from civils' merchants, prior to placing the new material. The purpose of the jointing compound is to keep water out of the joint and to prevent it getting beneath the surfacing, where a freeze-thaw action could cause the repair to fail.
It is best to use fresh, hot bitmac for the repair, laying it in at least two layers, compacting each with an asphalt punnel, vibratinbg plate compactor or roller. The 'seams' of the repair should be sealed with cold pour compound (see above) to prevent ingress of water. Whilst this makes the repair more noticeable, it will reduce the chance of the repair failing because of water penetration into the joint.
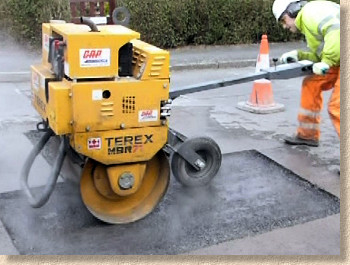
Macadam suppliers are not really keen on delivering quantities of less than 3 Tonnes, and may impose exorbitant part-load charges for small loads. Alternatively, some batch plants will quite happily load a half-tonne or so onto a trailer or private wagon. If carrying macadam on a vehicle, it is essential that the material is properly sheeted with a tarpaulin or similar to keep as much heat as possible in the material, otherwise it becomes very difficult to work.
Patching Video:

Overnight fuel leaked from my car, this has resulted in my tarmac drive being dissolved - it has left a couple of holes 5" wide. How can I patch these unsightly holes?
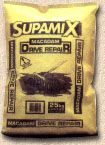
Using pre-packed 'mac
There are 'pre-packs' of repair macadam available from most builders merchants, and these can work out to be considerably cheaper than having hot bitmac delivered in small quantities. At approximately £8 for 25kg, this equates to a price of £320 per tonne, compared to £50-60 per tonne ex-works. However, for a 1 tonne load, the batch plant are likely to impose a part-load charge of around £150-180, so any quantity greater than 1 tonne is best bought in as hot, fresh material.
For your guidance, a 25kg bag of repair bitmac will cover approximately 0.45m² at 25mm thick, but no macadam surface should be less than 70mm deep overall, so coverage is reduced to 0.16m² per 25kg bag at this thickness, requiring just over six bags to cover each square metre.
The pre-packed tarmacadam has been ' cutback ' or 'doped' to retard setting until exposed to the atmosphere, where the doping oils can evaporate away over time. The packs are supplied cold, but work best if left in a warm place for several hours before using. The 'mac is removed from the packaging, spread out as required, and compacted down to level, in the same manner as hot tarmac. It will take several weeks for the doping oils to evaporate completely, but the compacted surface should be usable more or less immediately. If the surface of this repair 'mac remains tacky, and is being picked up on the tyres of a car or the soles of shoes, dust the surface with a fine sand, much like flouring a work-surface before rolling out pastry. The sand will wash away over time.

We are not overly impressed with these pre-packed repair tarmacadams. They have their uses for very small repairs, but we would never consider them for any area greater than a couple of square metres. They remain soft for several weeks and will be easily penetrated by any point load, such as the side-stand of a motorbike or a ladies' stiletto heel.
For patching areas of 2-20 m², you might be able to find a tarmacadam contractor working locally who will order a tonne or so extra if you make it worth their while with beer vouchers.
Bitmac cover-ups
There are various products available that allow you to 'paint' an existing tarmacadam surface to leave it looking like new. Some are little more than a paint, whilst the better products actively bond to the existing tarmacadam and revitalise the bitumen binder. They are best used to re-cover an entire driveway or courtyard, rather than just "touching-up" in patches.
Variously known as Tarmac Sealers, Tarmac Sealcoats or Tarmac Paints there is an ever growing range of products on the market, but it's important to choose the most appropriate product for each job.
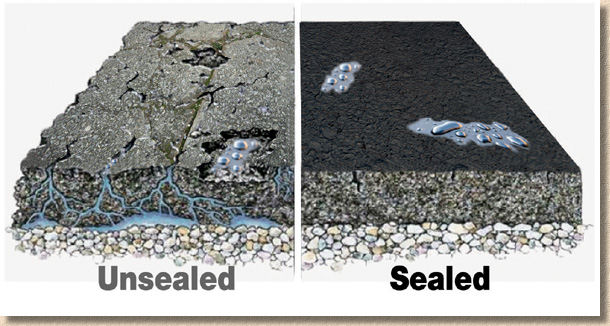
They can be used quite successfully to cover up minor blemishes or patches on tarmacadam, or just to rejuvenate a tired-looking driveway. They are sometimes available from builders merchants, larger DIY stores and construction chemical suppliers in traditional black colour or a shade of burgundy red, but may need to be specially ordered in if smaller quantities are required.
The macadam surface to be treated needs to be as clean and free from dust and detritus as possible. We power-wash the surface and allow it to dry before applying the sealcoat product. Usually, two coats will be required, and they are best applied with a long-handled squeegee (saves the back-ache!) Allow each coat to dry before applying the next. They usually dry in 2-3 hours, and can be trafficked once dry.
Patching concrete
In common with macadam (bitmac/tarmac), repairs to concrete are practically impossible to do without the resulting work being visible. For all sorts of reasons, it's simply not practical, nor possible, to exactly match the existing surface, and, even if it was, there would still be observable lines where the old surface was cut out and the new surface installed.
This fact applies to the simplest of plain, unadorned concrete surfaces , or a highly decorated, coloured and textured pattern imprinted surface. Making an invisible repair is just not possible.

Stains are not usually considered to be sufficient justification for breaking out and patching a concrete bay, although there are circumstances that will require the concrete to be renewed. Salt or frost damage, repairs to underground services, or removal of damaging tree roots will all require a repair to be effected. Two types of repair are considered here - a shallow, surface repair, and a full depth repair.
Shallow repairs
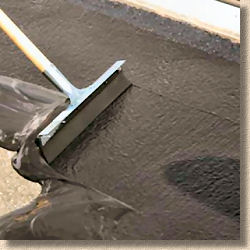
This method is suitable for repairing minor surface defects or blemishes, such as salt and frost damage. The area to be repaired is marked out and the perimeter cut with a power-saw to a depth of at least 40mm. The spoiled concrete surface can then be chipped out using a hammer and chisel or a demolition hammer from a hire shop. If replacing salt or frost damaged concrete, ensure that all loose and unsuitable material is removed to a depth of at least 40mm. Clean off the area of repair, and brush out as much dust as possible. The exposed concrete surface should be primed with PVA or SBR bonding agents, or etched clean with an acid-etching fluid. The fresh concrete to be used for the repair needs to be a high-strength mix, with PVA, SBR or a hardening agent added. We would normally use a granolithic concrete for such a repair. See Mortars & Concretes Page for discussion of high strength and granolithic concretes.
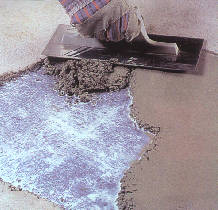
The fresh concrete should be spread out, tamped to level and float-finished as required. Make sure the fresh concrete is worked tight into the edges of the repair and finishes flush with the existing surface.
It is always a good idea to cover or fence off wet concrete as the neighbourhood cats and eejit children seem to love leaving their pawprints behind for posterity. The repair can be trafficked in 3-4 days.
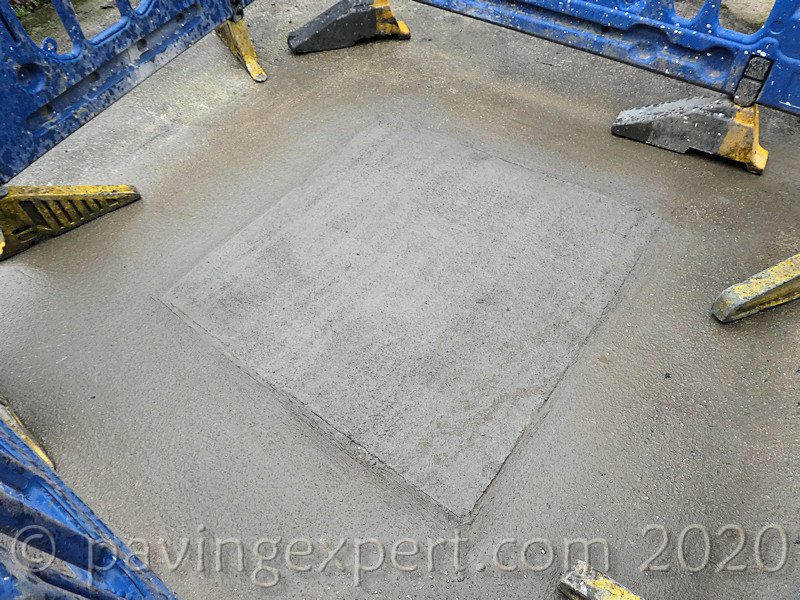
Full depth repairs
When a shallow repair is not feasible or desirable, a full depth repair can be used. Mark out the area of repair, and cut right through the concrete with a power-saw or floor saw. Break out the unwanted concrete and dispose.
For larger areas, it may be advisable to 'tie-in' the new concrete to the existing material by using steel dowels. The diagram opposite illustrates a cross-section of a typical dowel tie with movement joint. Holes of a diameter 5-10mm greater than the diameter of the dowels are drilled into the exposed face of the the existing concrete at approximately 600mm centres, dusted out with a blast of compressed air, and injected with an epoxy gouting agent, such as Lokset®, via a sealant gun. The dowels are hammered into the holes to half depth and allowed to set.
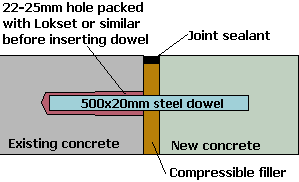
If a movement joint is to be created, a compressible board filler is used to line the face of the existing concrete prior to pouring the new concrete. For small areas, movement joints may not be required; if in doubt, consult a civil or structural engineer. It is essential that any such movement joints are properly sealed to prevent water ingress.
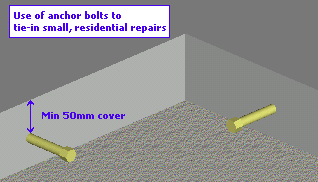
For most domestic or lightweight applications, 200mm anchor bolts can be used to replace steel dowels in the method described above.
Drill holes for bolts at 450-600mm centres, screw in the anchor bolts, and leave protruding by 100mm or so. Make sure there is at least 50mm cover above and below the anchor bolts/dowels.
The new concrete is placed in the area of repair, levelled out, screeded, tamped and float-finished as required. Use a high-strength ready mixed concrete from your local supplier or see Mortars & Concretes Page for discussion of high strength concretes. Protect from unwanted disturbance, and the repair can be subjected to light traffic in 3-4 days. Allow at least 7 days before allowing vehicular traffic to use the repaired surface.