The actual installation was done by Essex DIYer, Steve Rogers, following on from a thread posted to The Brew Cabin .
Construction:
Other than the column itself, and the light unit head, the important components are shown in the photograph opposite.
The Threaded Rod Anchors are set into a concrete mass and, once set, the column base is fastened onto them by means of the nuts. Note how the lower end of each length of threaded rod is kinked so that it will be securely held by the concrete and there's no chance of them being ripped out.
The plastic duct allows the power cable to be passed through the concrete anchor block. It would be possible to allow the cable to be in direct contact with the concrete anchor block, but, by using a duct, the cable could be withdrawn and replaced, or a second cable added, if necessary, without having to break out the anchor block.
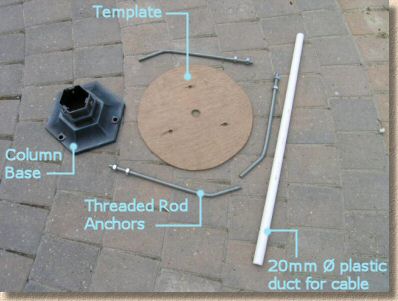
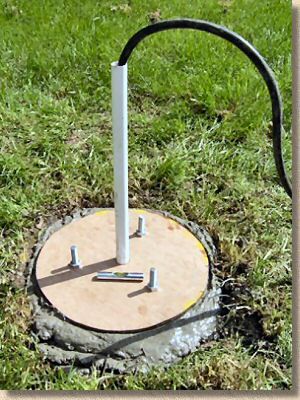
The template is a simple 450mm diameter disc cut from 6mm ply that has been marked up with the positions of the bolt holes in the column base. This will guide the positioning of the threaded rod anchors when the concrete is first poured, and hold them securely in position until the concrete hardens.
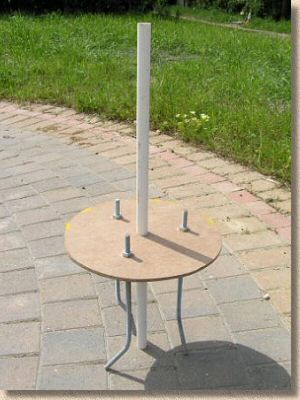
This photo shows the components assembled prior to installation. Nuts above and below the plywood template hold the anchors securely in place, while the 20mm diameter duct (a short length of kitchen overflow pipe available at any good Plumbers' Merchant or DIY Shed) passes through a hole in the centre of the template.
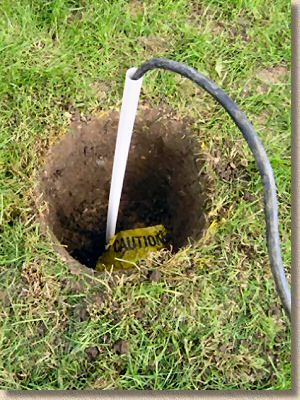
The power cable was laid previously and a marker left in the ground. A hole is excavated for the anchor block, measuring roughly 450mm diameter and 600mm deep. The previously buried power cable is retrieved and fed through the duct, as shown.
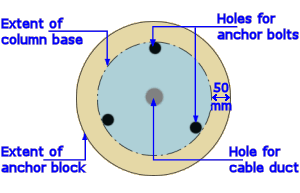
The diameter of the anchor block should be calculated to ensure that, when the anchor bolts are in place, there is at least 50mm of 'cover' between the bolts and the outside edge of the concrete. This is done to ensure the bolts are firmly and securely embedded and also to offer a decent amount of protection from the atmosphere which would rust the threaded rods and so damage the structure.
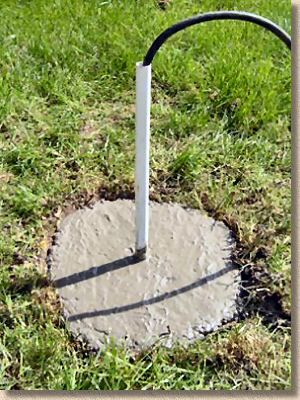
The anchor block can now be cast. A reasonably strong ST4 (C20 equivalent) concrete is used, and mixed to a wet consistency ( slump ) before being poured into the hole and tamped down or vibrated to drive out as much of the trapped air as is possible.
The top of the concrete needs to be fairly flat and at a level that will allow it to support the column base at just the right height above the surface.
The template with the anchor bolts can now be slid into position over the protruding duct and cable, and pushed down so that the anchor bolts are forced into the still-fresh (plastic) concrete. The template needs to be established perfectly flat, so its level is checked using a small spirit level, first in one direction (say north-south) before being turned through 90° to check east-west. The template (and the anchor bolts fastened to it) should be tapped down as necessary until it is perfectly flat and at the correct height relative to the surfacing - the lawn, in this case.

The concrete needs to be allowed to harden before the lighting column is fitted. For the first few days, even though it may be hard to the touch, the concrete is still regarded as 'green' and the anchor bolts could easily be ripped out if forced. It's best to give the concrete at least a week, preferably even longer, before removing the plywood template and fastening the column base into position.
Once the base is in place, the column itself can be attached, and the lighting head wired-up as required, all ready for the grand switch-on when complete.
Thanks to Steve Rogers from Measuring Machines for the photos and the labour. I couldn't have done it without you, Steve!