Introduction:
This page is part of a series of pages that consider cutting techniques used with flags (or slabs, if that's what you call 'em). The first page examined the basic principles of cutting-in: this page looks at how curves are cuts; subsequent pages consider other cut features such as notches and flagged radii. See the menu above right or the related pages listing at the foot of this page for a more comprehensive guide to what's available.
Cutting curves
While cutting straight lines is relatively straightforward (literally!), cutting a curve is more of a challenge, and although it relies upon the basic skills and techniques introduced in the previous section, it takes them 'one step further', refining, adapting and developing them in the process.
There are two basic types of curve to be considered when it comes to cutting flags: internal and external. Internal curves are those that bite into the body of a flag (or pavement), what might be called 'concave' in another discipline, while external curves are those that project outwards from a flag (or pavement), convex, in other words. This basic division is better explained in the diagram below, which shows a fairly simple patio layout that incorporates both versions.

The left-hand side of the flagged area consists of an internal curve or arc while the right-hand side is an external curve or arc. Although the curves extend over a number of flags, it can be seen that each flag within a larger curve consists of a curved or arced cut, whether the arc is internal or external.
There is a significant difference in the way that each type of arc is cut, and of the two, cutting an external arc is by far the easier, so we'll look at that first.
Cutting external arcs
External arcs are cut as a series of straight lines, each successive line at a slightly skewed angle, so the result is not actually a true arc. Arcs with larger radii ( slow arcs ) may be cut as true arcs, as it is possible to 'twist' the blade of the saw to a small degree as it traverses the flag(s). However, any arc faster than around 1800mm radius will probably have to be cut as a series of skewed straight lines.
As described above, when a line of cut extends over two or more flags, a better finish will be achieved by marking the arc onto the flags once all of them are in place. Further, making the 'first traverse' while the flags are in position allows the 'sweetness' and accuracy of the proposed line of cut to be assessed and adjusted slightly if necessary. Once scored, individual flags can be lifted out, put into a suitable cutting position, and then cut as required. When re-placed within the pavement, the sweetly aligned arc should be apparent, but it may be necessary to tweak the position of the flag, a few millimetres this way or t'other, to re-create the original arc line.
Slow arcs of radius 6 metres or more, may be achieved by simply cutting each component flag as a straight line, with the angle of the cut line increasing/decreasing with each successive flag. This is particularly true when smaller flags (450mm or less) are used with slower arcs. As a general guide, if an arc marked onto a flag "bellies out" by less than 10mm from a line joining the position of the cut on the two edges, it would normally be cut as a straight line, but if it "bellies out" by more than 10mm, it will need to be cut as a series - see diagram.
As can probably be seen from the diagram, an external arc is usually cut as a series of straight lines. While this may not seem acceptable to the purist, in practice, as long as each section of straight is relatively short (250mm or less) and the angle change between successive straight sections is minimal (10° or less), the finished effect is surprisingly neat, especially if the arc is edged with a kerb or edging of some description.
Example:
An arc or 900mm radius is to be cut on a patio project. The flags are laid in such a way that the edge flags project over the proposed line of cut. One of these flags is a 600mm wide piece, and this is shown in the accompanying illustration.
The arc has been scribed onto the flag and is shown in orange. Two chords are scribed, joining the points where the arc intersects the edges of the flags and the centre line of the flag. At the mid point of each chord, there is a 13mm gap to the nearest point on the arc. Bearing in mind the 'no bellying out by more than 10mm' rule from above, it's obvious that the chords will need to be sub-divided to reduce their length and bring the proposed line of cut closer to the desired arc. This is done by marking a point on the arc nearest to the mid-point of the chord, and the new line of cut is marked. This will give a piece of flag shaped as shown in the lower portion of the diagram. Just how this shape is actually cut is dealt with next.
On site, all this geometry and measurement is unlikely to take place, but whether they know it or not, many flaggers are making these geometric decisions in their head while marking-up a flag for cutting. There comes an instinctive awareness that such-and-such an arc will work out fine, while another is "too pointed" and will need adjusting to give a suitably sweet arc. It's an awareness that comes from experience and familiarisation; it's not something that can be learned from a book (or a website), but it does become second nature after a relatively short while.
An alternative to creating a 'freehand' arc using a standard blade involves using a special 'arc-cutting blade'.
It should be obvious that four cuts are needed to produce the shape and size of flag shown above. Each cut is made in turn, and the sequence is shown in the diagram.
Although the cut edge may look somewhat jagged and pointed, with each cut edge measuring just a shade over 150mm, and the change in angle being just around 10°, it's likely that, when fitted, the piece will look the part. Naturally, on high quality or prestige work, it may be considered necessary to reduce further the jagged appearance by making, say six or eight cuts to produce the same arc. This is a matter for individual taste and preference - the nature of the work in hand should dictate when fewer or additional cuts are justified. However, there is a limit: once a cut edge is less than around 50mm in length, it becomes difficult to justify the extra work involved in making additional cuts.
Cutting internal arcs
When it comes to cutting internal arcs, the simplest method again involves cutting a series of shorter straight line rather than attempting to cut a true curve. There are a couple of methods that can be used to cut true, or true-ish, arcs, and these are described later in this section, but the vast majority of internal arc cuts rely on cutting short, straight lines.
When cutting external arcs, both ends of the cut lie at a free edge, but internal arcs require lines of cut that have one end lying inside the body of the flag. This is illustrated opposite.
For larger radius internal arcs that require just two lines of cut, it is possible to cut each line, starting at the free edge and cutting towards the centre of the flag.
However, smaller (faster) radii may require the cut to be created as a series of three of more individual cuts. The cut-lines for a two-part cut will always have one free end, easily accessible to the saw blade, but any cut involving three or more individual cuts will have section with no free ends. The only way to create these contained cuts is to start the cut in the centre of the cut line and allow the blade to cut into the flag from the top surface.

With such cuts, the blade should never be allowed to cut beyond the necessary line, as this would leave a permanent mark on the retained piece of flag, and would weaken it, making it more liable to spall or to break.
So, for the example shown opposite, the saw would be used to create the two edge cuts first (the green line and the brown line), taking care to ensure that the leading edge of the blade did not encroach into the retained portion of flag, that is, the blade is allowed to cut up to the intersection of the green line and brown line (the blob on the end of the blue label line), but no further.
However, if we abide to this 'intersection and no further' rule, because of the curvature of the cutting blade, it's not possible to create a complete all-the-way-through cut: there will be a portion of the flag cross-section that just cannot be cut without extending the cut line too far, as shown in the diagrams below, which show a simple, two-line cut with just one intersection.
Because of the angle of the cut on the surface of the flag, the uncut section of flag has an annoying tendency to break in such a way that leaves it protruding, and will often prevent it being successfully fitted to the gap for which it was intended.
Some extra 'trimming' work will be required to ensure an easy fit. A single, vertical cut centred on the point of intersection will bisect the unwanted section and make it much easier to remove with a few taps using a lump hammer and cold chisel. If necessary, make additional vertical cuts through the unwanted section, but be careful to ensure the blade does not cut into the surface of the flag.
When cutting flags to relatively fast arcs, the size of the saw blade can make it difficult to achieve short-length cuts. The larger diameter blades will only penetrate the flag to a particular depth when making short-length cuts. As can be seen in the diagram opposite, when using a 300mm blade to make a cut that is 150mm long, the blade can only penetrate to a depth of 20mm, which is possibly not enough to give a clean break.
This is more likely to happen with larger flags being cut to arcs with short radii, which, as described previously, require considerably shorter straight sections to achieve the fast arc. Where a three-section line of cut is necessary, the relatively shallow depth of the central section should not adversely affect the overall cut because the two cuts made from the edges will be full depth (or nearly so) and will focus the stresses in the right direction. For cuts requiring a greater number of individual sections, the risk of the cut 'going wrong' can be reduced by creating a series of cuts from the nearest free edge, as shown in the diagram below.
The line of cut can be marked as a series of short, straight lines or as a single sweeping arc that is little more than a shallow mark in the surface of the flag. When the first option is used, the additional cuts should connect the points of intersection to the edge: when the line of cut is a simple shallow arc, the additional cuts need to be more numerous, dividing the discard piece into sections not more than 100mm wide so that the forces used to break off the discard piece can be more carefully controlled.
The method of cutting a shallow, sweeping arc, described above, is one of a couple of methods that can be used to cut true arcs, rather than arcs that are actually a series of short straight lines. The ability to cut that first, shallow arc, and to cut it accurately, is not something that can be taught: it comes with practice, with having a familiarity in handling the saw and understanding the balance and movement needed to create a single, true arc. This initial marking cut need be only a few millimetres deep, as this is just a surface scoring, indicating the limit of removal, and not a major line of weakness. The significant lines of weakness, those cuts that actually determine just where the flag will break, are the cuts made from the nearest edge, as described above. As long as these cuts are full depth (or nearly so) and they divide the discard section into relatively narrow strips, the shallow surface scoring will be sufficient to focus the breaking forces and ensure the flag snaps where required, and nowhere else.
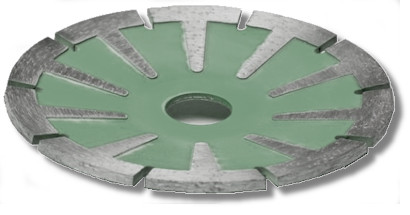
For fast arcs, ie those with a radius of 600mm or less, a curve-cutting blade can be used. In general, these blades are only suitable for fitting to larger angle grinders and not to cut-off saws or bench saws, although there are persistent rumours of a curved blade that is allegedly compatible with the standard 300mm cut-off saw. Seeing is believing, and I ain't seen one yet! It should be noted that these convex blades (also known as radius blades or radius cutting blades) are not suitable for full depth or 'plunge' cutting: their shape precludes penetration deeper than a few millimetres, and so additional cutting may be necessary, much as described above, to create weaknesses that can be exploited to reduce the flag to the required curved line-of-cut.