
Introduction:
This page has been produced with the invaluable assistance of Stone Paving Supplies , one of Britain's leading importers and distributors of porcelain paving. Full details of the complete range of porcelain paving and tiles, as well as their extensive range of natural stone paving, can be found on their website.

This group of pavings has been given various names, some designed to mask its true nature; some intended to make it sound grander than it really is, but whatever description is used, be it porcelain or vitrified or ceramic or litho-summat, the basic product is a specialised tile that has been printed with a surface pattern to replicate, say, granite, travertine or limestone, and then fired in a kiln at scarily high temperatures to give a very tough, very resilient tile.
Strictly speaking, the term "Porcelain" should only be applied to those products with a water absorbency of 0.5% or less. Other producrs are 'ceramic' or 'vitrified'....but does it matter?

And tiles are what they are, no matter what the manufacturers, importers and distributors might say. They are, to all intents and purposes, a specialised flooring tile, not too dissimilar to the tiles that may be on the floor of a kitchen or conservatory, although they are manufactured to be weatherproof, and therefore suitable for outdoor use, even in these damp and dreary islands.
The term 'tile' is used advisedly. Back in the days of punk and Two-Tone when I was serving my time, we were repeatedly told that a flagstone (a flag or a slab) had to be at least two inches thick (the metric system was only just being adopted, and forty years later, we're not much further on with it!) and anything less than an inch-and-three-quarters must be a tile.
Obviously, with refinements in concrete technology and the onslaught of imported stone paving from Asia since the turn of the century, we have had to accept that a flagstone might actually be just 20 or 22mm thick, thickness that were unheard of when all we had was yorkstone, pennant stone or basic concrete. However, these new ceramics, at just 8-12mm, really have crossed the Rubicon and can't be thought of as anything other than tiles.
There are various sources and, at the time of writing, all the significant suppliers are based overseas, predominantly in Italy, where the technology was first developed and pushed into continental Europe, and, of course, China, where they make just about anything that can be made, and plenty of things that shouldn't.
The basic premise is a porcelain tile which is printed with a lithographic image taken from a large, high quality photograph of whatever surface is being replicated. To avoid obvious repetition (think of rolls of wallpaper) the master photo is shifted a few centimetres left-right and up-down as each tile is printed so that the number of identical tiles in any one batch is minimised. The better quality products might have, say, 128 variations, while cheaper versions might have just 8.


Texture or 'profiling' can be introduced by moulding or embossing the tile blanks before the surface pattern is printed. This enables manufacturers to create tiles that can be essentially flat and smooth, or which are textured to various degrees with stipples, ripples or even a riven effect. If it can be imagined, it can be manufactured.
One characteristic that all of these tiles have in common and which is highly relevant when considering an installation method, is their exceptionally low water absorption values. They do not draw in moisture to the same degree as do many other paving materials. This should render them less vulnerable to flaking or delamination which can happen with some of the cheaper natural slates and riven stones.
Porcelain pavings are more akin to some of the denser slates, absorbing almost nothing from the bedding and jointing materials, and this, obviously, has an effect on how the bed and jointing might bond to the tiles. In short, without help, these tiles will not form a strong, sustainable bond to either bed or jointing.

Choosing Quality
What to look for:
As already mentioned, the better products have far fewer repetitions, so leaf through open packs to see how often the same tile appears. Look at display areas to see if identical tiles can be identified.
But surface appearance isn't everything. Consider also the thickness. The cheaper end, budget products tend to be smaller and, more critically, thinner. The top end products will be in the 17-22mm range of thickness, while the cut-price stuff (often intended for indoor use) might be 10-13mm.
Most of the quality European manufacturers have now settled on a standard 20mm (2cm) thickness for outdoor grade porcelain paving.
Read more about assessing the quality of porcelain
Installation:
This is where it becomes tricky. There are two commonly suggested or recommended methods of laying porcelain paving, but each has its pros and cons, not least of which is the skill level required to achieve a high standard of finish. While there are umpteen different terms used to describe each method, we'll go with 'Full Wet Bed' and 'Thin Bed Adhesive'.
Regardless of which method is used, drainage will be essential, as it is with all non-permeable forms of paving. Most porcelains are relatively smooth and so surface water runs off with ease. Consequently, the sensible approach is to rely on the requirements of the relevant British Standard for external flagstone paving (the nearest equivalent to porcelain slabs) and set a minimum fall of 1:80 ~ 12.5mm fall per linear metre.
A third method relies on using pedestals but, just for now, this is a technique that is much less popular in Britain and Ireland than is the case in mainland Europe, and so it is not covered any further on this page.
Full Wet Bed:
Advocated by several major suppliers, this method relies on carefully placing the tiles onto a levelled-out bed of standard sand/cement mortar, prepared to a wet consistency (slump of 50mm or more – Slump Class S2 or higher).
The mortar bed needs to be a 6:1 or stronger mix of grit sand with ordinary portland cement (OPC) - see Contractors' Mix - minimum of 20mm thick, and should be placed over a prepared sub-base or base. Most contractors are using 25-40mm thickness to ensure a bed with sufficient depth to create a rigid layer capable of supporting both itself and the paving units, although some are using considerably thicker beds, as much as 100mm depth in some cases.

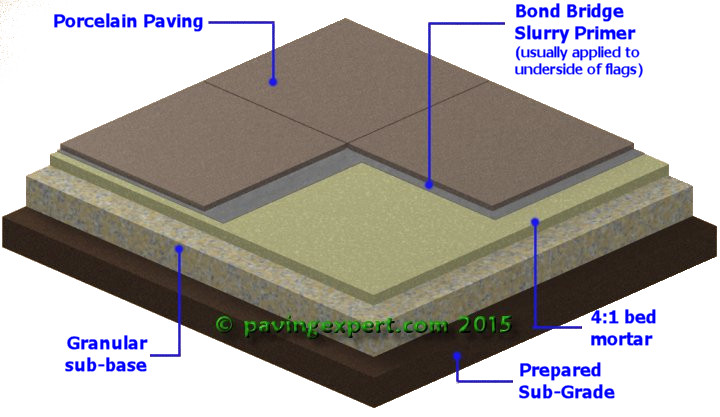
The inclusion of a sub-base (or base) is essential. For the Wet Bed method, a 100mm deep sub-base of Type 1 material (or similar) is typical, although in exceptional circumstances a rigid base , usually mass concrete, will be used. Omitting the sub-base (or base) and placing the mortar bed directly onto a sub-grade is highly likely to result in the whole pavement failing in the short-medium term.
As with the Thin Bed Adhesive method described below , a Bond Bridge primer applied to the underside of the tiles is essential.
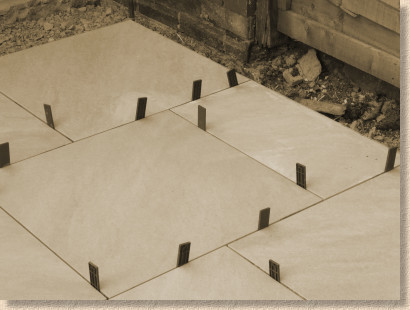
Using joint spacers (either proprietary paving joint spacers , plastic spacers as used in the window fitting trade, or even pieces of 6mm plywood) will help maintain a regular joint width between the units and also minimise the risk of accidentally spalling any vulnerable edges.
The tricky bit to this method lies in consolidating the tiles down to the correct falls and levels. This requires the receiving bed to be fairly accurate, but sufficiently proud to accept the tiles and allow them to be tapped down. Accordingly, judging the ideal level of the receiving bed and then getting the right degree of rippling in its surface to accommodate the tile is not as simple as some guides would have you believe.
And then there is the 'tapping down'. Admittedly, the tiles are tough, probably much stronger than one might expect, but they cannot be hammered. They will withstand a reasonable clonking, but too much force, too heavy a blow will probably cause a breakage.
However, there has to be enough of a tapping down to ensure that a sufficient proportion of the tile base is in direct contact with the supporting bed, so an overly gentle tap or two probably isn't enough to get the 70% contact we would regard as the minimum requirement. Too little clonking will leave the tile resting on ridges of mortar with voids between, and so the bed will not provide a full support.
Trial and error is the only way to learn just how much surcharge, how much rippling, and how much clonking is needed to get the tile down to the perfect level, with the correct falls. Obviously, as more and more tiles are laid, the bed preparation will become second nature, but for the first few tiles, it's really important to take time to judge the bed and the amount of settling that is possible.
This is what makes the Wet Bed method tricky for those unfamiliar with paving and the use of mortars.
Thin Bed Adhesive:
This method is favoured by those with many years' experience using porcelain paving in Europe, and would be our preferred method of installation. It is being promoted by some suppliers as a better option for the occasional installer and/or DIYer. While the fixing of the tiles might be considered easier using this method, the necessary preparatory work is more exacting than that for Wet Bed installation.
In this method, the tiles are laid in the same manner that would be used for flooring tiles inside the house. They are affixed to a pre-installed base using a specialist tile adhesive, which should be an outdoor grade polymer-modified cement-based goo. The adhesive is spread over the rigid base using a notched spreader to give a bed of uniform depth, and the tile is then pressed down onto the adhesive and settled down to falls and levels.
As with the Wet Bed method described above , a Bond Bridge primer should be applied to the underside of the tiles prior to placement unless the adhesive manufacturer specifically states that no such primer is required when used with porcelain paving tiles. It may be necessary to check with the adhesive manufacturer's technical department because the guidance given on/with the packaging may not have been updated since porcelain paving became popular.
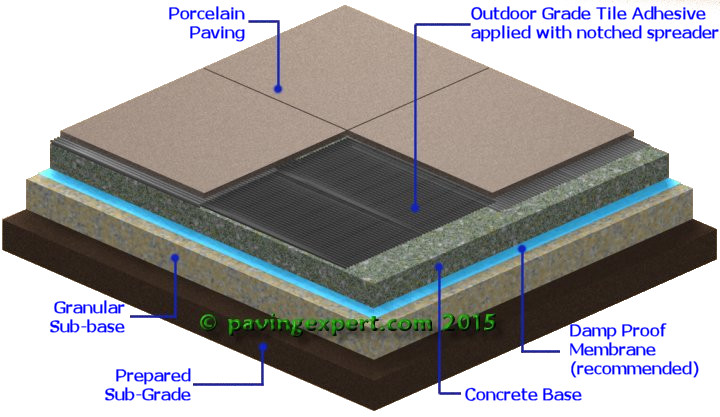
The thickness of the bed is usually specified by the adhesive manufacturer. Some will be as little as 3mm, but most will be 6-10mm.
The bed thickness is critical to establishing the finished level of the base onto which the tiles will be laid. To ensure a high standard of finish, the tiles need to be laid to falls and levels over a bed of uniform (or fairly uniform) depth. It's not good practice, and will make the job that much more difficult, if the bed is, say 4mm deep at one end and 10mm deep at the other.
So, the key to getting an even, uniform bed is to have an even, uniform base on which to lay it. In nearly all cases this will be a rigid concrete base which can be placed immediately prior to laying the tiles or can be done hours, days, or even weeks in advance.
The concrete base need not be reinforced: a simple 75-100mm thick slab of mass concrete, C7.5 or stronger, can be poured and retained by formwork to ensure the finished levels, once the plastic concrete is tamped and floated off, are within a millimetre or two of the levels needed to accommodate the bed and tiles.
Obviously, this concreting is an additional skill. Erecting shuttering and/or formwork, then placing, compacting and finishing concrete is a separate task to laying tiles of flagstones, but it is generally regarded as being relatively simple and well within the capabilities of a competent general builder, landscaper or DIYer. Fuller details of establishing a concrete base can be found on the relevant page of this website.
Read more about how porcelain paving is should be laid, according to European manufacturers
Compare and contrast:
There is no definitive answer to the "which is better" question. It all depends on the site conditions, and the skill-sets available. Most paving contractors will probably opt for the Full Wet Bed method as it's quick, cheap, uses tools they have in the back of the van, and relies on the same skills they use more or less every day. It's also the method being pushed by the major suppliers. High-specification contractors, DIYers or occasional installers might well opt for the Thin Bed Adhesive method, even though it's slightly more costly, because it takes out a lot of the guesswork in bed preparation and offers a more certain outcome.
Full Wet Bed can be tricky: as one tile is tapped down, the plastic mortar is pushed and moves and may well lit the adjacent tiles out of level and/or position. Thin Bed Adhesive becomes tricky when trying to pave/tile undulating, dished or hump-profiled areas because getting the base to accurately follow such profiles is somewhat tricky.
Everyone will have their own preference, and it's not really possible to say one method is righta nd the other wrong but..... were I to have porcelin laid at my own home, it would be the Thin Bed method for me everytime!a
Jointing:
So far, it's all been about the bed, the choices to be made, the need to use a Bond Bridge primer to ensure the tiles stay put when placed onto the chosen bed, but the jointing needs consideration, too.
Flags or tiles are bed-dependent paving; that is, the strength and competence of the completed pavement arises from the bed being capable of holding fast and supporting the chosen surface material, whether it is a flagstone or a tile. Joint-dependent paving (such as setts, cubes and cobbles ) rely more on the friction generated between individual units, with a lesser contribution from the bed.
As noted previously, the very low water absorption values of most porcelain pavings can make it difficult to achieve a good bond between conventional cement-based mortars and the edge faces of the tiles. So, it might seem a good idea to simply 'prime' the edges of the tiles as well as the base, but Bond Bridge slurry is a bloody messy product and unless everything is kept scrupulously clean, it *will* end up messy.
In practice, a good quality cement-based mortar should achieve sufficient bond to the bed to keep it in place between the edge faces. When a proprietary cement-based jointing mortar is used, the bonding agents that are often included in such mixes should be adequate. However, all cement-based jointing materials require a lot, and I mean *a lot*, of intensive cleaning to remove every last vestige of the cement 'haze' which will remain on the surafce following installation.
Where a resin-based jointing medium is to be used, a two-part slurry will achieve a good bond to both the edge faces and the bed, but it is very important to use a product that is suitable for the given joint width. Polymeric resin mortar (the ready-mixed, tip-'em-out and brush-it-in type) are, in general, much less reliable and so best avoided. Narrow joint, two-part epoxy resins are, it seems, about as good as you can get for a quick, clean and reliable joint finish.
Cutting:
Unless a particular project is flexible enough to allow the use of full units only, at some point, these porcelain tiles will need to be cut. It may be to fit in against a wall or fence, or to accommodate a drain cover or linear channel. Whatever the reason, there is only ONE suitable cutting method: a powered cut-off saw fitted with a good quality diamond blade .
These tiles can not be successfully cut using traditional hand tools (hammers and chisels) and use of abrasive cutting discs, even if marked as being suitable for stone, will more than likely result in chipping and spalling of the incredibly hard surface.
We are now finding that, in order to minimise breakages and spoiled (or spalled!) cuts, the best type of blade to use is a seriously good quality continuous rim diamond blade specifically for cutting porcelain tiles. Note how these blades have no gaps in the cutting edge - no segments , as the terminology goes - no breaks or missing bits, but are a whole, uninterrupted circle.

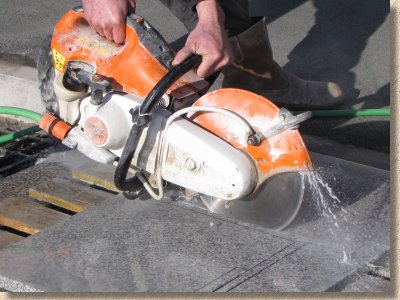
Cut from the top surface. Have the line of cut clearly marked, and the blade rotating at around half-revs before bringing it into contact with the tile. Ensure the blade is water-fed for dust suppression, as the dust that can be generated is potentially carcinogenic. As the blade bites into the tile, increase the engine revs if necessary, but ensure the saw remains evenly-balanced and progresses along the line of cut at a regular pace.
In theory, it is usually possible to 'score' the tile surface to around one-third to one-half full depth and then 'snap' the tile. This saves on blade wear, but can only really be used successfully on straight-line cuts creating pieces no smaller than one-quarter of a full tile. Given than potential savings on blade wear and time are minimal, and that there is always a risk that the snapping will go awry and end up losing the tile. Is it worth it?
Keeping it clean:
The essential use of a Bond Bridge primer has been mentioned a few times on this page, and the cardinal rule when working with a Bond Bridge is to keep everything clean. Tools, tiles, clothing, buckets and barrows, all must be wiped down or rinsed immediately if there are any spills or splashes. This stuff sticks like the proverbial to a blanket, and once set, it's virtually impossible to shift.
Keep a wet rag and a bucket of clean water to hand. Wipe the surface after each tile is laid, and keep checking that mallets are clean so they are not spreading primer, adhesive or mortar onto the paving.
Use the same clean approach when jointing, too. Keep the tiles as clean as possible, remove every last vestige of excess mortar, wipe, wipe and wipe again. Porcelain paving looks lovely when laid carefully and cleanly, but any stains or residue on that near-perfect surface will stand out like a sore thumb.
Further Information:
Stone Paving Supplies hold extensive stocks of ceramic paving for outdoor use and complementary porcelain tiles for indoor applications.
Visit their website to view the fuller range of products and to find out more.
Customer Services Team
Julie & Holly

0333 600 4567
0845 647 4567
Mon to Fri
08:00-17:00


Shed 31,
Tilbury Docks,
Essex
RM18 7SX

