Introduction
There should be four layers to all residential flexible block or brick paving installations, whether on a drive, patio or for a path. There are complicated assessment methods used in the paving industry to determine 'ideal' dimensions and specifications for each application. We find that the following specification is adequate for 90% of residential applications. If in doubt, email for confirmation. We will require certain information and details from you before we can propose a specification, we will ask for this information in our reply e-mail.
Preparation:
See also Setting Out page
Decide where the paving is to run, and mark out with sand guide-lines, if required. It is assumed that the paving is to be flush i.e. level, with the existing ground. It is a good idea to dig wider than the planned paving width, allowing an extra 75-100mm at the edges makes handling much easier.
Sub-grade
See also sub-grades page
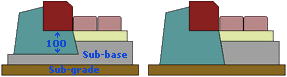
The surface needs to be dug off to a depth of approx. 200mm. The depth of dig can be roughly calculated as.....
(average depth of paviors + 40mm bedding + 100mm sub-base)
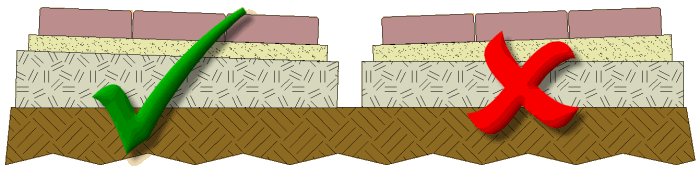
Remove all weeds and other unwanted organic matter. Excavate any soft spots and fill with compacted sub-base material. If the area of the paving is troubled with weeds, you may treat the excavated sub-grade with a general weedkiller such as Glyphosate, but it is unlikely any normal weed will be able to penetrate the upper layers.
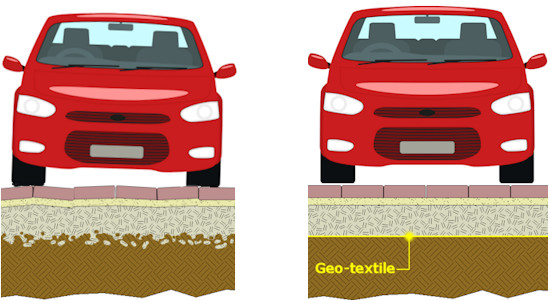
If the excavated sub-grade is suspect, clayey, riddled with Mares Tails or other pernicious, deep-rooted weeds, an appropriate geo-textile can be laid over the sub-grade. These geo-textiles can act as root barriers, and help to keep the overlying sub-base material from sinking into a clayey or softish sub-grade. However, they are not a substitute for a sub-base, and will only be of benefit if a proper sub-base is laid above the geo-textile.
Kerbs
If a kerb is required, this is a good point to construct it. Road kerbs, plain or decorative edgings, small unit kerbs, or setts laid lengthways are all suitable. The kerbs must be laid on and haunched with concrete in order for it to restrain the body of the paving and prevent it from disappearing into the garden.
If you do not use a concrete bedded kerb unit at the free edges of the pavement, you MUST lay the edging courses on concrete and haunch them as you would a kerb unit.
Note: Kerbs for flexible block pavements are normally laid on a concrete bed directly over the sub-grade layer or in a shallow channel excavated into the sub-base to ensure a full 100mm depth of bedding material. Bedding the kerbs over the un-altered sub-base results in too shallow a bed and haunch.
See the Edgings & Kerbs page for more information on laying kerbs on a concrete bed.
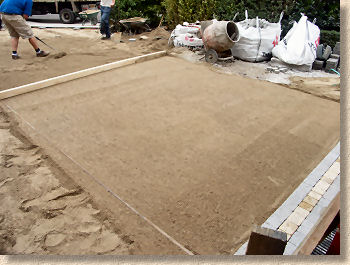
Sub-base
This is essential if you want your paving to last longer than a couple of years. If a contractor tells you that a sub-base is not required - show him the door immediately, and tell him to climb back on his horse and ride away.
Try this thought experiment....the bricks/blocks are not mortared together, they are separated from each other by 3mm or 4mm of loose silica sand. The blocks are laid on a sand bed, there is no cement or concrete used in the bedding, except for the perimeter edges. How can such a construction carry the weight of cars, vans, etc?
The sub-base is the load-bearing layer of a block or brick pavement, and should never be omitted. Having said that, existing sub-bases that are sound and competent can be re-utilised.
The sub-base should be a minimum 100mm thick, but in exceptional circumstances could be reduced to 75mm for paths or patios on good ground.
Bear in mind that the completed paving will need a fall (slope) of not less than 1:80 to ensure adequate drainage of surface water .
The laying course material needs to be a consistent thickness so the fall needs to be established at this stage in the construction process, in the surface levels of the sub-base.
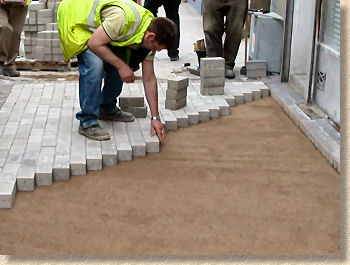
Edge Courses
see also Edge Courses page
Following completion of the sub-base, the edging courses of the paving should be constructed before placing the bedding layer and the blocks/bricks. The perimeter edges of the paving can be laid in a different colour, or even a different block/brick, which should be laid on a concrete bed and haunched to prevent lateral (sideways) movement of the paving. These edges 'frame' the body of the paving and must be strong enough to withstand the lateral forces generated on a pavement by traffic.
Edge Courses, their functions, their construction and a gallery of some of the more popular choices, are considered in much greater depth on a separate page .
Laying edge course to curves and arcs is discussed on the Detailing page.

If a concrete haunched kerb is not being used, the edge courses MUST be firmly restrained in some way. The usual method is to lay and haunch the edge courses with concrete, as described on the Laying Edgings on Concrete page.
However, there are a number of proprietary alternatives to using concrete to haunch the edging courses. Although these manufactured systems are not used often in Britain and Ireland, they do have their uses and they are considered in more detail on the Alternative Edging Restraints page.

Note: Edging restraints for flexible block pavements are normally laid on a concrete bed directly over the sub-grade layer or in a shallow channel excavated into the sub-base to ensure a full 100mm depth of bedding material. Bedding the blocks over the un-altered sub-base results in too shallow a bed and haunch.
Two methods of constructing edge courses as shown in the left-hand cross-section above are looked at on a separate page
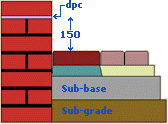
There is an exception to the above recommendation, and that is when an edging course is laid against an existing solid object, such as a wall, in a position where it can not be overrun by a vehicle, as shown in the diagram opposite. In a situation such as this, it is acceptable to lay the soldier edging on a 50mm concrete bed, solely to ensure that the blocks will not move or settle when used as a level guide for subsequent screeding of the bedding layer.
More on edge courses:
Bedding layer
Also known as the "Laying Course"
The paving blocks or bricks should be laid directly onto a bed of coarse, grit sand , 25-40mm thick. This sand may also be known as sharp sand, concreting sand, Zone 2 or Class M - see the Sand section of the Aggregates page for a fuller explanation of these terms.
There must be NO cement added to the laying course for this type of block paving. None. Never. No binder of any form, no cement, no lime, no resin - nothing but pure, free-running fine aggregate as described above. The laying course must remain unbound, flexible, capable of movement - this is how flexible block paving works. Anyone suggesting the addition of a cement will make for a better job is a fool, a conman and a cowboy.
Block paving laid on a sand + cement bed is known as "rigid" block paving and it has a different construction specification considered on a separate page.
In some parts of Britain and Ireland, a grit or a stone dust (whin dust) is used in place of the more usual grit sand. Grit is also used with permeable paving and on some commercial applications. However, the vast majority of conventional projects are laid using a plain, simple, straightforward grit sand.
DO NOT USE BUILDING SAND - it is too soft and can become 'fluid' when waterlogged, consequently moving beneath the paving, causing settlement.
It is best to prepare a pre-compacted and screeded bedding layer, and lay the blocks or bricks directly onto this bed. Screed preparation is a complex subject and a key skill when it comes to laying many different types of segmental or elemental paving, such as block pavers (and flags, sett, cubes). Accordingly, Screeding, as it is generally known, is covered in detail on a separate page.

Use this Pavingexpert Calculator to work out the quantity of Class II sand or grit required to cover any given area of paving at the regulation 25-40mm compacted thickness
Paving Layer
The paving bricks or blocks should be laid to a specific pattern. If you are using more than 1 pack of blocks, mix the pavers by drawing them from 3 or 4 packs simultaneously, to ensure there is no banding or spotting of certain shades within the pavement. This is very important with multi-coloured blocks, such as the ever popular multi-red described as 'Brindle' as there can be distinct 'banding' of individual colours within the blocks, while with single colour blocks, thorough randomisation helps ensure the natural (and impossible to avoid) slight variation in tone that occurs with all concrete products is distributed over a larger area.
A fully interlocked 'Herringbone' pattern should be used for areas to be trafficked by vehicles whenever possible or practical. Other patterns are fine for foot-traffic areas such as paths and patios.
The perimeter edge courses of the paving should have been laid after the sub-base, and should by now be set solid on their concrete bed and haunching.
Lay all the full blocks first, taking care not to stand on the screeded bedding layer, but working from the laid paving. Use a taut string line as a guide to the laying line if required.
Compliance:
Compliance is the term used to cover laying accuracy. There are three main components: pattern alignment, level accuracy and block quality.
Alignment
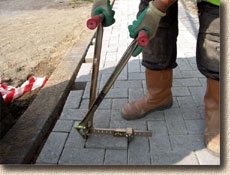
On average, it's a good idea to check alignment after laying one metre of paving, or 10 courses. Stand back and look along the joints - are they straight and true? Stretch a string line over the surface to check how the joints align and use the alignment bar to lever them one way or the other as necessary to get them into the correct alignment, and tap the leading edge with the paving hammer to ensure the joints are reasonably tight. Remember to check from at least two directions at right angles to each other. Walk around the paving (WITHOUT stepping onto the screed laying course) to check and check again. It's much easier to fix a misalignment while it's only affecting a couple of square metres than to allow it to "creep" and end up distorting 20 or 30 square metres.
Note that clay pavers, with their inherent imperfections (part of their charm!) can sometimes be quite difficult to align, but persevere; you (or your client) have to live with this pattern for a long time!
Level accuracy
Compliance also means checking levels and surface regularity. On a 'flat' or 'even' pavement, the relevant Standard sets a limit of 10mm dip beneath a 3m straightedge, but to find as much as 10mm dip beneath a 3m straightedge, indicates something has gone seriously wrong. Good block layers are highly skilled at screeding their laying course, and would expect to see no more than 4-6mm of deviation from true.
Block Quality
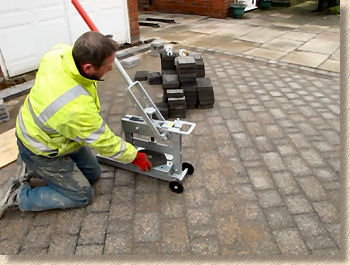
When you're rattling in the blocks, it's all too easy to overlook a block that has a damaged corner or a hairline crack. So, while checking pattern alignment and surface levels as part of the compliance routine, these 'iffy' blocks should be removed and replaced. A Block Extractor Tool is invaluable for this task. It renders removal of unjointed blocks an effortlessly simple task, and does away with all that nonsense of jiggling-out blocks using two screwdrivers, which inevitably results in damage to the adjacent blocks.

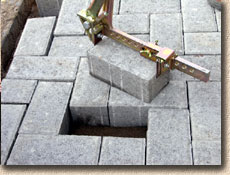
Higher resolution versions of the three images above can be viewed here
Cutting-in
Once you are satisfied with the alignment, blocks can be cut to fit the edges and elsewhere, using a block splitter or a cut-off saw.
Cutting-in is a complex subject that often makes the difference between a good job and a botch. Consequently, it is covered on a separate page.
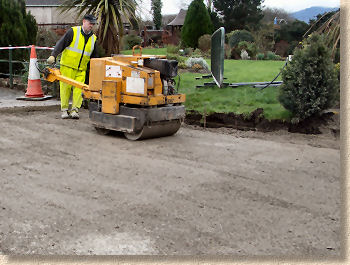
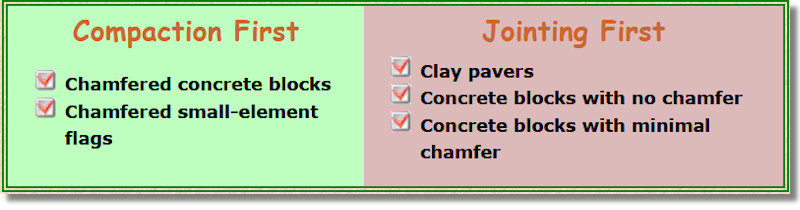
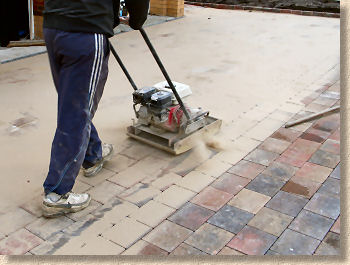
Compaction
Compaction, also known as consolidation, refers to the use of a vibrating plate compactor to 'hammer down' the blocks once they are laid. It should be carried out following compliance checks and cutting-in.
Compaction is achieved by making several passes (minimum of two) over the paving with a vibrating plate compactor, often referred to as a "Wacker Plate".
The plate compactor vibrates the paving units, driving them downwards and settling them into the laying course.
The plate spans several blocks at once, and so any slight variation in block thickness is "ironed-out" as the plate passes over the blocks.
The aim is to compact or consolidate the blocks into the laying course which is simultaneously compacted to, more or less, the point of refusal, which is the point at which no further compaction is possible. Notice the phrase "more or less" in that last sentence. That is not a throwaway line: it is a key concept, which is linked back to the earlier statement regarding the variation in block thickness (block depth). Consider a typical selection of 60mm blocks. The manufacturing standard allows for a ±3mm tolerance, which means there could be a 6mm lip between two adjacent blocks laid onto an even screeded laying course. In actuality, most British and Irish manufacturers achieve a tolerance closer to ±1mm, but even this would, potentially, allow for a 2mm lip between adjacent blocks.
When the plate compactor runs over these two blocks, the 61mm block may well be "compacted to refusal". Wonderful! But the other side of that particular coin is that the 59mm block is unlikely to have been compacted to refusal, and, left to its own devices over an extended period of time, is likely to settle under the dual influences of traffic and gravity, re-creating that original 2mm lip.
The Kit
It should be noted that using any old plate compactor that happens to be available is NOT an acceptable practice. The compactor needs to meet certain minimum requirements to ensure it carries out this crucial part of the construction process to best effect. The British Standard that covers this type of paving recommends that compactors should have a ...
- Minimum mass (weight in Kg)
- Minimum plate area (m²)
- Minimum effective force per unit area (kN/m²)
- Frequency of vibration (Hz)
The category of pavement under construction will determine what the values are for each of the parameters listed above. Pavement category, an indication of the type of traffic that will be carried by a pavement, is summarised here . Most residential pavements would be considered to be Category IV - Private drives. The table below is derived from Table F1 of the British Standard...
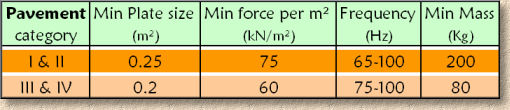
The key thing to take from the above table is that the type of plate compactor that can be lifted by one operative into and out of a van is highly unlikely to be suitable. Even for Cat IV pavements, the plate has to have a mass of at least 80Kg, which is over three times the maximum weight that should be lifted by a single person.
Similarly, the minimum plate size is important and often overlooked. Too many contractors select a plate compactor on the grounds of ease of lifting, and some have a plate size of only 500x300mm (0.15m²). The plate must be big enough to span at least two blocks at each pass.
As a very general guide, a plate measuring 500x400mm should be satisfactory for Cat II and IV pavements. For heavier pavements, much heavier plates are required and the machine weight, frequency and effective force should be checked with the manufacturer prior to use.
Compaction strategy
Using a plate compactor for extended periods runs the risk of HAVS (Hand and Arm Vibration Syndrome) which can be disabling for those affected. Try to ensure the plate compactor being used is adequately dampened to minimise the danger. Check out the Health & Safety Executive website for further information.

It is essential that the surface of the pavement is cleared of any debris, rubble, bits of block, the crusts off butties, and anything else that could adversely affect compaction before starting up the plate compactor. If, for example, a small pebble or a piece of block was left on the surface, and the plate was to run over it, there's a real risk that this would force down the block underneath to a level that is too low.
As already mentioned, the plate compactor should make an absolute minimum of TWO passes over each and every part of the pavement. These two passes should be at 90° to each other, so, in effect, one pass would be up-down, while the second would be side-to-side. In practice, we prefer a minimum of FOUR passes:
- up-down
- side-side
- diagonal top-right bottom-left
- diagonal top-left bottom-right
If, at any time during the compaction, the plate starts to 'rattle' or bounce about on the blocks, this indicates that no further consolidation of the paving layer is possible and that the point known as "Compaction To Refusal" has been reached. Should this happen, STOP the plate immediately or move away to areas that are not causing the plate to bounce. Continuing to consolidate when the plate is bouncing will only result in damage to the blocks, or even to the plate itself.
Once compaction has been completed, a further round of compliance checks should be undertaken. Any blocks that have broken or become badly damaged during the compaction process should be removed and replaced. Levels and alignment should also be checked, and any corrections made before moving on.
Jointing
The relevant British Standard (BS 7533:3) requires joints between adjacent blocks to be no greater than 5mm. This applies whether they are full, uncut blocks straight from the pack, or blocks that have been cut or trimmed in some way to fit. No joints wider than 5mm. No excuses!
Jointing is achieved by filling the 2-5mm close joints with a specially selected jointing sand which then generates a phenomenal amount of frictional interlock between the adjacent blocks. This frictional interlock "grips" the blocks and helps transfer loads from individual blocks to each of its neighbours, which then transfer the received load to each of their neighbours and so on and so forth. This is how the blocks that have not been completely compacted to refusal, as described above, are able remain at the required surface level (more or less).
If you've ever wondered just how much force is generated by the sand jointing, try using the Block Extractor Tool to remove a jointed block - it's not impossible, but it's quite a struggle. Which is why, before the jointing sand is applied, the whole pavement MUST be checked for compliance once again. It's a lot easier to yank out an unjointed block with a spalled corner than one that has been sanded, so, to repeat what was listed earlier, check alignment, surface levels and block quality before spreading the jointing sand, regardless of whether you're jointing before or after compaction.
Dry jointing can only be done in dry conditions (stating the bleeding obvious, I know). If the blocks are damp, or if the heavens open, the sealing sand will not flow freely as required, and you may have wasted your time and money. However, all is not lost, and it is possible to use wet-jointing techniques when the surface is damp and/or when the weather is against you.
See the Pointing and Jointing page for more information on jointing sand A kiln-dried silica sand, designed for this purpose, is available from most builders' and civils merchants. This is a selected sand, very clean, and of certain grain sizes that work to increase the 'friction' between each brick or block. A specific grading envelope for this sand is given in Table D4 of BS7533:Part 3 .
Building sand, play sand, soft sand, grit sand or any other form of sand is NOT acceptable: it will fail and result in a rutted pavement. Don't spoil the ship for a ha'porth of tar! The correct jointing sand costs around £4 for a 25kg bag, and this quantity should seal 8 - 15 m² of block paving depending on unit thickness and type. Clay bricks often have wider joints (3-6mm), due to their being imperfect rectangles, a result of kiln-firing, and so may require extra sand.
The sealing sand is simply brushed over the surface repeatedly, and allowed to trickle down into the joints between the paving units. Once the joints are as full as possible, all of the excess sand should be swept off the paving, or into a corner where it can be salvaged for re-use. The vibrating plate compactor should make a couple of passes over the paving, ideally in different directions, to vibrate and settle the sealing sand, and complete any partial compaction of the paving units.

When using the plate compactor to settle the sand, it is essential that the operative wears a dust mask - a pair of safety goggles would be a good idea, too. The vibration of the plate sends up a plume of dust from the sanded joints and this dust is highly abrasive. This 'dust is referred to as "airborne respirable crystalline silica (RCS)". If breathed into the lungs, it can cause untold damage and has been implicated in pneumo-silicosis . Similarly, dust or sand in the eye is best avoided.
After settling the jointing sand, some joints will appear empty or only partially filled. These should be topped up immediately, but there is no need to repeat the compaction. Finally, sweep off any surplus sealing sand and there you have it - a completed block/brick pavement that can be trafficked immediately!
The sealing sand will continue to settle over the ensuing weeks, and can be topped-up by simply brushing further sand over any empty joints until they are full again. There is no need to use the plate compactor again.