Introduction
There are several British and Irish contractors that specialise in this type of paving, and we would most strongly recommend that you use an experienced and reputable trader for this type of work rather than a general builder or so-called block paving "specialist". The skills required to make a good job of PIC are NOT the same as those used for block paving , flagging or tarmacadam . Horses for courses, as they say.
Note also that PIC typically involves a full-depth, freshly placed concrete slab which is coloured and textured in-situ. For existing concrete slabs, there are decorative thin cementitious overlays which can be applied to create a more decorative finish.
Structure
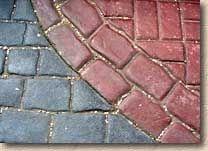
The basic construction for this type of paving is relatively simple, consisting of a concrete layer laid over a suitable sub-base or sub-grade . There may be an edging or restraining kerb , if desired, or a temporary formwork or shuttering can be used and removed once the concrete has set, usually 3-7 days after pouring. Many contractors will apply a different finish and/or colour to the perimeter of a PIC surface to give the impression of a soldier course edging or other edging detail.
The recommendations and specifications given on the Concrete Hardstanding page equally apply to PIC. A minimum thickness of 75mm is recommended for paths and pedestrian areas, and a minimum 100mm thickness for driveways or parking areas. Steel mesh reinforcement is not usually specified for PIC residential driveways, although it may be used on higher specification jobs, where heavier loads or heavy traffic is expected.
Many Ready Mixed Concrete suppliers have specific mixes for this type of work, usually with a small-size aggregate (10mm) and fibre reinforcement. The small aggregate ensures that a reasonable amount of matrix (also known in the trade as 'fat') is present at the surface for imprinting and the polyester fibres serve a dual purpose, replacing cumbersome and costly traditional steel reinforcing mesh and reducing the occurrence of micro-fractures on the surface of the cured concrete, which could mar the finished effect. The contractor and/or concrete supplier should be able to give more details on the exact mix that they recommend and supply., but it would normally be a fairly high strength mix SP300 - SP375 (300-375 Kg of cement per m³) - see Specifying Concrete page for more details on ready-mixed concrete.
As with all areas of mass concrete, special consideration should be given to jointing, specifically movement joints, and also to drainage, as the finished surface is impermeable, to all intents and purposes. Even if no movement joints are present, crack control joints are an essential feature of most PIC pavements and these are discussed below . Careful pre-planning can ensure that any essential movement joints are positioned to coincide with decorative band courses, which help hide their presence to some degree. More information on drainage can be found on the Drainage for Pavements page.
Preparation
As with certain other paving types, a sub-base is only required beneath those pavements expected to carry vehicular traffic. A sub-base is not essential beneath a patio or pathway, but may be used beneath driveways, forecourts, etc, if the ground is suspect in any way or exceptional loads are anticipated. For many domestic driveways, no proper sub-base is constructed, although the sub-grade is usually 'blinded' with 25-50mm of a clean aggregate to level it up for the concrete pour.
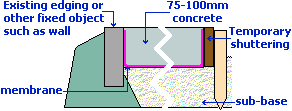
A separation barrier (damp proof membrane or DPM) of at least 1200 microns is normally laid unless there are specific reasons not to do so. Pre-formed edging kerbs are constructed before placement of the concrete, otherwise temporary formwork must be installed prior to delivery of concrete to contain the concrete at any free edges.
Concrete
The concrete is delivered to the site by wagon. It is most unusual for PIC to be laid using concrete mixed on site, as a consistent quality is essential, with thorough mixing of the aggregates and cements, even distribution of the fibre reinforcement and a regular slump throughout the mix. Only by mixing in large quantities is this level of quality possible.
PIC Contractors like to work with a high slump concrete, typically 75mm or even 100mm, (sloppy or dead sloppy, in everyday parlance!), with an added air-entraining agent, as this makes the concrete easier to level out, but there is a tendency for such a wet mix to splash while being placed and during working. Consequently, the better contractors will use a disposable polythene sheeting or a protective gel to cover vulnerable areas such as walls or other hard surfaces. It's much easier to spend half an hour and 20 quid protecting the brickwork of a conservatory than having to spend half a day cleaning it off with brick acid and a wire brush!
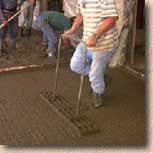
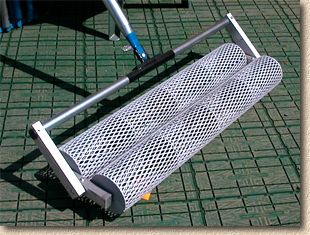
Once the concrete is placed, it is roughly distributed by shovel and/or concrete rake to an approximate level. It will then be screeded to ensure a smooth, flat surface level is achieved, with no high spots or hollows, and then worked with pierced tampers and/or bug rollers to depress any hard aggregate and ensure a layer of 'fat' is present at the surface. Finally, it will be worked with Bull Floats to achieve a fairly smooth finish, free of any major trowel marks. This floating helps bring excess water (bleed water) to the surface.
Apply Colour
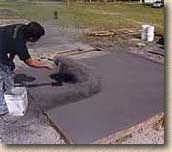
As soon as the concrete has been tamped and floated sufficiently and excess bleed water removed, the special colour dyes combined with a surface hardener are applied, usually by hand. Some gangs have various gadgets such as flour drifts purloined from the kitchen at home to aid even distribution, but most rely on hand-scattering. Most contractors tend to make 2 or 3 passes with the dye/hardener powder, first up-down, then side-to-side and finally diagonally or up-down again. The rate of application for the colour hardener is approximately 1.5Kg per m², but this can vary from brand to brand.
Care is required with the colour hardener, and the release agent, as rough scattering can result in it being cast beyond the boundaries of the work, and so polythene sheeting or back-boards should be used to minimise accidental contamination of other areas. Spillage or overthrow should be cleaned up immediately.
For work with more than one colour, a true artist is needed to achieve the right balance and distribution of powder dye to achieve the desired effect. This is a skill that can only be learned by practice and experience. It is well nigh impossible to rectify bad distribution of the colour dyes/hardener, so a steady hand and keen eye are essential.
There is some variability in the effectiveness and fading-resistance of different products. With this type of paving, it really does pay to make sure you are getting the best quality colours, and, as in other walks of life, quality comes at a price.
The dye/hardener absorbs water from the concrete and once wetted is trowelled onto the surface of the concrete, creating a tough, durable surface to the slab. The hardener agent has a more or less immediate effect and work must continue uninterrupted to achieve best results. Edges of the pavement are normally arrissed (rounded) with a special finishing trowel while the body of the surface is flat floated to a smooth finish with no trowel marks.
Apply Release Agent
The coloured and chemically hardened surface will need some 'help' to avoid it sticking to the imprint mats or lifting as the mats are removed, and so a special Release Agent is applied, again by hand broadcasting over the surface. Many of these release agents also contain a dye that enhances the colouring of the concrete by adding a subtle extra tone. For highly decorative finishes, two or more colours of release agent may be used. Rate of application again varies from brand to brand but is approximately 200g per m² (1 kg treats 4-5m²)
Imprinting
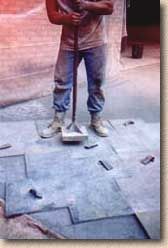
As soon as the release agent has been applied, the imprinting must be started. This is done via texture mats, a sort of stiff plastic or alloy 'negative' of the chosen pattern. There are also highly flexible 'floppy mats' for those areas where a full mat cannot fit, so a 'floppy' mat is folded or twisted to cover the required area and then imprinted.
Many of the texture mats are modular, in that a series of mats are aligned to build up a pattern over a larger area, but there are also 'freeform' mats with no definite edges which are used to apply a simple texture (such as 'stone' or 'slate') over the surface, with no need for exact alignment or careful working at edges and boundaries. These freeform texture mats tend to be considerably larger than the pattern mats, up to 1.8m x 1.8m, and are allowed to overlap their neighbours rather than be positioned exactly. This enables quicker working with a lower skill level, although the more decorative patterns are not possible using this technique.
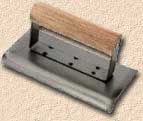
The standard pattern mats tend to be of a more manageable size, usually between 300x300mm and 900x900mm, as they need to be carefully positioned on the surface, abutting their immediate neighbour and aligning with previously imprinted concrete. Once in position, they are tapped gently into the still workable concrete with the aid of a punnel to imprint the chosen pattern. The whole area of each mat must be punnelled to ensure edges and centre imprint evenly. The operative doing the punnelling (often known as the 'Stamper') is usually an experienced hand with a wealth of experience in judging just how hard to punnel the mats to impart the correct depth of pattern, something that can only be determined by trial, error and experience.
Different mats are used to create variety and it is common for one particular pattern be used to imprint the edging course, say a soldier brick edging, and a different pattern, say ashlar stone, be used for the body of the pavement. The exact design of the pavement will determine the most effective working sequence, but, normally, any edge pattern, such as a soldier course, will be completed in advance of the body pattern.
Care has to be taken to deal with 'snots', the concrete matrix that can squeeze-up between adjacent mats when imprinting is being carried out. These 'snots' are normally removed immediately so that they are not accidentally kicked onto the already-stamped area or carried elsewhere on the site on the soles of boots.
A set of mats will be used to imprint the pattern. In normal circumstances, the contractor will use a full 'row' of mats to span the pavement and to commence the next 'pass'. The mats from the first pass are then lifted in sequence and re-positioned for the next pass. One operative is normally appointed as 'Toucher-Upper' and it is their responsibility to follow behind the 'Mat Placer' and the 'Stamper', to tidy the freshly imprinted area, re-tooling any parts that have not imprinted cleanly, removing snots, stamping the floppies and generally ensuring the work is up to standard. This touch-up work is often the giveaway, identifying the artisan from the lackadaisical sloven. It is the attention to detail that can make or break a job.
Wash Down
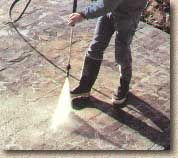
24-96 hours later, the now hard and patterned concrete will be power-washed to remove excess release agents and any other detritus. The timing of this operation is critical, as if done too soon, it can damage the surface, marring the pattern or the colour, or, if left too late, can fail to clean the surface properly. Again, the timing of this operation is something that cannot be accurately predicted but is judged by experience.
During the power-washing, the surface is again checked for any snots (lumps and bumps of excess concrete) should be removed before the final stage, application of the sealants.
Sealant
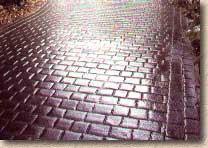
The patterned concrete should be allowed to thoroughly dry, and then 1 or preferably 2 applications of a transparent sealant are made, to safeguard the concrete from spills and stains, and to protect the colours from UV light fading. A solvent-based acrylic sealant will protect the surface while still allowing the concrete to 'breathe', ie, lose moisture content. Many sealants impart a gloss finish, although there are satin and matt finishes available, these being typically silicon-based and more expensive than acrylics.
More information on the various types and uses of paving sealants on the Sealants page
It should be noted that acrylic sealants are not particularly durable and pavements experiencing heavy wear may wish to consider a top-coat of a urethane or epoxy-resin sealant 6-8 weeks after completion of the work. Under normal conditions, a good acrylic sealant will have a life-span of 2-5 years after which, it should be re-coated.
Jointing
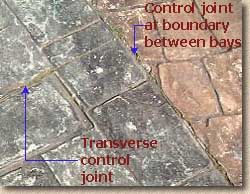
Crack control joints are essential on most PIC projects. Their purpose is to ensure that when (not “if”, note, but “when”!) the concrete slab cracks, it cracks at this point and nowhere else, and that this control joint has been prepared in advance to cope with the eventual crack.
The usual recommendation is for some form of movement joint to be created in a non-reinforced slab at a separation of approximately 30 times the slab thickness. So, for a 100mm thick slab, there should be some form of joint every 100mm × 30 = 3000mm = every 3.0-3.6m and, in a 150mm slab, 150mm × 30 = 4500mm = 4.5-5.4m. Naturally, there is some leeway with these calculations, and joints can be positioned to coincide with band courses or to be 'centred' within a slab for aesthetic reasons.
Movement joints (expansion and/or contraction) are discussed in more detail on the Concrete Hardstanding page. The remainder of this section considers only crack control joints.
If crack control joints are required, there are two common methods of creating them; they can be created during the actual laying of the surface or they can be sawn at a later date, after the sealant has been applied. On residential driveways, most contractors seem to prefer sawing control joints at the end of the works, although it is debatable whether this practice would be acceptable on larger, supervised commercial works.
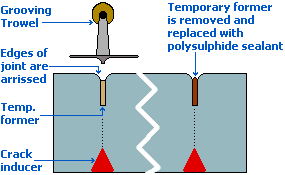
For creation during construction, the control joints may be pre-formed using a timber strip and/or a Grooving Trowel. The inclusion of a crack inducer will help ensure cracking takes place in exactly the right place. Depending on the type of joint required, additional work may be necessary once the concrete has cured. If a timber or other temporary former has been used to create the wet-formed joint, it should be removed and the joint sealed with a suitable sealant, usually a polysulphide such as Thioflex.
Sawn joints are normally cut a week or more after sealing, so that the concrete will have had a reasonable amount of time to cure and avoid 'spalling' at the cut edges, and for the sealant to protect the surface from the concrete dust. On no account should concrete dust be allowed to rest on the surface for any length of time as it will set and could damage the surface when forcibly removed.
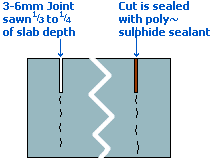
They are cut into the cured pavement using a power saw with diamond-blade, and should be between 25% and 33% of the depth of the slab. A trolley-mounted floor saw will ensure a neat and true cut is made; hand-held cut-off saws have a tendency to 'wobble' during the cutting operation, giving a cut with all the straightness of a dog's back leg. If a hand-held cut-off saw is the only option, a suitable guide rail should be used to keep the cut straight and true.
The work is now finished. The contractor will advise as to when it will be safe to traffic, usually 4-7 days after laying. Any temporary formwork should have been removed after 3-7 days and the edges made good with backfilling or similar. Any protective sheeting used to prevent concrete splashing onto walls or other surfaces during the work should be removed and the site left in a clean and tidy condition.